Test https on blog
After applying certification on Let’s Encrypt, I tested the certification and generated the report.


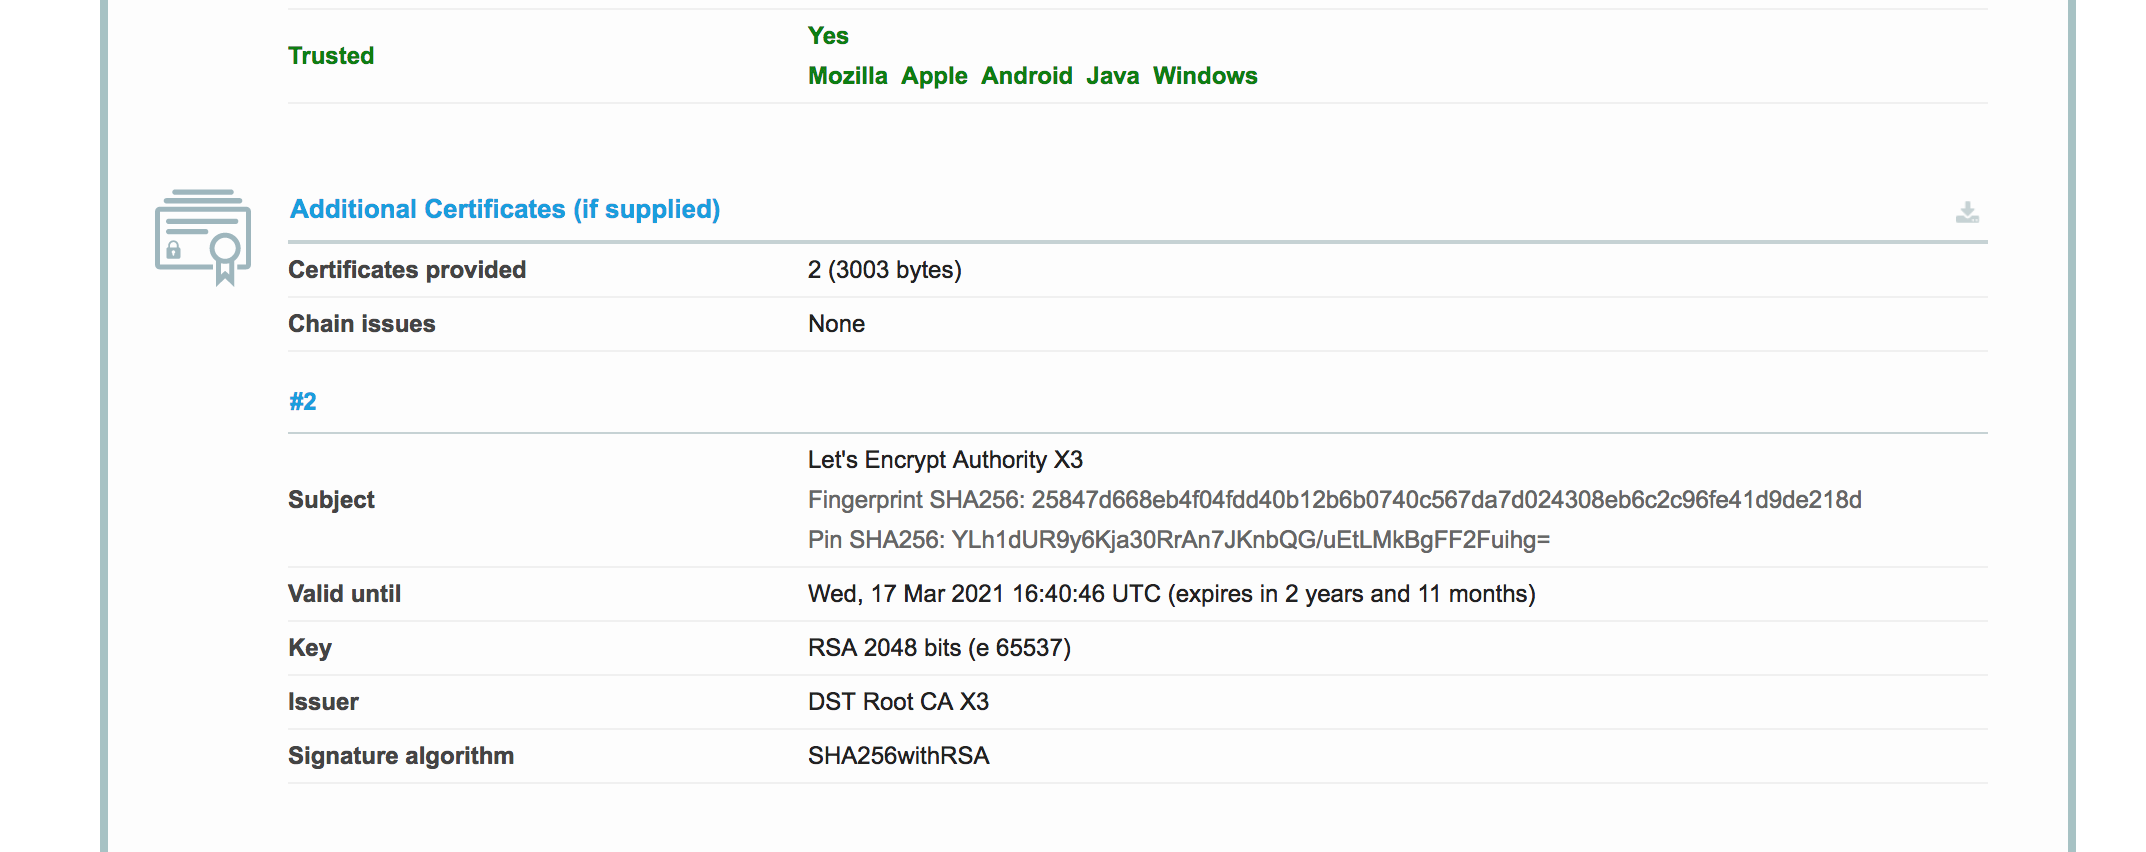
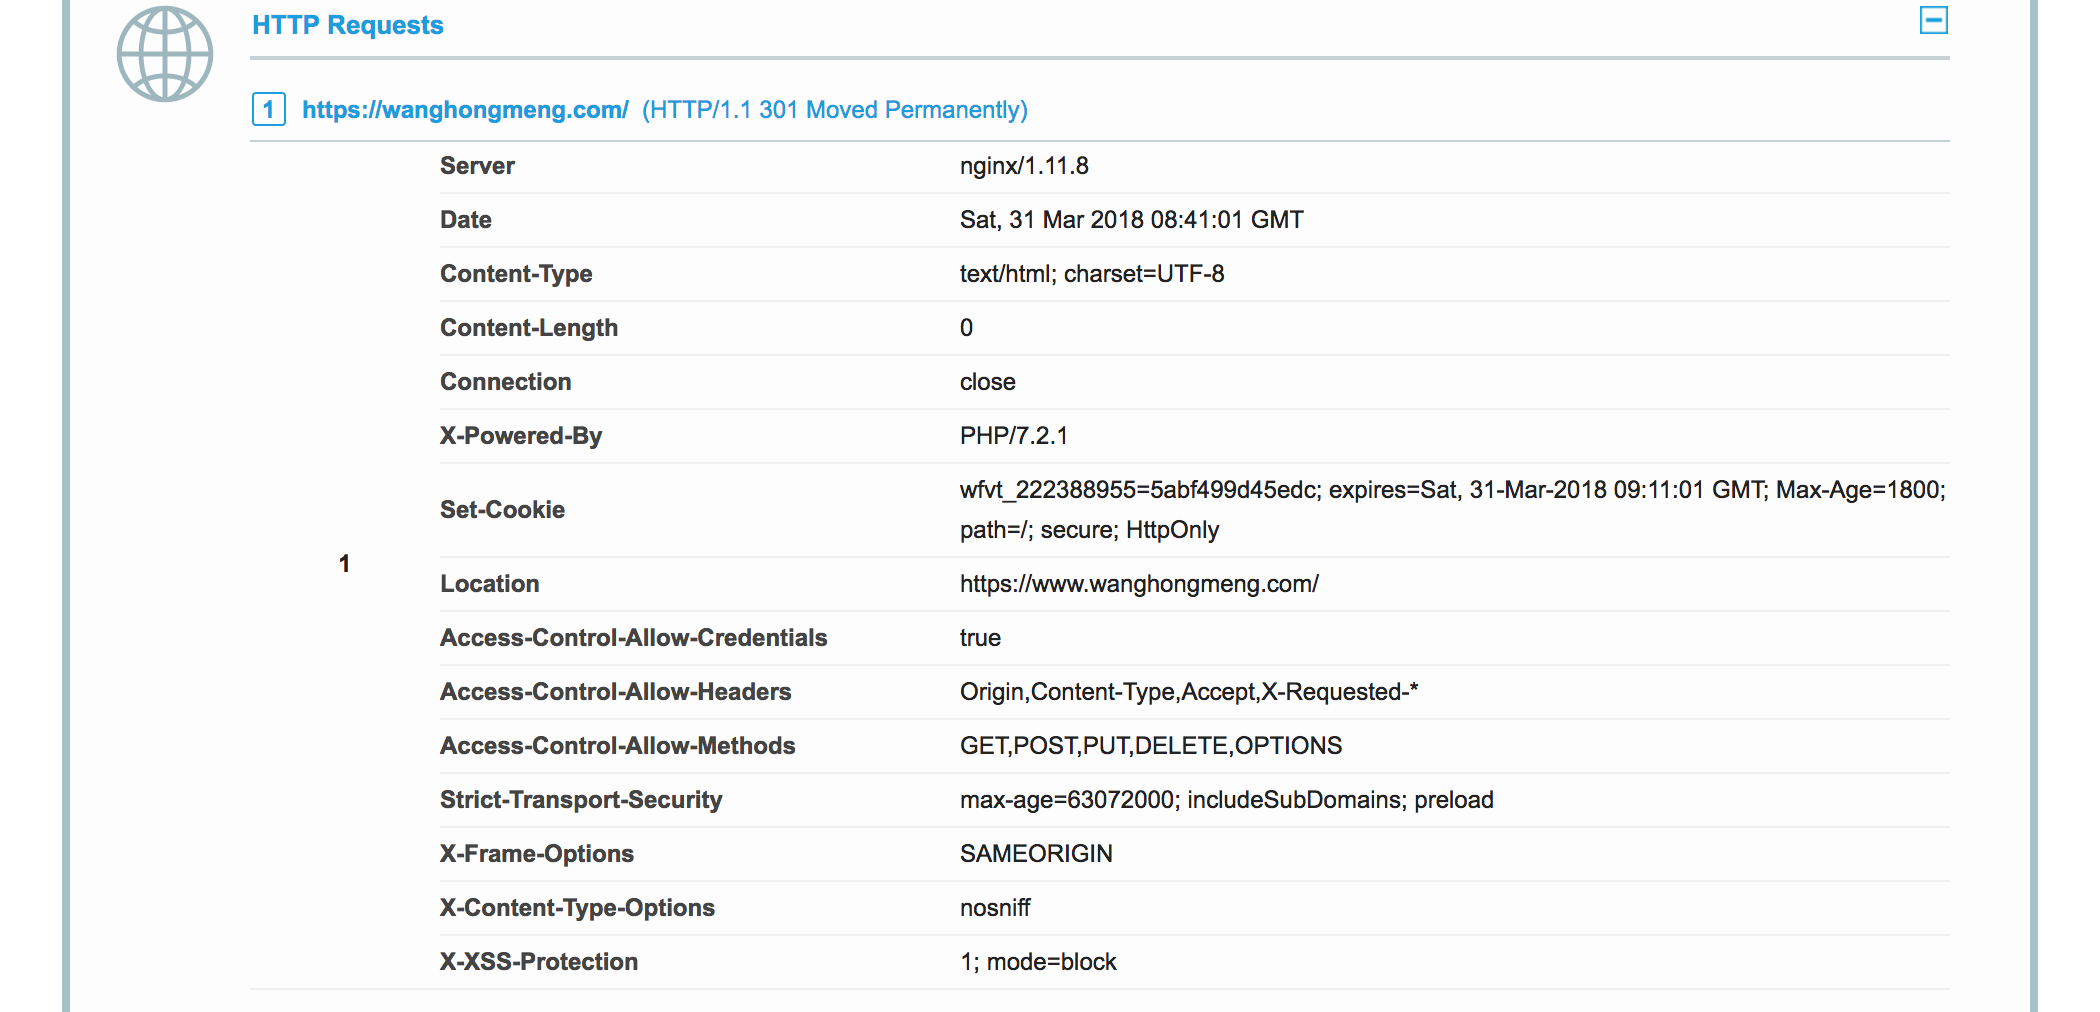
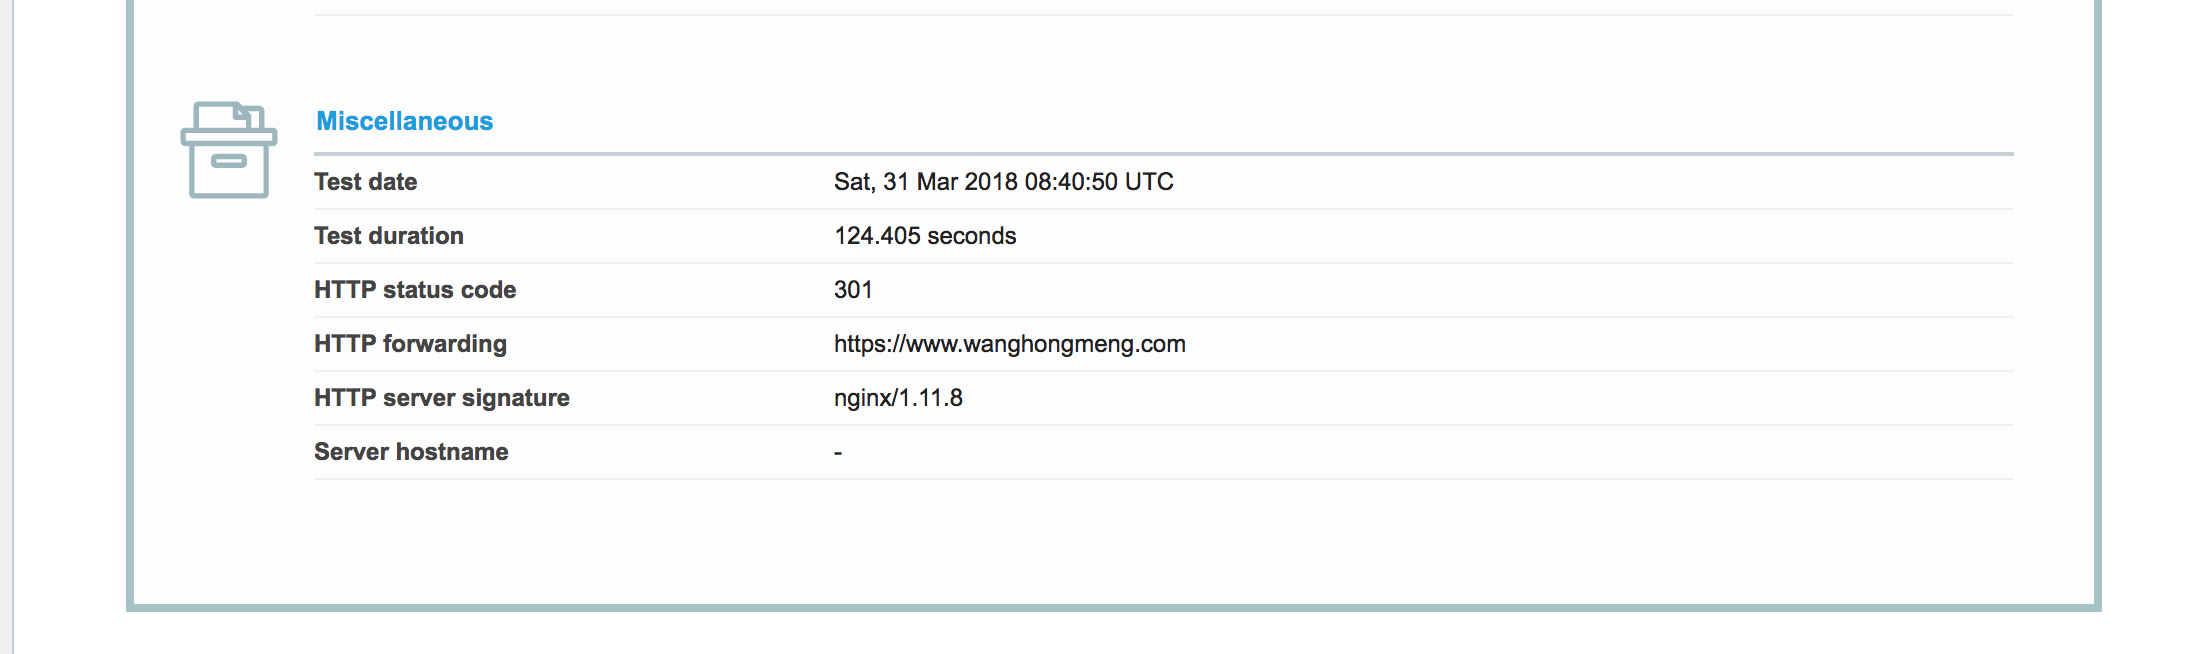


After applying certification on Let’s Encrypt, I tested the certification and generated the report.
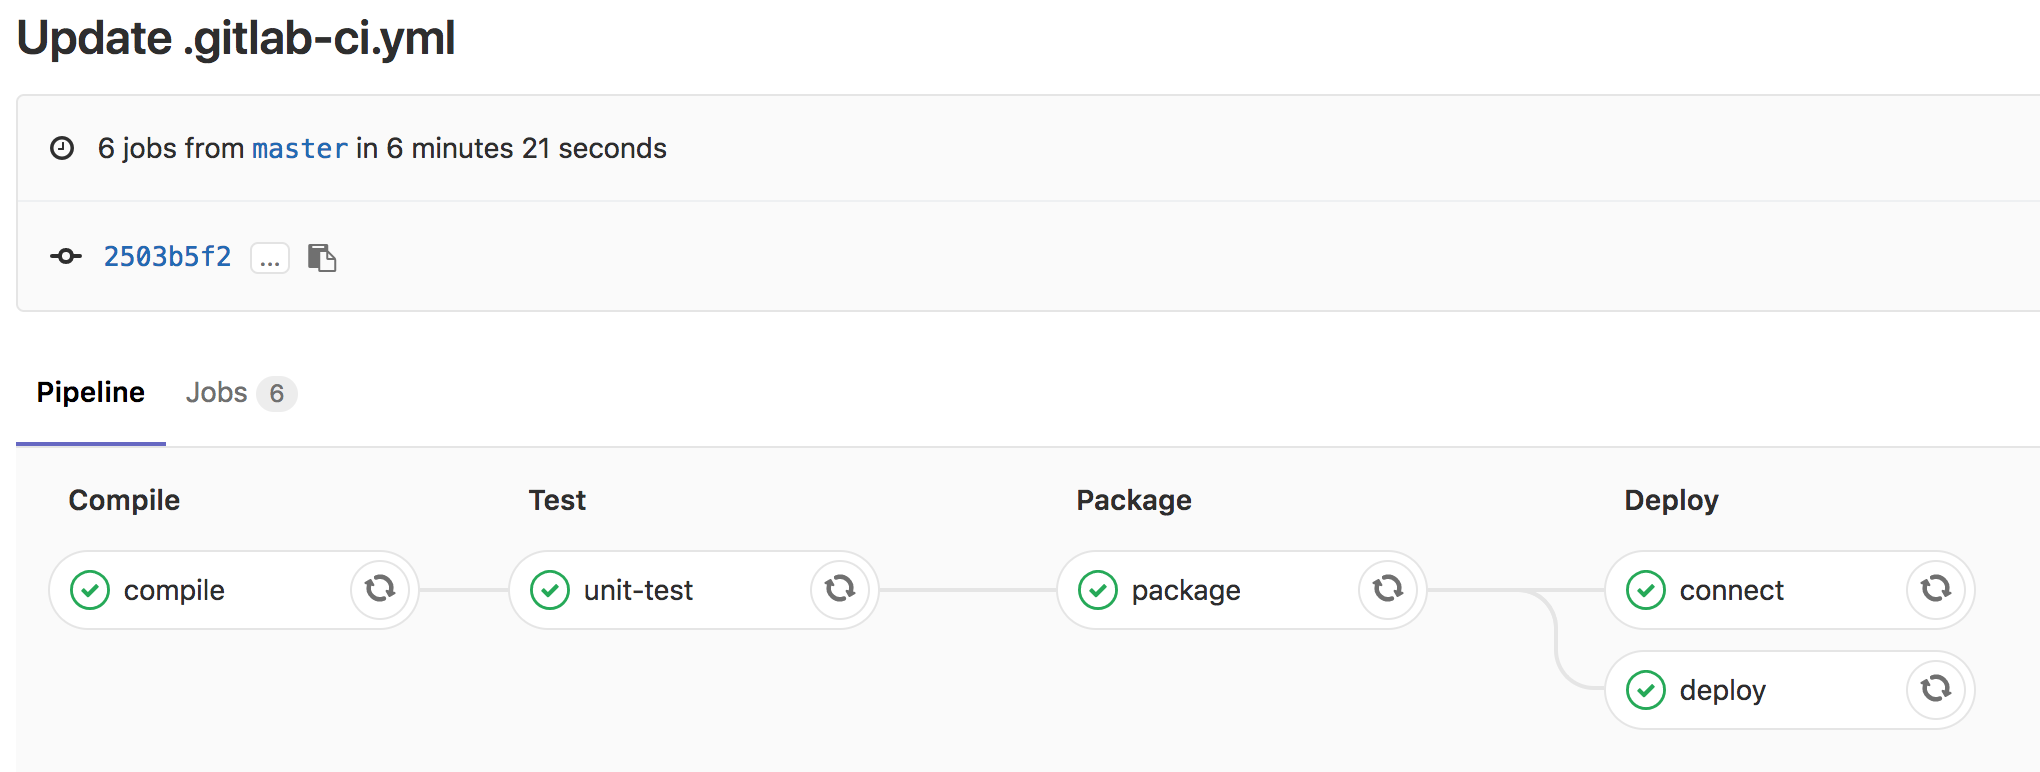
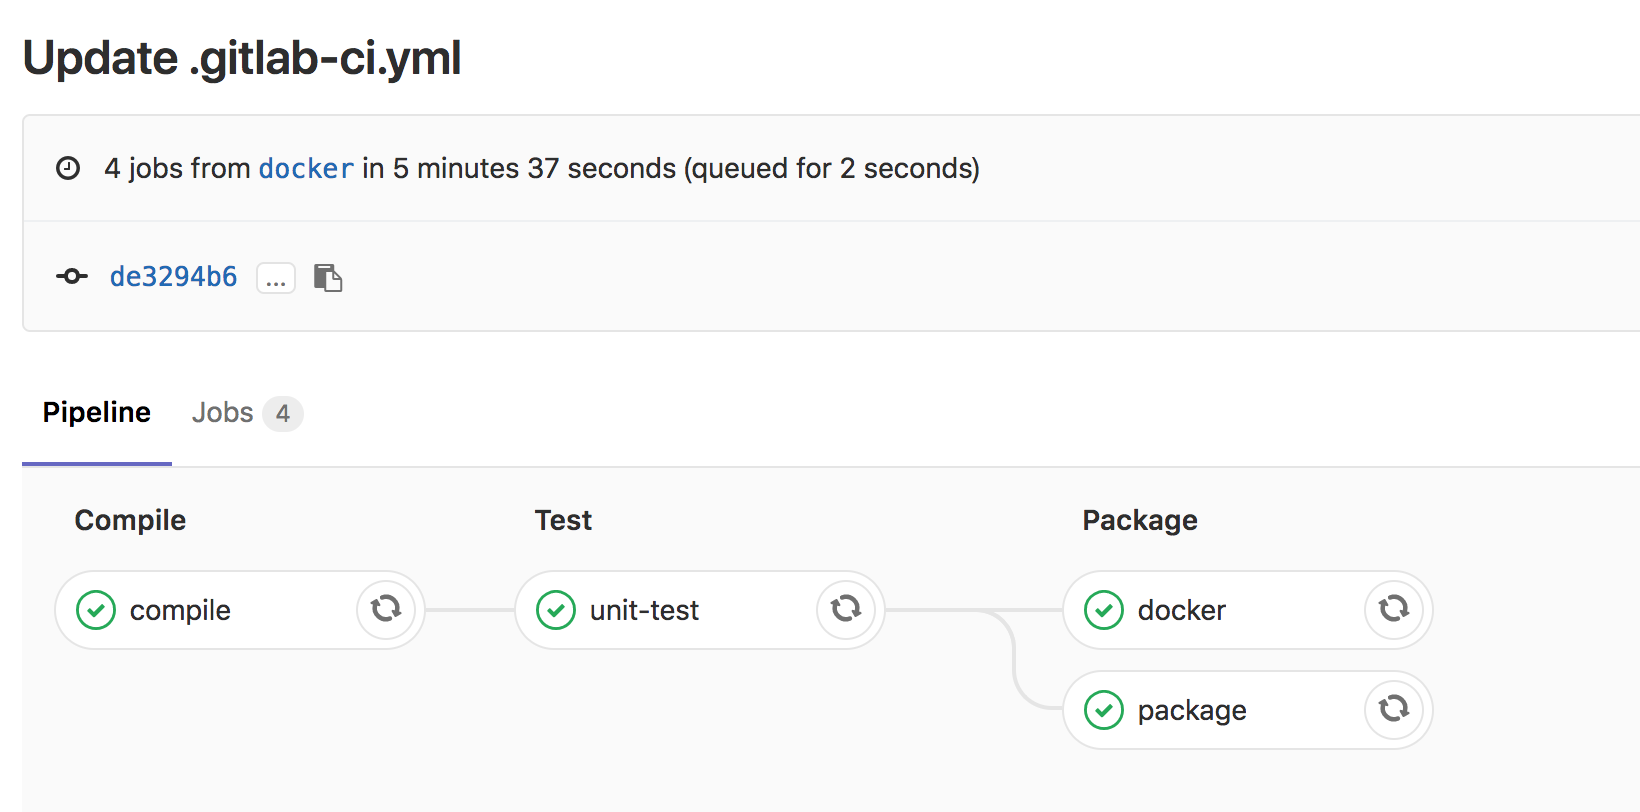
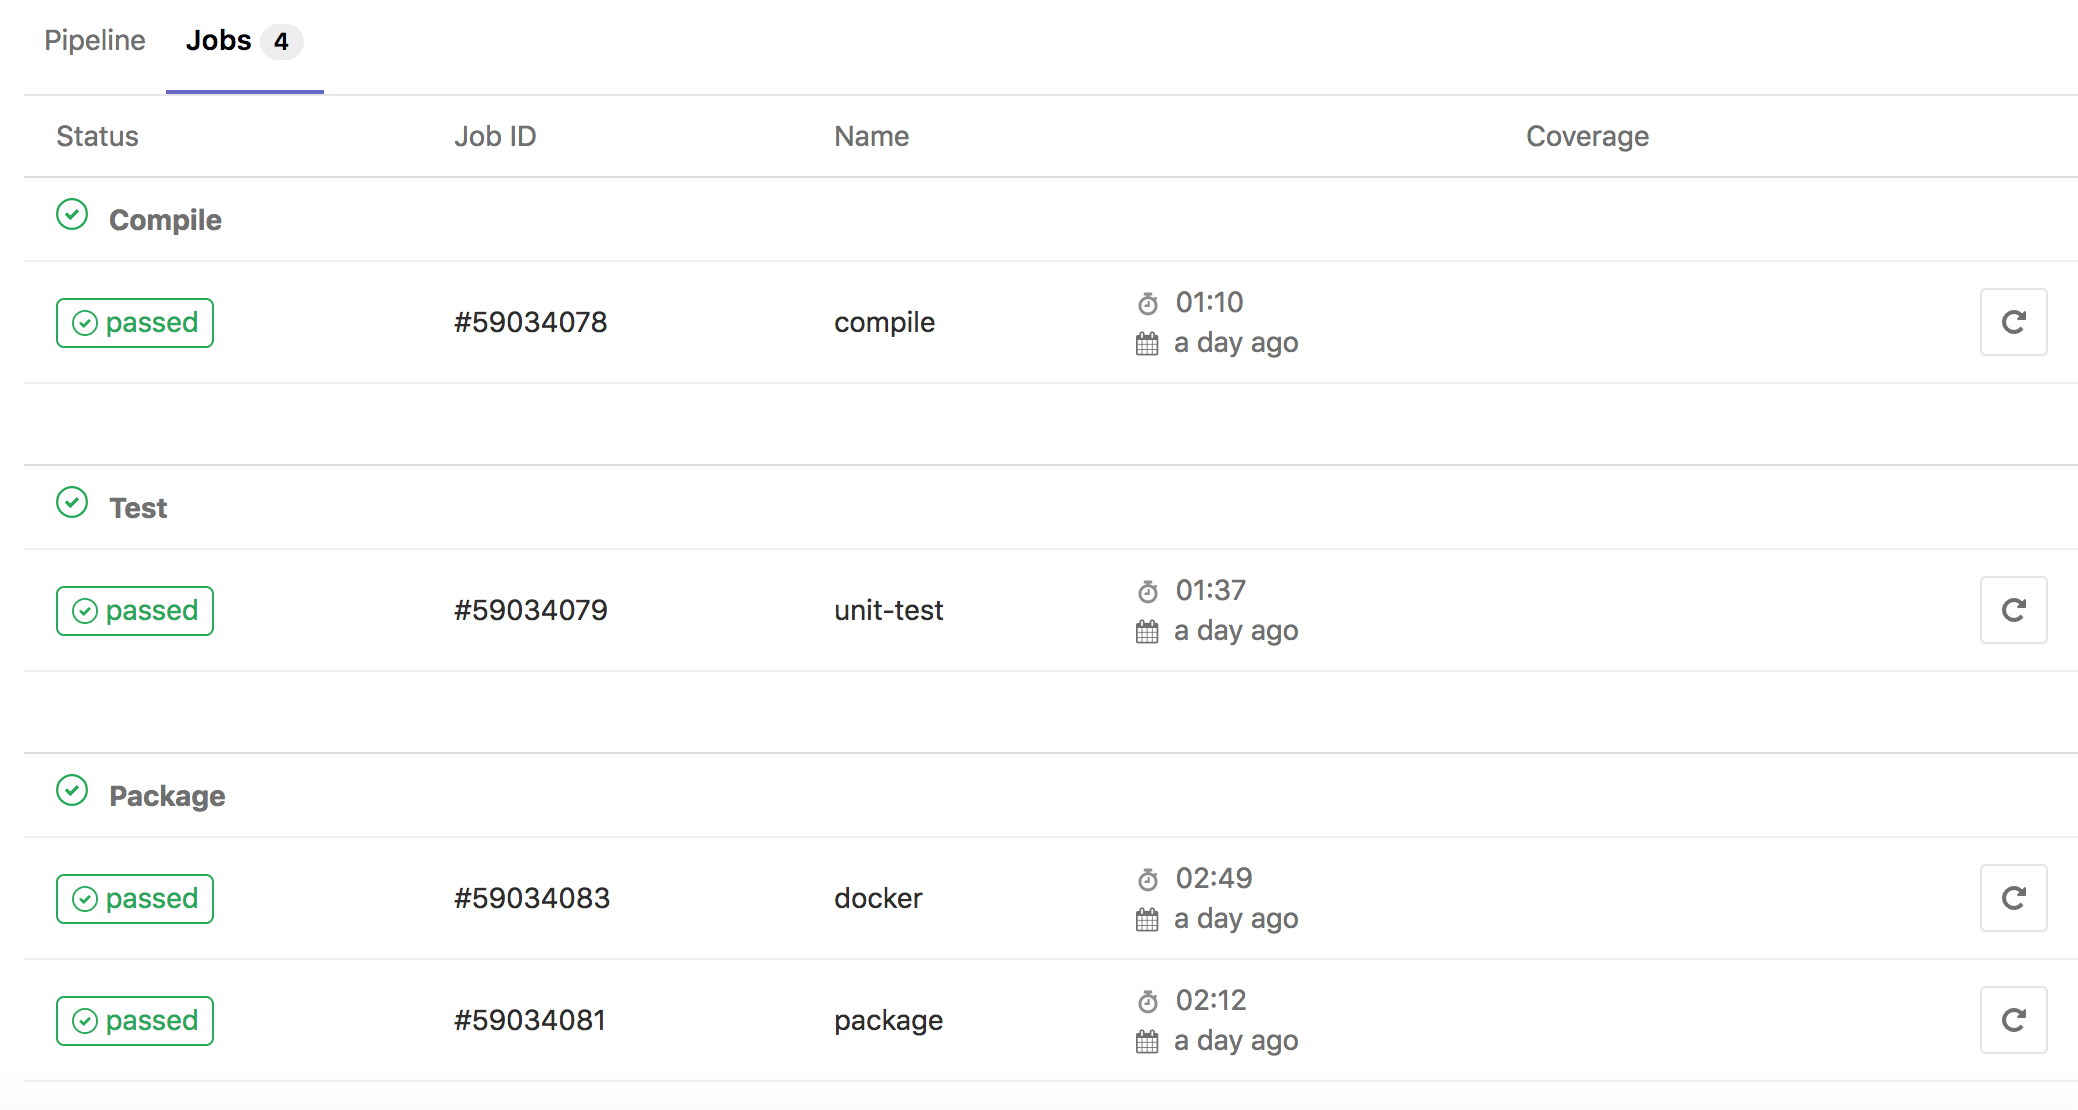
Although there are many CI tools, like Jenkins, Travis CI, Circle CI, but personally I like gitlab ci most..
So I wrote a simple .gitlab-ci.yml, and tested on gitlab, below are the result screenshots.


Recently Spring Boot has released version 2.0.0.RELEASE, so I did a small demo which included the basic CRUD, I have uploaded the code to github.
There are two branches, master is the normal branch, and docker branch will create docker image when you build.
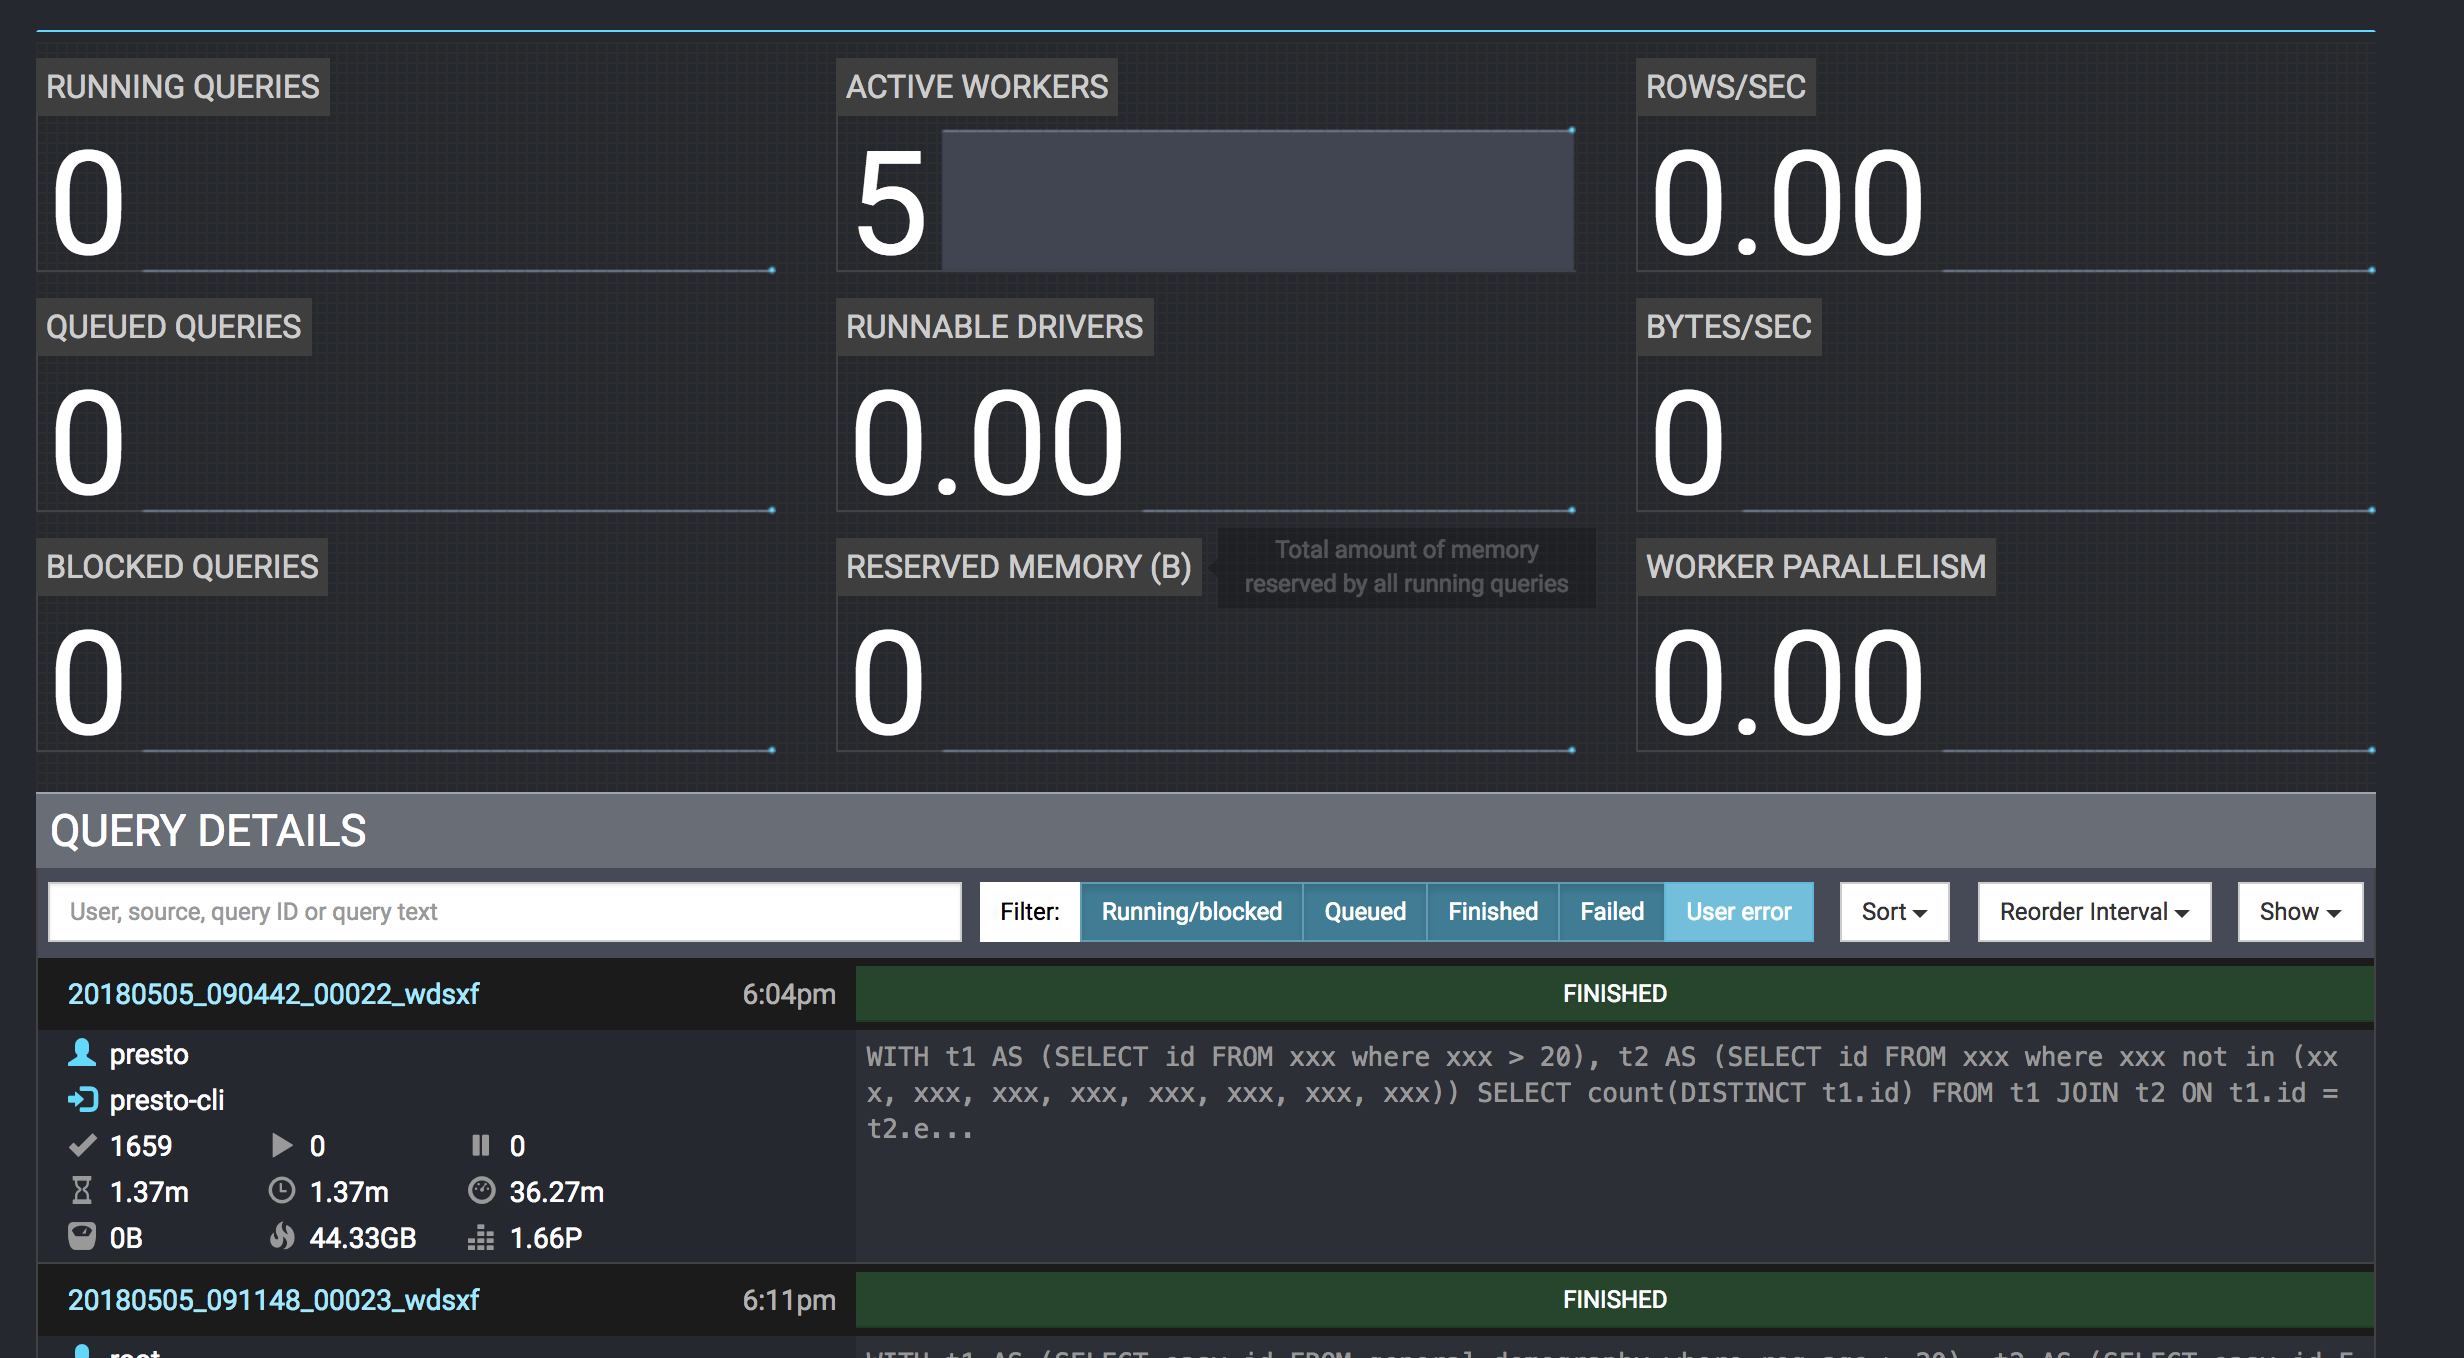
Days before I have installed presto and ambari separately, officially ambari doesn’t support presto, you have to download ambari-presto-service and configure it yourself if you wanna manage presto on ambari.
So I tried this.
1.download hdp yum repository
wget -nv http://public-repo-1.hortonworks.com/HDP/centos6/2.x/updates/2.6.3.0/hdp.repo -O /etc/yum.repos.d/HDP.repo
2.download ambari-presto-service and configure
version=`hdp-select status hadoop-client | sed 's/hadoop-client - ([0-9].[0-9]).*/1/'`
mkdir /var/lib/ambari-server/resources/stacks/HDP/$version/services/PRESTO
wget https://github.com/prestodb/ambari-presto-service/releases/download/v1.2/ambari-presto-1.2.tar.gz
tar -xvf ambari-presto-1.2.tar.gz -C /var/lib/ambari-server/resources/stacks/HDP/$version/services/PRESTO
mv /var/lib/ambari-server/resources/stacks/HDP/$version/services/PRESTO/ambari-presto-1.2/* /var/lib/ambari-server/resources/stacks/HDP/$version/services/PRESTO
rm -rf /var/lib/ambari-server/resources/stacks/HDP/$version/services/PRESTO/ambari-presto-1.2
chmod -R +x /var/lib/ambari-server/resources/stacks/HDP/$version/services/PRESTO/*
3.restart ambari-server
ambari-server restart
4.add presto service on ambari, please configure discovery.uri when you add presto service, e.g. discovery.uri: http://coordinator:8285
After doing this, you could add catalogs and use presto as query engine.
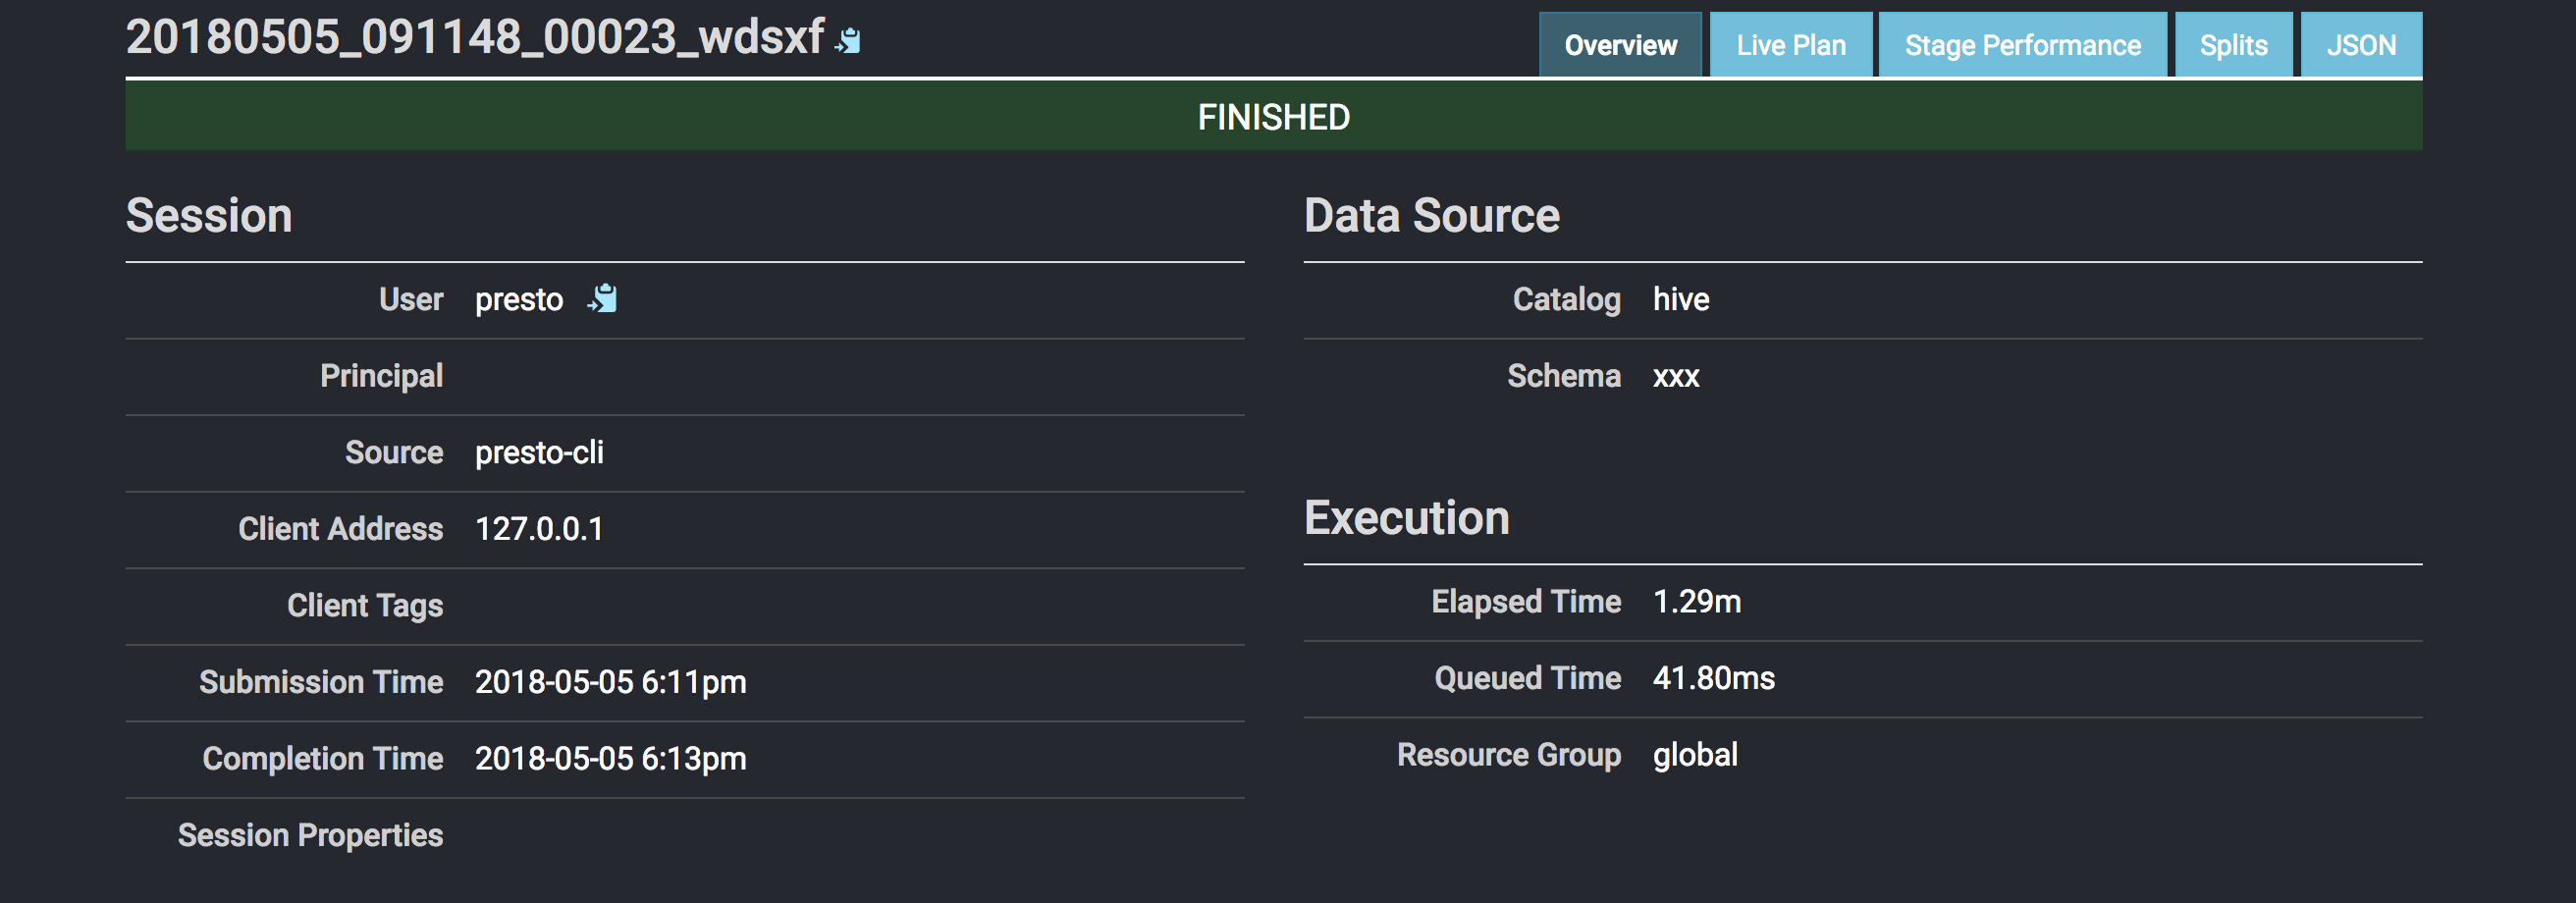
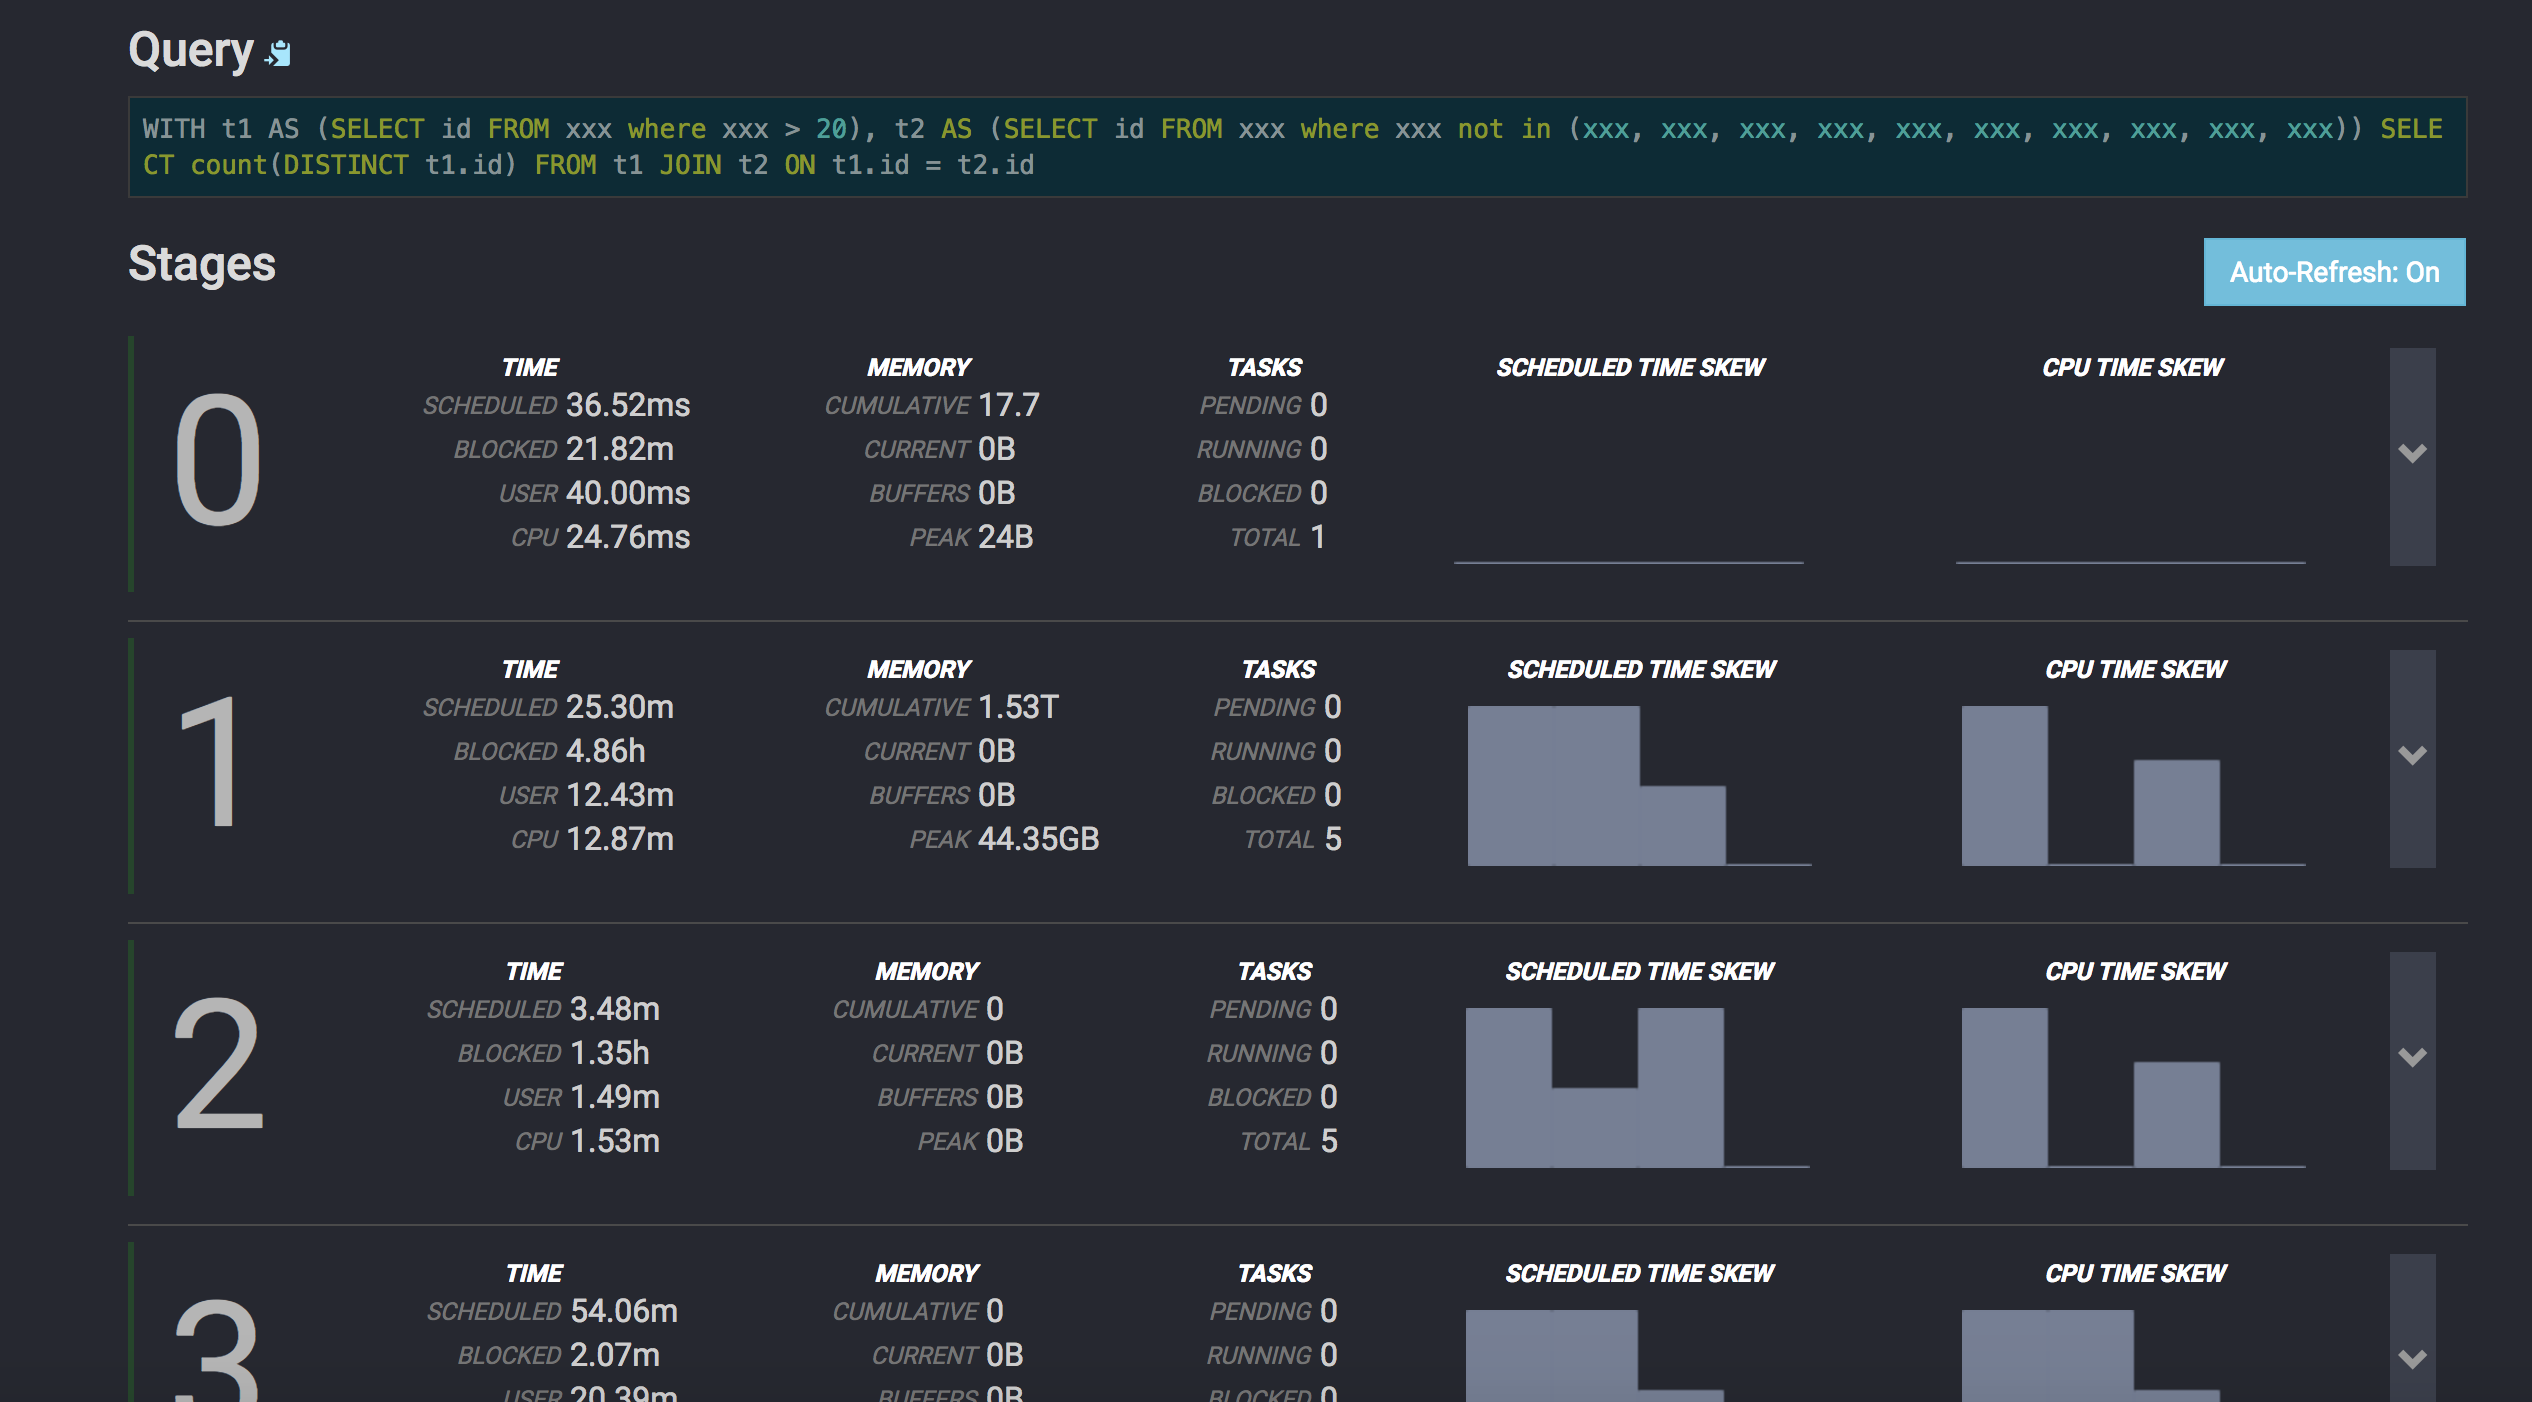
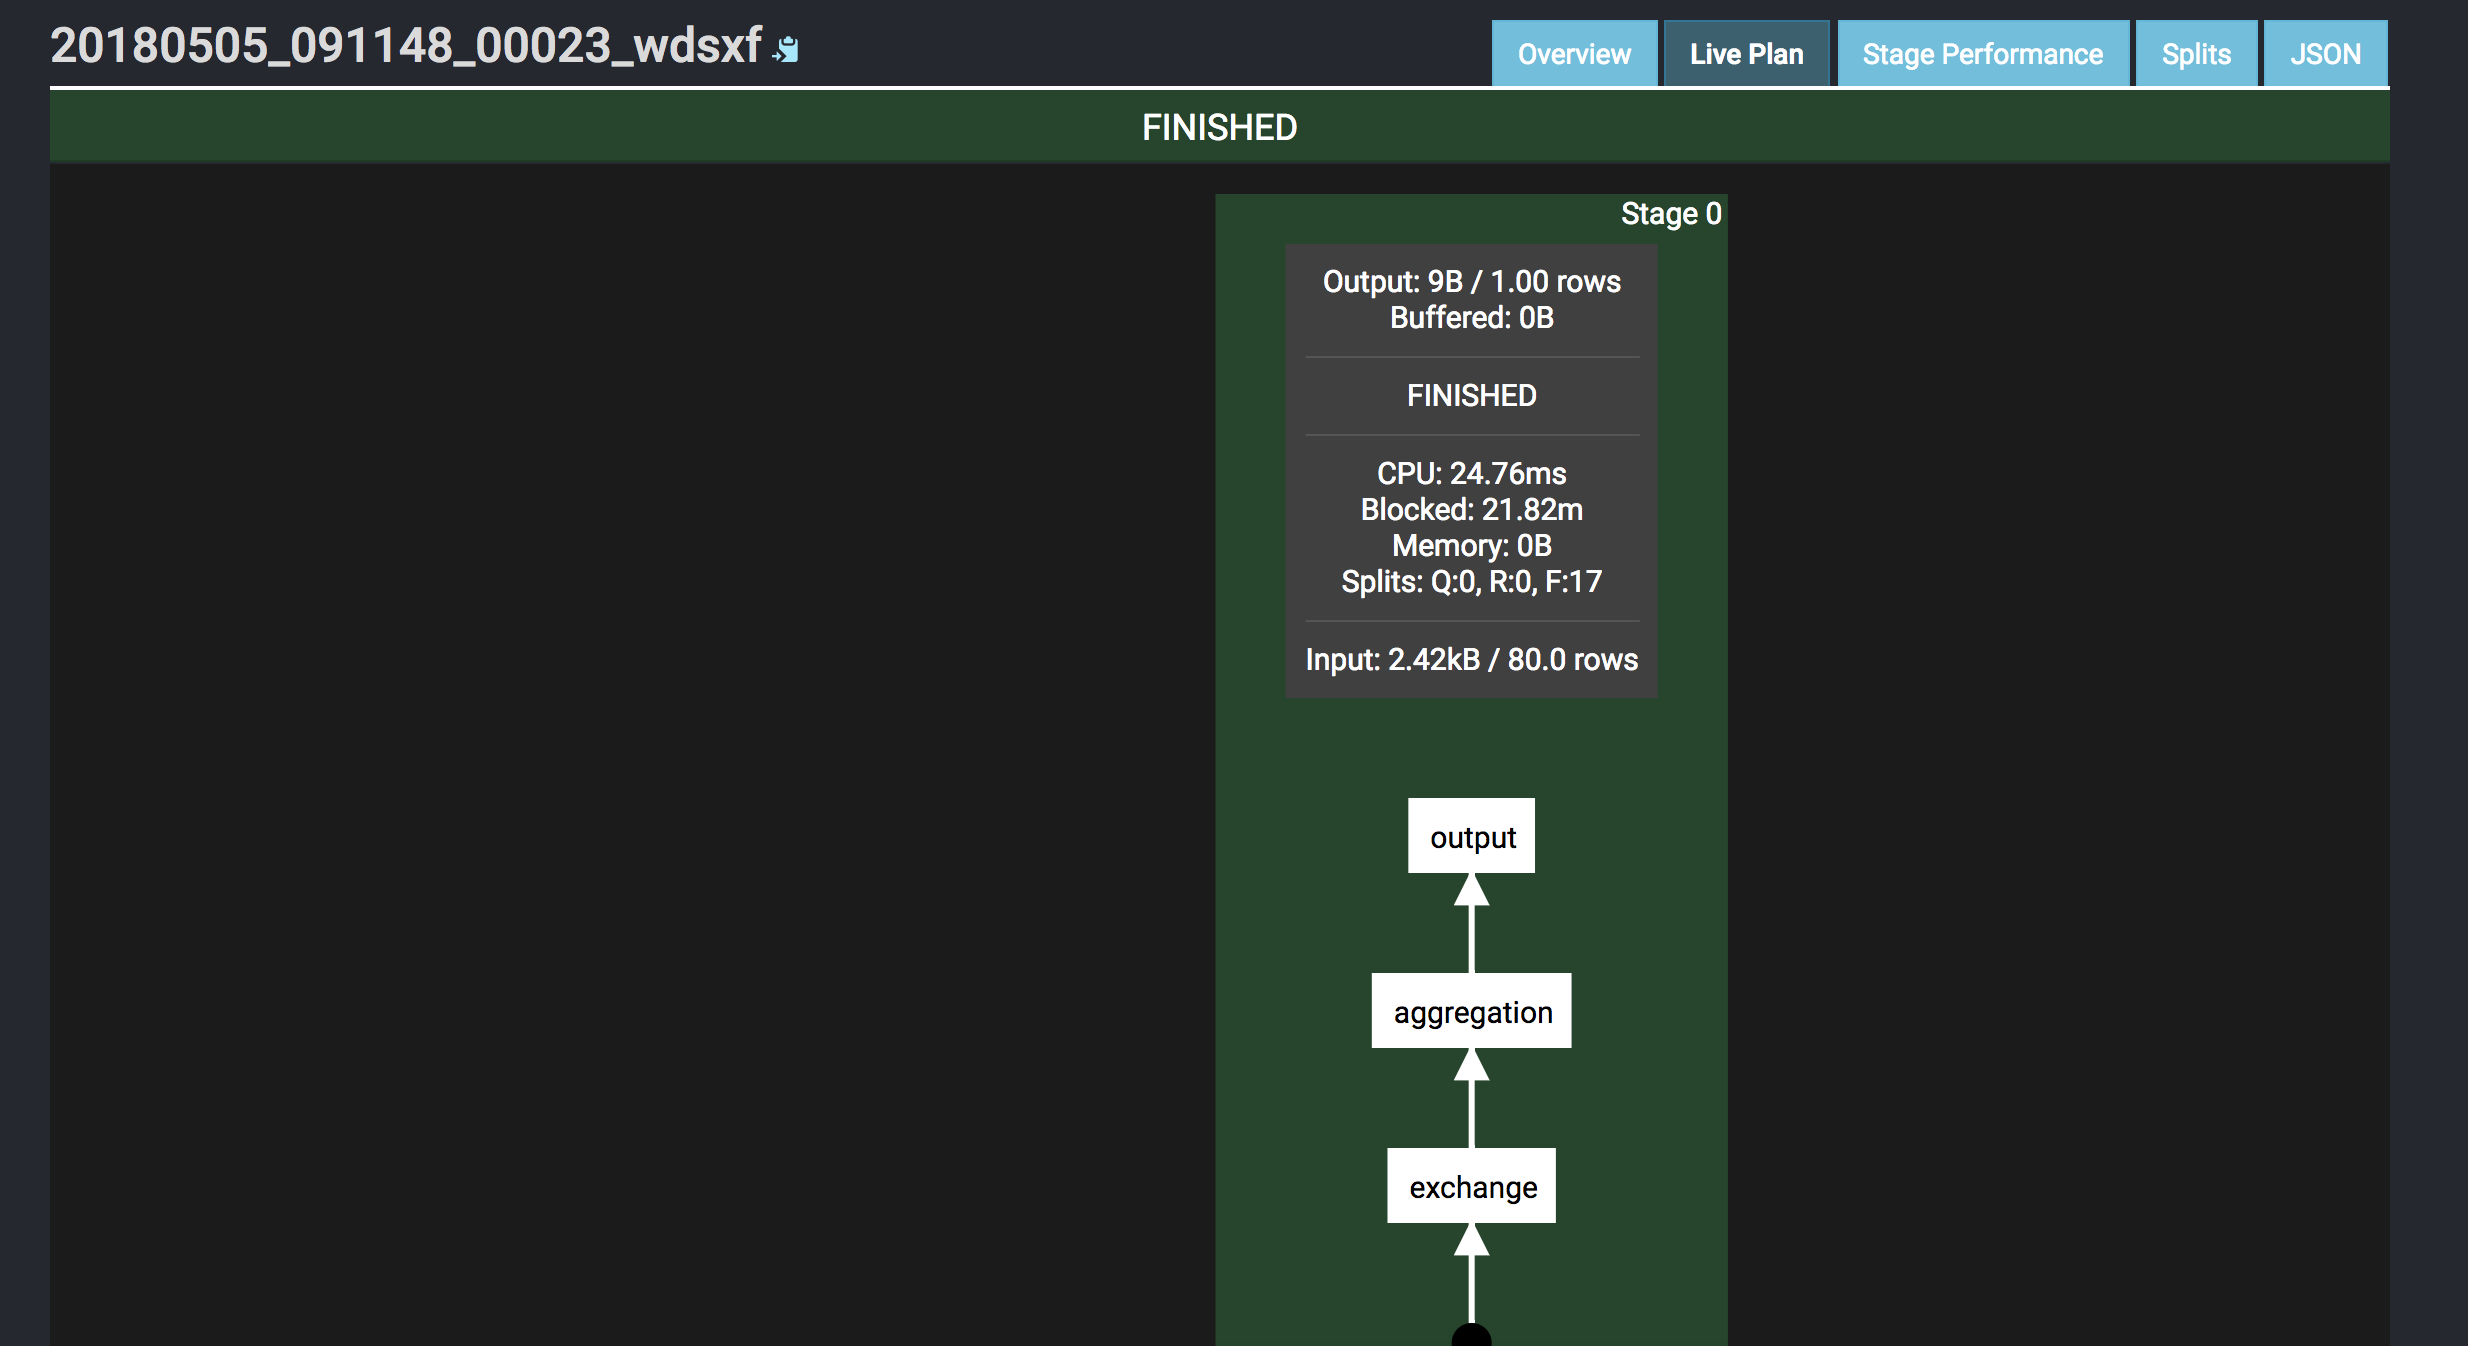
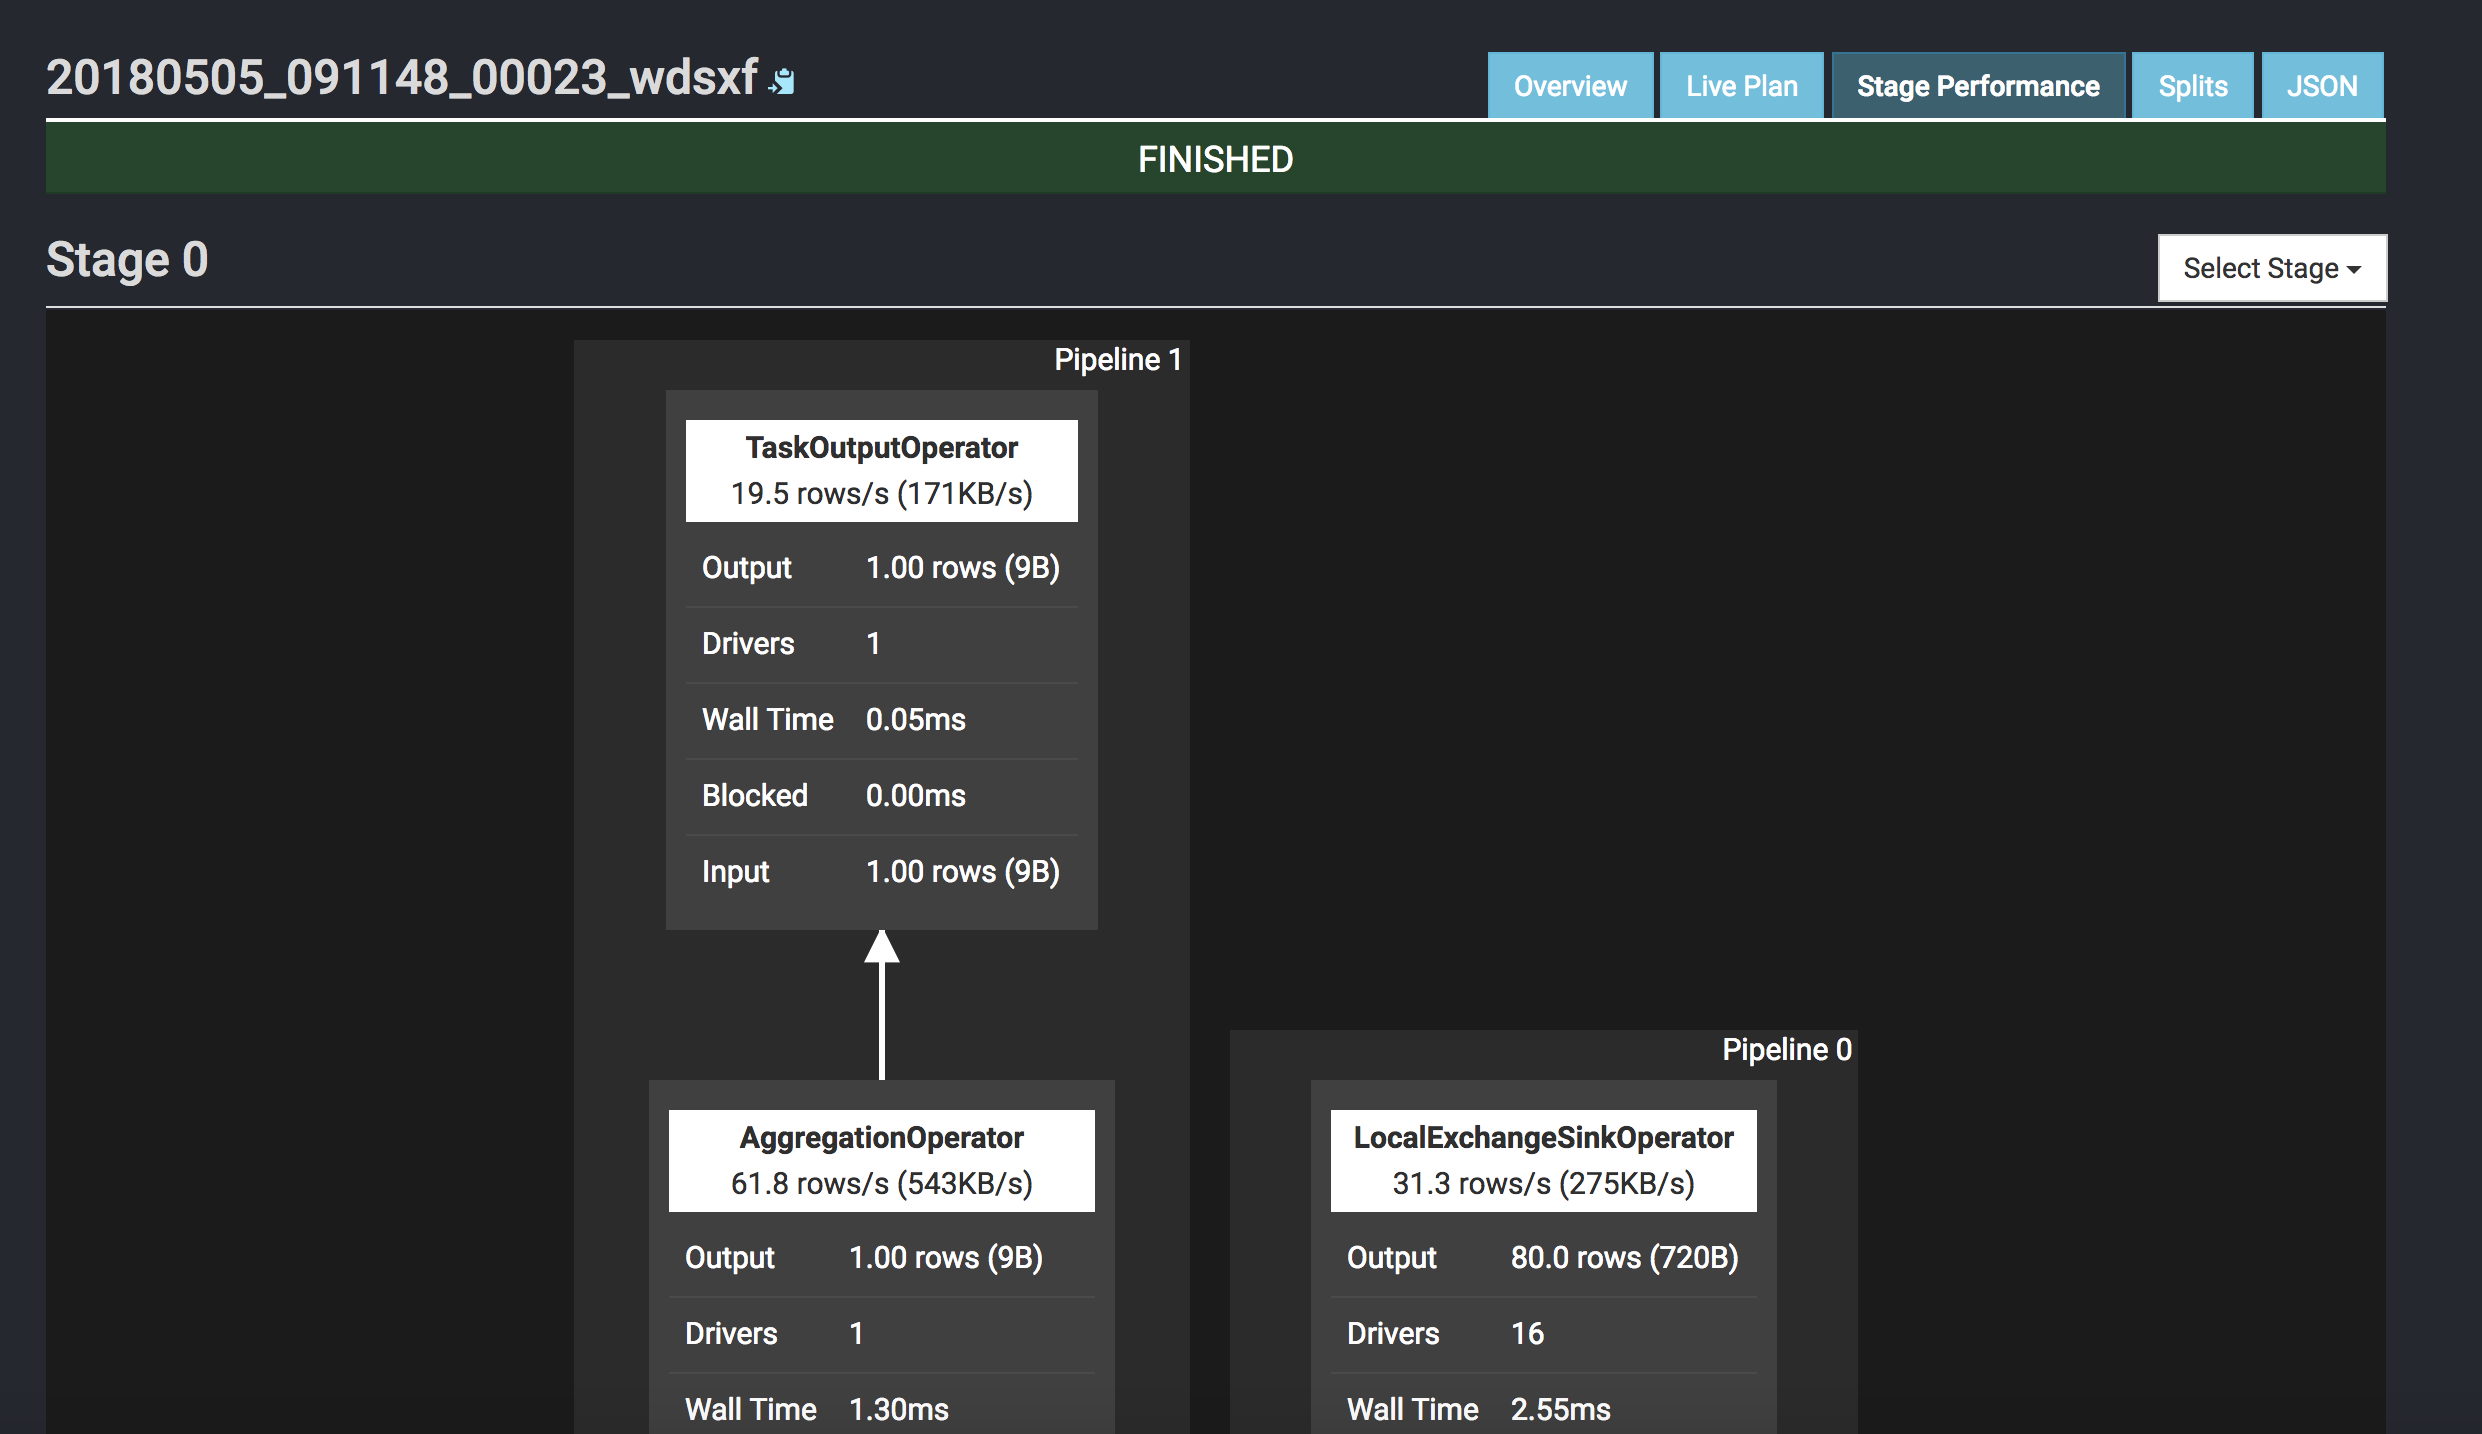
I did a simple query comparison between Tez and Presto, if you wanna accurate benchmark result, I think this benchmark test could help. The query is to calculate sum on a hive table.
Presto: 4s
presto:test> select sum(count) as sum from (
          -> select count(*) as count from t0004998 where month = '6.5'
          -> union
          -> select count(*) as count from t0004998 where typestatus in ('VL2216','VL2217','VL2218','VL2219','VL2220')
          -> union
          -> select count(*) as count from t0004998 where countrycode in ('FAMILY','FORM','GENUS','KINGDOM','ORDER','PHYLUM','SPECIES')
          -> ) t;
  sum
--------
 307374
(1 row)

Query 20180317_102034_00040_sq83e, FINISHED, 1 node
Splits: 29 total, 29 done (100.00%)
0:04 [982K rows, 374MB] [231K rows/s, 87.8MB/s]
Tez: 29.77s
hive> select sum(count) from (
    > select count(*) as count from t0004998 where month = "6.5"
    > union
    > select count(*) as count from t0004998 where typestatus in ("VL2216","VL2217","VL2218","VL2219","VL2220")
    > union
    > select count(*) as count from t0004998 where countrycode in ("FAMILY","FORM","GENUS","KINGDOM","ORDER","PHYLUM","SPECIES")
    > ) t;
Query ID = hdfs_20180317102109_5fd30986-f840-450e-aedd-b51c5e3a48f1
Total jobs = 1
Launching Job 1 out of 1
Status: Running (Executing on YARN cluster with App id application_1521267007048_0012)

--------------------------------------------------------------------------------
        VERTICES      STATUS  TOTAL  COMPLETED  RUNNING  PENDING  FAILED  KILLED
--------------------------------------------------------------------------------
Map 1 ..........   SUCCEEDED      1          1        0        0       0       0
Map 10 .........   SUCCEEDED      1          1        0        0       1       0
Map 8 ..........   SUCCEEDED      1          1        0        0       0       0
Reducer 11 .....   SUCCEEDED      1          1        0        0       0       0
Reducer 2 ......   SUCCEEDED      1          1        0        0       0       1
Reducer 4 ......   SUCCEEDED      1          1        0        0       0       0
Reducer 6 ......   SUCCEEDED      1          1        0        0       0       0
Reducer 7 ......   SUCCEEDED      1          1        0        0       0       0
Reducer 9 ......   SUCCEEDED      1          1        0        0       0       0
--------------------------------------------------------------------------------
VERTICES: 09/09  [==========================>>] 100%  ELAPSED TIME: 29.77 s
--------------------------------------------------------------------------------
OK
307374
Time taken: 30.732 seconds, Fetched: 1 row(s)
emmm, not bad..


Presto is a distributed query engine which is developed by Facebook, for specific concept and advantages, please refer to the official document, below are the steps how I build pseudo cluster on my mac.
1.download presto
wget https://repo1.maven.org/maven2/com/facebook/presto/presto-server/0.196/presto-server-0.196.tar.gz
tar -zvxf presto-server-0.196.tar.gz && cd presto-server-0.196
2.configure configurations
mkdir etc

cat << 'EOF' > etc/jvm.config
-server
-Xmx16G
-Xms16G
-XX:+UseG1GC
-XX:G1HeapRegionSize=32M
-XX:+UseGCOverheadLimit
-XX:+ExplicitGCInvokesConcurrent
-XX:+HeapDumpOnOutOfMemoryError
-XX:+ExitOnOutOfMemoryError
EOF

cat << 'EOF' > etc/log.properties
com.facebook.presto=INFO
EOF

cat << 'EOF' > etc/config1.properties
coordinator=true
node-scheduler.include-coordinator=true
http-server.http.port=8001
query.max-memory=24GB
query.max-memory-per-node=8GB
discovery-server.enabled=true
discovery.uri=http://localhost:8001
EOF

cat << 'EOF' > etc/config2.properties
coordinator=false
node-scheduler.include-coordinator=true
http-server.http.port=8002
query.max-memory=24GB
query.max-memory-per-node=8GB
discovery-server.enabled=true
discovery.uri=http://localhost:8001
EOF

cat << 'EOF' > etc/config3.properties
coordinator=true
node-scheduler.include-coordinator=true
http-server.http.port=8003
query.max-memory=24GB
query.max-memory-per-node=8GB
discovery-server.enabled=true
discovery.uri=http://localhost:8001
EOF

cat << 'EOF' > etc/node1.properties
node.environment=test
node.id=671d18f9-dd0f-412d-b18c-fe6d7989b040
node.data-dir=/usr/local/Cellar/presto/0.196/data/node1
EOF

cat << 'EOF' > etc/node2.properties
node.environment=test
node.id=e72fdd91-a135-4936-9a3e-f888c5106ed9
node.data-dir=/usr/local/Cellar/presto/0.196/data/node2
EOF

cat << 'EOF' > etc/node3.properties
node.environment=test
node.id=6ab76715-1812-4093-95cf-1945f4cfefe3
node.data-dir=/usr/local/Cellar/presto/0.196/data/node3
EOF
p.s. If you want to restrict operation, please add access-control.properties as below, only permit read operation.
cat << 'EOF' > etc/access-control.properties
access-control.name=read-only
EOF
3.start presto server
bin/launcher start --config=etc/config1.properties --node-config=etc/node1.properties
bin/launcher start --config=etc/config2.properties --node-config=etc/node2.properties
bin/launcher start --config=etc/config3.properties --node-config=etc/node3.properties
4.downlaod cli
wget https://repo1.maven.org/maven2/com/facebook/presto/presto-cli/0.196/presto-cli-0.196-executable.jar -O bin/presto-cli
chmod +x bin/presto-cli
5.create catalogs
cat << 'EOF' > etc/catalog/mysql.properties
connector.name=mysql
connection-url=jdbc:mysql://localhost:3306?useSSL=false
connection-user=presto
connection-password=presto
EOF

cat << 'EOF' > etc/catalog/hive.properties
connector.name=hive-hadoop2
hive.metastore.uri=thrift://localhost:9083
EOF
6.connect
bin/presto-cli --server localhost:8001 --catalog hive

presto> show catalogs;
 Catalog
---------
 hive
 mysql
 system
(3 rows)

Query 20180318_045410_00013_sq83e, FINISHED, 1 node
Splits: 1 total, 1 done (100.00%)
0:00 [0 rows, 0B] [0 rows/s, 0B/s]
Screenshot:


P.S. If build cluster, pay attention to below items:
1.node.id in node.properties in every node must be unique in the cluster, you could generate it by uuid/uuidgen.
2.query.max-memory-per-node in config.properties better to be half of -Xmx in jvm.config.
Recently I need do some statistic, so I choose ELK to build it. I will introduce about how to clean logs and send the logs to elasticsearch by logstash.
Logstash Version: 5.6.6
Firstly add a new configuration file named xxx.conf under config directory, the content are as below, please replace “xxx” with your business.
input {
    file {
        path => "/**/xxx.log"
        codec => plain {
            charset => "UTF-8"
        }
        tags => ["xxx"]
    }
    file {
        path => "/**/xxx.log"
        codec => plain {
            charset => "UTF-8"
        }
        tags => ["xxx"]
    }
}

filter {
    if "xxx" in [tags] {
        dissect {
            mapping => {
                "message" => "%{timestamp} - [%{thread}] - [%{level}] - [%{class}] - xxx:%{xxx}, xxx:%{xxx}, xxx:%{xxx}, xxx:%{xxx}, xxx:%{xxx}, xxx:%{xxx}, xxx:%{xxx}, xxx:%{xxx}"
            }
        }
    }
    if "xxx" in [tags] {
        dissect {
            mapping => {
                "message" => "%{timestamp} - [%{thread}] - [%{level}] - [%{class}] - xxx:%{xxx}, xxx:%{xxx}, xxx:%{xxx}, xxx:%{xxx}, xxx:%{xxx}, xxx:%{xxx}, xxx:%{xxx}, xxx:%{xxx}, xxx:%{xxx}, xxx:%{xxx}, xxx:%{xxx}, xxx:%{xxx}, xxx:%{xxx}"
            }
        }
    }
}

#replace @timestamp
#filter {
#date {
#match => ["timestamp", "yyyy-MM-dd HH:mm:ss,SSS"]
#target => ["@timestamp"]
#}
#}

output {
    if "xxx" in [tags] {
        elasticsearch {
            index => "xxx"
            hosts => ["http://xxx:9200"]
        }
    }
    if "xxx" in [tags] {
        elasticsearch {
            index => "xxx"
            hosts => ["http://xxx:9200"]
        }
    }
}
Then start logstash with this configuration file
bin/logstash -f config/xxx.conf
After this, please configure kibana dashborad, and you will get some cool charts.
P.S.
There are many kinds of input/filter/output, like jdbc/redis/kafka/mongodb, please refer to the official document.
If you are familiar with grok filter, you can also filter logs as below:
filter {
    grok {
        match => {
            "message" => "%{TIMESTAMP_ISO8601:timestamp}%{SPACE}-%{SPACE}[.*]%{SPACE}-%{SPACE}xxx:%{GREEDYDATA:xxx},%{SPACE}xxx:%{GREEDYDATA:xxx},%{SPACE}xxx:%{GREEDYDATA:xxx},%{SPACE}xxx:%{GREEDYDATA:xxx},%{SPACE}xxx:%{GREEDYDATA:xxx},%{SPACE}xxx:%{GREEDYDATA:xxx},%{SPACE}xxx:%{GREEDYDATA:xxx},%{SPACE}xxx:%{GREEDYDATA:xxx}"
        }
    }
}
Recently I tested sqoop2 which has many new features compared to sqoop1, about the comparision, I think you could check here and stackoverflow, I will introduce about the operation manual.
1.install
wget http://ftp.jaist.ac.jp/pub/apache/sqoop/1.99.7/sqoop-1.99.7-bin-hadoop200.tar.gz
tar -vzxf sqoop-1.99.7-bin-hadoop200.tar.gz && cd sqoop-1.99.7-bin-hadoop200
2.replace @LOGDIR@/@BASEDIR@ in sqoop.properties
3.download mysql driver into server/lib
4.configure proxy user in core-site.xml
<property>
    <name>hadoop.proxyuser.sqoop2.hosts</name>
    <value>*</value>
</property>
<property>
    <name>hadoop.proxyuser.sqoop2.groups</name>
    <value>*</value>
</property>
5.verify & start sqoop2 server
bin/sqoop2-tool verify
bin/sqoop2-server start
6.start client & test
bin/sqoop2-shell
7.show the connectors
sqoop:000> show connector
+------------------------+---------+------------------------------------------------------------+----------------------+
| Name | Version | Class | Supported Directions |
+------------------------+---------+------------------------------------------------------------+----------------------+
| generic-jdbc-connector | 1.99.7 | org.apache.sqoop.connector.jdbc.GenericJdbcConnector | FROM/TO |
| kite-connector | 1.99.7 | org.apache.sqoop.connector.kite.KiteConnector | FROM/TO |
| oracle-jdbc-connector | 1.99.7 | org.apache.sqoop.connector.jdbc.oracle.OracleJdbcConnector | FROM/TO |
| ftp-connector | 1.99.7 | org.apache.sqoop.connector.ftp.FtpConnector | TO |
| hdfs-connector | 1.99.7 | org.apache.sqoop.connector.hdfs.HdfsConnector | FROM/TO |
| kafka-connector | 1.99.7 | org.apache.sqoop.connector.kafka.KafkaConnector | TO |
| sftp-connector | 1.99.7 | org.apache.sqoop.connector.sftp.SftpConnector | TO |
+------------------------+---------+------------------------------------------------------------+----------------------+
8.create links & show links
sqoop:000> create link -connector generic-jdbc-connector
sqoop:000> create link -connector hdfs-connector

sqoop:000> show link
+-------------+------------------------+---------+
| Name | Connector Name | Enabled |
+-------------+------------------------+---------+
| mysql-local | generic-jdbc-connector | true |
| hdfs-local | hdfs-connector | true |
+-------------+------------------------+---------+

sqoop:000> show link --all
2 link(s) to show:
link with name mysql-local (Enabled: true, Created by hongmeng.wang at 3/1/18 10:56 AM, Updated by hongmeng.wang at 3/1/18 12:51 PM)
Using Connector generic-jdbc-connector with name {1}
Database connection
Driver class: com.mysql.jdbc.Driver
Connection String: jdbc:mysql://localhost:3306
Username: root
Password:
Fetch Size: 100
Connection Properties:
protocol = tcp
useUnicode = true
characterEncoding = utf-8
autoReconnect = true
SQL Dialect
Identifier enclose: (blank, if use default, will get error)
link with name hdfs-local (Enabled: true, Created by hongmeng.wang at 3/1/18 10:58 AM, Updated by hongmeng.wang at 3/1/18 12:54 PM)
Using Connector hdfs-connector with name {1}
HDFS cluster
URI: hdfs://localhost:9000
Conf directory: /usr/local/Cellar/hadoop/2.8.2/libexec/etc/hadoop
Additional configs::
9.create job & show job
sqoop:000> create job -f "mysql-local" -t "hdfs-local"

sqoop:000> show job
+----+----------------------+--------------------------------------+-----------------------------+---------+
| Id | Name | From Connector | To Connector | Enabled |
+----+----------------------+--------------------------------------+-----------------------------+---------+
| 1 | mysql-2-hdfs-t1 | mysql-local (generic-jdbc-connector) | hdfs-local (hdfs-connector) | true |
+----+----------------------+--------------------------------------+-----------------------------+---------+

sqoop:000> show job --all
1 job(s) to show:
Job with name mysql-2-hdfs-segment (Enabled: true, Created by hongmeng.wang at 3/1/18 11:06 AM, Updated by hongmeng.wang at 3/1/18 11:39 AM)
Throttling resources
Extractors:
Loaders:
Classpath configuration
Extra mapper jars:
From link: mysql-local
Database source
Schema name: test
Table name: t1
SQL statement:
Column names:
Partition column: id
Partition column nullable:
Boundary query:
Incremental read
Check column:
Last value:
To link: hdfs-local
Target configuration
Override null value: true
Null value:
File format: TEXT_FILE
Compression codec: NONE
Custom codec:
Output directory: /sqoop/mysql/test
Append mode:
10.start job & check job’s status
sqoop:000> start job -name mysql-2-hdfs-segment
Submission details
Job Name: mysql-2-hdfs-segment
Server URL: http://localhost:12000/sqoop/
Created by: sqoop2
Creation date: 2018-03-01 13:53:37 JST
Lastly updated by: sqoop2
External ID: job_1519869491258_0001
http://localhost:8088/proxy/application_1519869491258_0001/
2018-03-01 13:53:37 JST: BOOTING - Progress is not available

sqoop:000> status job -n mysql-2-hdfs-segment
Submission details
Job Name: mysql-2-hdfs-segment
Server URL: http://localhost:12000/sqoop/
Created by: sqoop2
Creation date: 2018-03-01 14:01:54 JST
Lastly updated by: sqoop2
External ID: job_1519869491258_0002
http://localhost:8088/proxy/application_1519869491258_0002/
2018-03-01 14:03:31 JST: BOOTING - 0.00 %
Issues
1.modify “org.apache.sqoop.submission.engine.mapreduce.configuration.directory=”directory of hadoop configuration” in conf/sqoop.properties if you got below error when executing bin/sqoop2-tool verify
Exception in thread "main" java.lang.RuntimeException: Failure in server initialization
at org.apache.sqoop.core.SqoopServer.initialize(SqoopServer.java:68)
at org.apache.sqoop.server.SqoopJettyServer.<init>(SqoopJettyServer.java:67)
at org.apache.sqoop.server.SqoopJettyServer.main(SqoopJettyServer.java:177)
Caused by: org.apache.sqoop.common.SqoopException: MAPREDUCE_0002:Failure on submission engine initialization - Invalid Hadoop configuration directory (not a directory or permission issues): /etc/hadoop/conf/
at org.apache.sqoop.submission.mapreduce.MapreduceSubmissionEngine.initialize(MapreduceSubmissionEngine.java:97)
at org.apache.sqoop.driver.JobManager.initialize(JobManager.java:257)
at org.apache.sqoop.core.SqoopServer.initialize(SqoopServer.java:64)
... 2 more
2.check $CLASSPATH and $HADOOP_CLASSPATH, maybe some jars conflict if got below error:
Caused by: java.lang.SecurityException: sealing violation: package org.apache.derby.impl.services.locks is sealed
at java.net.URLClassLoader.getAndVerifyPackage(URLClassLoader.java:399)
at java.net.URLClassLoader.definePackageInternal(URLClassLoader.java:419)
at java.net.URLClassLoader.defineClass(URLClassLoader.java:451)
at java.net.URLClassLoader.access$100(URLClassLoader.java:73)
at java.net.URLClassLoader$1.run(URLClassLoader.java:368)
at java.net.URLClassLoader$1.run(URLClassLoader.java:362)
at java.security.AccessController.doPrivileged(Native Method)
at java.net.URLClassLoader.findClass(URLClassLoader.java:361)
at java.lang.ClassLoader.loadClass(ClassLoader.java:424)
at sun.misc.Launcher$AppClassLoader.loadClass(Launcher.java:335)
at java.lang.ClassLoader.loadClass(ClassLoader.java:357)
at java.lang.ClassLoader.defineClass1(Native Method)
at java.lang.ClassLoader.defineClass(ClassLoader.java:763)
at java.security.SecureClassLoader.defineClass(SecureClassLoader.java:142)
at java.net.URLClassLoader.defineClass(URLClassLoader.java:467)
at java.net.URLClassLoader.access$100(URLClassLoader.java:73)
at java.net.URLClassLoader$1.run(URLClassLoader.java:368)
at java.net.URLClassLoader$1.run(URLClassLoader.java:362)
at java.security.AccessController.doPrivileged(Native Method)
at java.net.URLClassLoader.findClass(URLClassLoader.java:361)
at java.lang.ClassLoader.loadClass(ClassLoader.java:424)
at sun.misc.Launcher$AppClassLoader.loadClass(Launcher.java:335)
at java.lang.ClassLoader.loadClass(ClassLoader.java:357)
at java.lang.Class.forName0(Native Method)
at java.lang.Class.forName(Class.java:264)
at org.apache.derby.impl.services.monitor.BaseMonitor.getImplementations(Unknown Source)
at org.apache.derby.impl.services.monitor.BaseMonitor.getDefaultImplementations(Unknown Source)
at org.apache.derby.impl.services.monitor.BaseMonitor.runWithState(Unknown Source)
at org.apache.derby.iampl.services.monitor.FileMonitor.<init>(Unknown Source)
at org.apache.derby.iapi.services.monitor.Monitor.startMonitor(Unknown Source)
at org.apache.derby.iapi.jdbc.JDBCBoot.boot(Unknown Source)
at org.apache.derby.jdbc.EmbeddedDriver.boot(Unknown Source)
at org.apache.derby.jdbc.EmbeddedDriver.<clinit>(Unknown Source)
... 11 more
Modify capacity-scheduler.xml under $HADOOP_CONF_DIR, and I configured 3 queues: default, business, platform
<configuration>
    <property>
        <name>yarn.scheduler.capacity.maximum-applications</name>
        <value>10000</value>
    </property>
    <property>
        <name>yarn.scheduler.capacity.maximum-am-resource-percent</name>
        <value>0.1</value>
    </property>
    <property>
        <name>yarn.scheduler.capacity.resource-calculator</name>
        <value>org.apache.hadoop.yarn.util.resource.DefaultResourceCalculator</value>
    </property>
    <property>
        <name>yarn.scheduler.capacity.root.queues</name>
        <value>default,business,platform</value>
    </property>
    <property>
        <name>yarn.scheduler.capacity.root.default.capacity</name>
        <value>50</value>
    </property>
    <property>
        <name>yarn.scheduler.capacity.root.default.user-limit-factor</name>
        <value>1</value>
    </property>
    <property>
        <name>yarn.scheduler.capacity.root.default.maximum-capacity</name>
        <value>50</value>
    </property>
    <property>
        <name>yarn.scheduler.capacity.root.default.state</name>
        <value>RUNNING</value>
    </property>
    <property>
        <name>yarn.scheduler.capacity.root.default.acl_submit_applications</name>
        <value>*</value>
    </property>
    <property>
        <name>yarn.scheduler.capacity.root.default.acl_administer_queue</name>
        <value>*</value>
    </property>
    <property>
        <name>yarn.scheduler.capacity.root.business.capacity</name>
        <value>30</value>
    </property>
    <property>
        <name>yarn.scheduler.capacity.root.business.user-limit-factor</name>
        <value>1</value>
    </property>
    <property>
        <name>yarn.scheduler.capacity.root.business.maximum-capacity</name>
        <value>30</value>
    </property>
    <property>
        <name>yarn.scheduler.capacity.root.business.state</name>
        <value>RUNNING</value>
    </property>
    <property>
        <name>yarn.scheduler.capacity.root.business.acl_submit_applications</name>
        <value>*</value>
    </property>
    <property>
        <name>yarn.scheduler.capacity.root.business.acl_administer_queue</name>
        <value>*</value>
    </property>
    <property>
        <name>yarn.scheduler.capacity.root.platform.capacity</name>
        <value>20</value>
    </property>
    <property>
        <name>yarn.scheduler.capacity.root.platform.user-limit-factor</name>
        <value>1</value>
    </property>
    <property>
        <name>yarn.scheduler.capacity.root.platform.maximum-capacity</name>
        <value>20</value>
    </property>
    <property>
        <name>yarn.scheduler.capacity.root.platform.state</name>
        <value>RUNNING</value>
    </property>
    <property>
        <name>yarn.scheduler.capacity.root.platform.acl_submit_applications</name>
        <value>*</value>
    </property>
    <property>
        <name>yarn.scheduler.capacity.root.platform.acl_administer_queue</name>
        <value>*</value>
    </property>
    <property>
        <name>yarn.scheduler.capacity.node-locality-delay</name>
        <value>40</value>
    </property>
    <property>
        <name>yarn.scheduler.capacity.queue-mappings</name>
        <value></value>
    </property>
    <property>
        <name>yarn.scheduler.capacity.queue-mappings-override.enable</name>
        <value>false</value>
    </property>
    <property>
        <name>yarn.scheduler.capacity.per-node-heartbeat.maximum-offswitch-assignments</name>
        <value>1</value>
    </property>
</configuration>
install sqoop1 on mac
brew install sqoop
#if you have set env profiles, uncomment profiles in conf/sqoop-env.sh
1.MySQL -> HDFS
1.1.import table
sqoop import --connect jdbc:mysql://localhost/test --direct --username root --P --table t1 --warehouse-dir /mysql/test --fields-terminated-by ','
1.2.import schema
sqoop import-all-tables --connect jdbc:mysql://localhost/test --direct --username root -P --warehouse-dir /mysql/test --fields-terminated-by ','
2.MySQL -> Hive
2.1.import definition
sqoop create-hive-table --connect jdbc:mysql://localhost/test --table t1 --username root --P --hive-database test
2.2.import table
sqoop import --connect jdbc:mysql://localhost/test --username root --P --table t1 --hive-import --hive-database test --hive-table t1 --fields-terminated-by ','
2.3.import schema
sqoop import-all-tables --connect jdbc:mysql://localhost/test --username root --P --hive-import --hive-database test --fields-terminated-by ','
3.MySQL -> HBase
3.1.definition
sqoop import --connect jdbc:mysql://localhost/test --username root --P --table t1
3.2.import table, need create table in hbase first
sqoop import --connect jdbc:mysql://localhost/test --username root --P --table t1 --hbase-bulkload --hbase-table test.t1 --column-family basic --fields-terminated-by ','
3.3.import table without creating table in hbase, but pay attention to hbase/sqoop version
sqoop import --connect jdbc:mysql://localhost/test --username root --P --table t1 --hbase-bulkload --hbase-create-table --hbase-table test.t1 --column-family basic --fields-terminated-by ','
4.HDFS/Hive/HBase -> MySQL
sqoop export --connect jdbc:mysql://localhost/test --username root --P --table t1 --export-dir /user/hive/warehouse/test.db/t1 --fields-terminated-by ','

fitness 17:41 on 2018-05-06 Permalink |
Yes! Finally something about fitness.
LikeLike