not good..

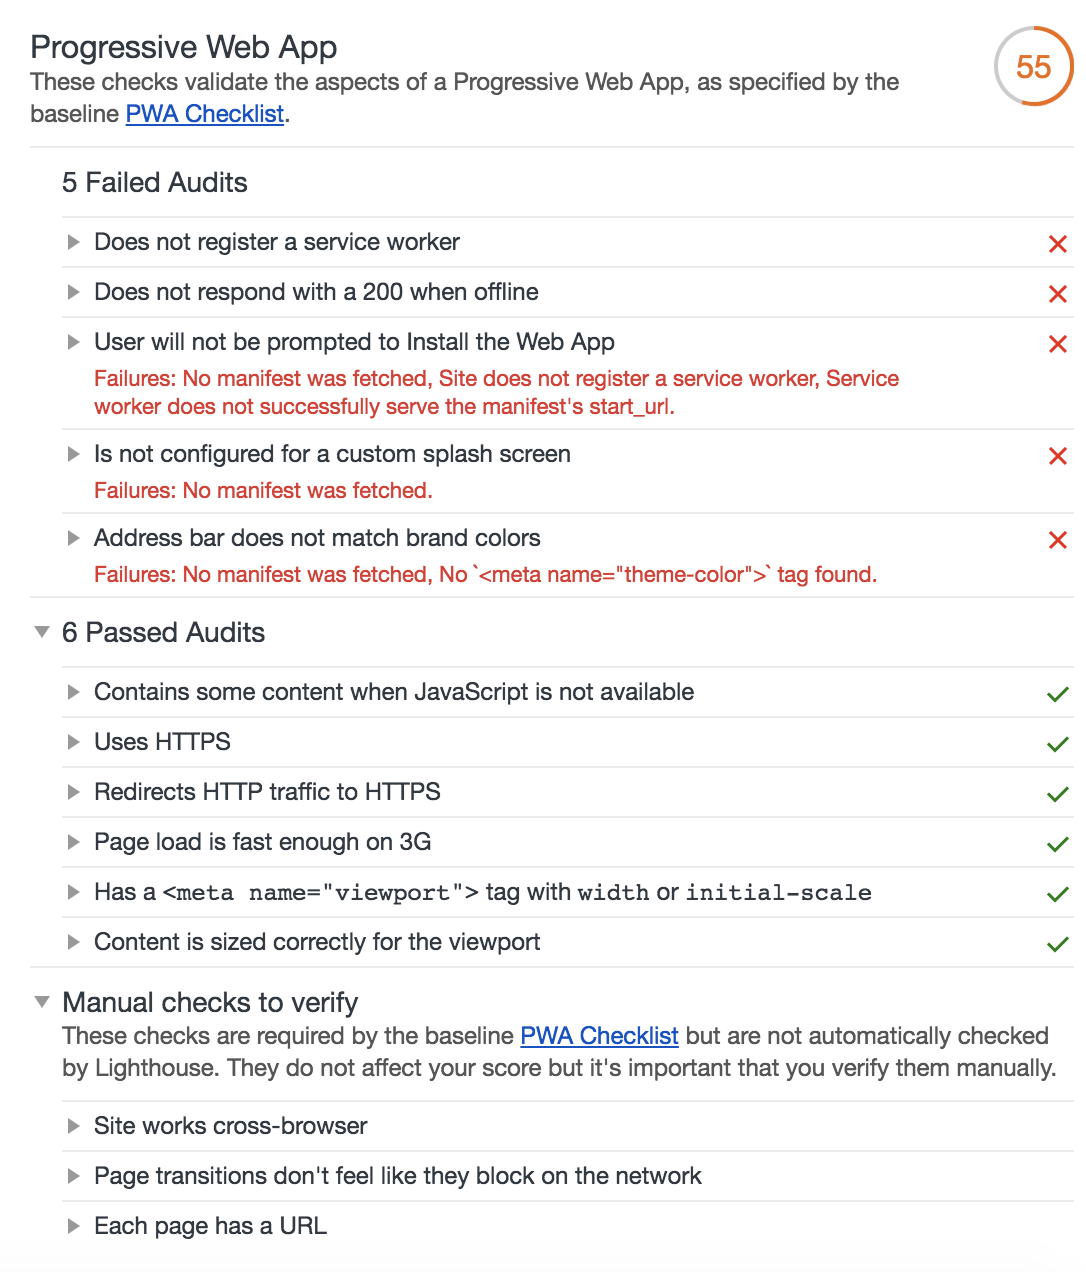
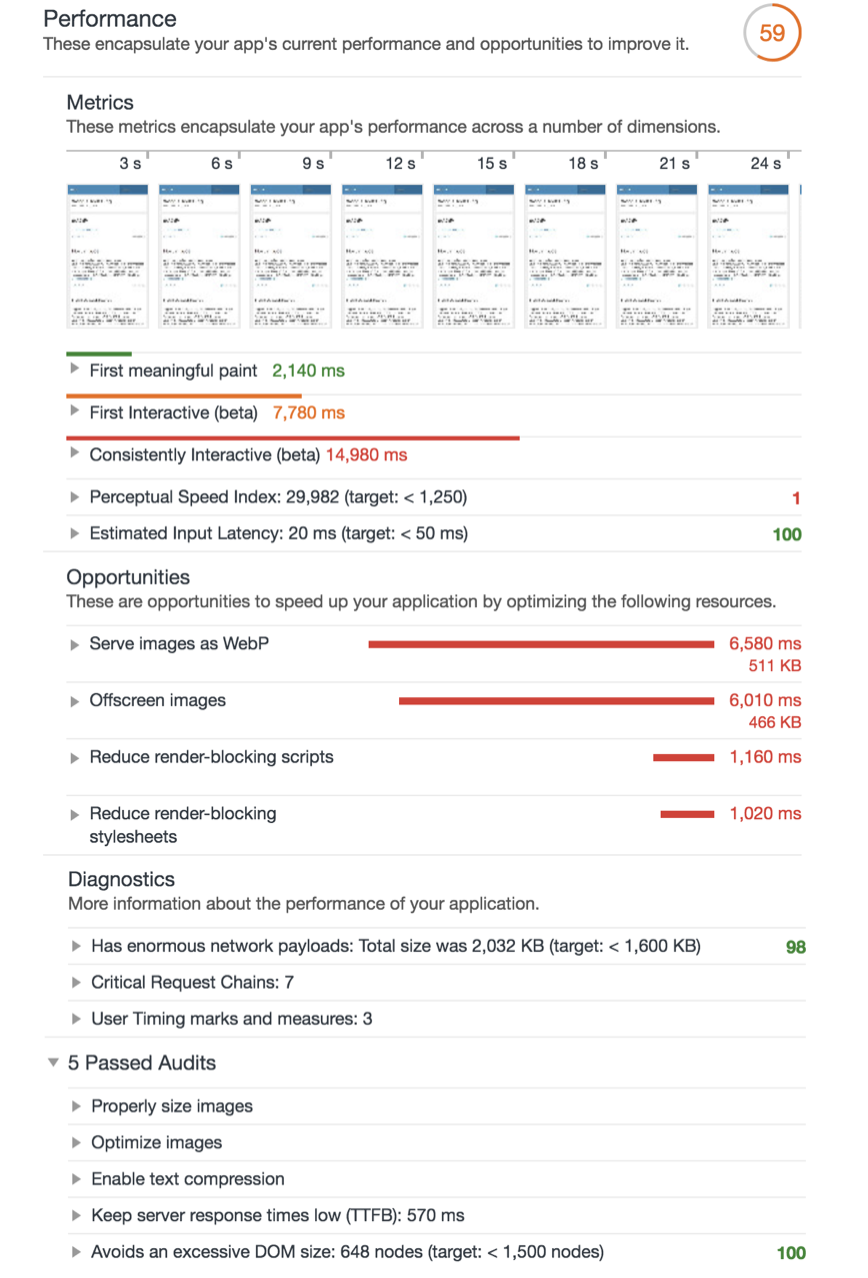

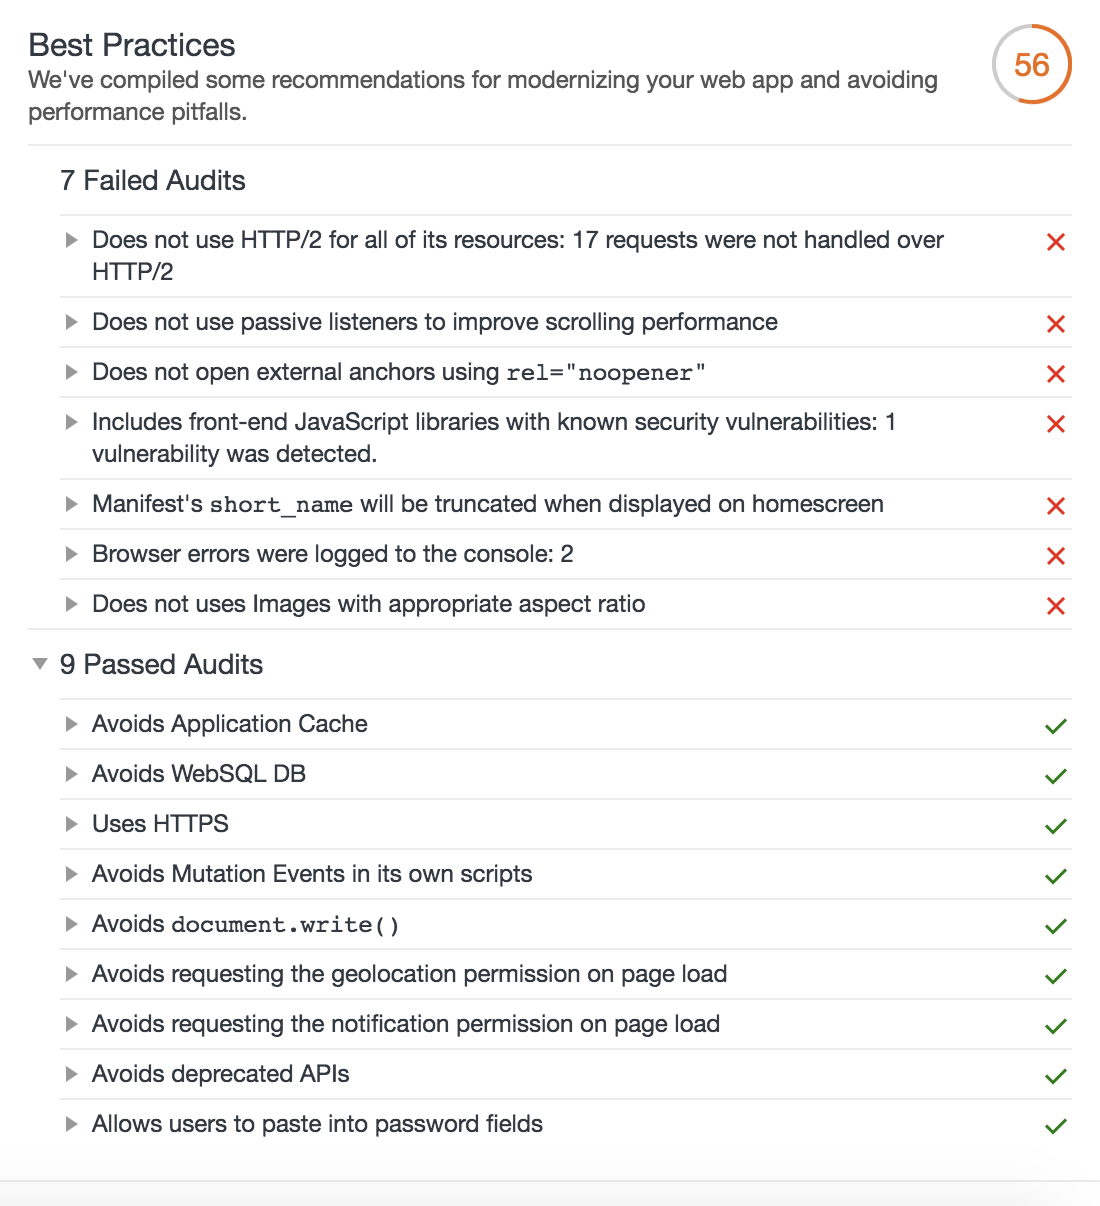


not good..
GBIF, global biodiversity information facility which contains huge data, I think it’s good to do analysis with gbif’s data sample.
Please follow the web’s instruction to download the sample dataset.
After doing this, I imported the dataset into hive, below are the steps.
1.create hdfs path
hdfs dfs -mkdir -p /user/hive/gbif/0004998
2.upload dataset into hdfs’s directory which was created on step 1
hdfs dfs -copyFromLocal /Users/wanghongmeng/Desktop/0004998-180131172636756.csv /user/hive/gbif/0004998
3.create hive table and load dataset
CREATE EXTERNAL TABLE gbif_0004998_ori (
gbifid string,
datasetkey string,
occurrenceid string,
kingdom string,
...
...
establishmentmeans string,
lastinterpreted string,
mediatype string,
issue string)
ROW FORMAT DELIMITED
FIELDS TERMINATED BY 't'
STORED as TEXTFILE
LOCATION '/user/hive/gbif/0004998'
tblproperties ('skip.header.line.count'='1');
4.create new hive table by snappy compression, then drop origin table
CREATE TABLE gbif.gbif_0004998
STORED AS ORC
TBLPROPERTIES("orc.compress"="snappy")
AS SELECT * FROM gbif.gbif_0004998_ori;

drop table gbif.gbif_0004998_ori;
5.check hive table’s infomation
hive> desc formatted gbif_0004998;
OK
# col_name data_type comment

gbifid string
datasetkey string
occurrenceid string
kingdom string
phylum string
...
...
# Detailed Table Information
Database: gbif
Owner: wanghongmeng
CreateTime: Wed Feb 7 21:28:25 JST 2018
LastAccessTime: UNKNOWN
Retention: 0
Location: hdfs://localhost:9000/user/hive/warehouse/gbif.db/gbif_0004998
Table Type: MANAGED_TABLE
Table Parameters:
COLUMN_STATS_ACCURATE {"BASIC_STATS":"true"}
numFiles 1
numRows 327316
orc.compress snappy
rawDataSize 1319738112
totalSize 13510344
transient_lastDdlTime 1519457306

# Storage Information
SerDe Library: org.apache.hadoop.hive.ql.io.orc.OrcSerde
InputFormat: org.apache.hadoop.hive.ql.io.orc.OrcInputFormat
OutputFormat: org.apache.hadoop.hive.ql.io.orc.OrcOutputFormat
Compressed: No
Num Buckets: -1
Bucket Columns: []
Sort Columns: []
Storage Desc Params:
serialization.format 1
Time taken: 0.078 seconds, Fetched: 74 row(s)
6.check data
hive> select * from gbif.gbif_0004998 limit 5;
OK
1633594438 8130e5c6-f762-11e1-a439-00145eb45e9a KINGDOM incertae sedis EE Põhja-Kiviõli opencast mine 70488160-b003-11d8-a8af-b8a03c50a862 59.366475 26.8873 1000.0 2010-04-30T02:00Z 30 4 2010 0 FOSSIL_SPECIMEN Institute of Geology at TUT GIT 343-200 Toom CC_BY_NC_4_0 Toom 2018-02-02T20:24Z STILLIMAGE GEODETIC_DATUM_ASSUMED_WGS84;TAXON_MATCH_NONE
1633594440 8130e5c6-f762-11e1-a439-00145eb45e9a KINGDOM incertae sedis EE Neitla Quarry 70488160-b003-11d8-a8af-b8a03c50a862 59.102247 25.762486 10.0 2012-09-12T02:00Z 12 9 2012 0 FOSSIL_SPECIMEN Institute of Geology at TUT GIT 362-272 CC_BY_NC_4_0 Toom 2018-02-02T20:24Z STILLIMAGE GEODETIC_DATUM_ASSUMED_WGS84;TAXON_MATCH_NONE
1633594442 8130e5c6-f762-11e1-a439-00145eb45e9a KINGDOM incertae sedis EE Päri quarry 70488160-b003-11d8-a8af-b8a03c50a862 58.840459 24.042791 10.0 2014-05-23T02:00Z 23 5 2014 0 FOSSIL_SPECIMEN Institute of Geology at TUT GIT 340-303 Toom CC_BY_NC_4_0 Hints, O. 2018-02-02T20:24Z STILLIMAGE GEODETIC_DATUM_ASSUMED_WGS84;TAXON_MATCH_NONE
1633594445 8130e5c6-f762-11e1-a439-00145eb45e9a KINGDOM incertae sedis EE Saxby shore 70488160-b003-11d8-a8af-b8a03c50a862 59.027778 23.117222 10.0 2017-06-17T02:00Z 17 6 2017 0 FOSSIL_SPECIMEN Institute of Geology at TUT GIT 362-544 Toom CC_BY_NC_4_0 Toom 2018-02-02T20:24Z STILLIMAGE GEODETIC_DATUM_ASSUMED_WGS84;TAXON_MATCH_NONE
1633594446 8130e5c6-f762-11e1-a439-00145eb45e9a KINGDOM incertae sedis EE Saxby shore 70488160-b003-11d8-a8af-b8a03c50a862 59.027778 23.117222 10.0 2017-06-17T02:00Z 17 6 2017 0 FOSSIL_SPECIMEN Institute of Geology at TUT GIT 362-570 CC_BY_NC_4_0 Baranov 2018-02-02T20:24Z GEODETIC_DATUM_ASSUMED_WGS84;TAXON_MATCH_NONE
Time taken: 0.172 seconds, Fetched: 5 row(s)
When I run hive, I got error as below:
Exception in thread "main" java.lang.ClassCastException: java.base/jdk.internal.loader.ClassLoaders$AppClassLoader cannot be cast to java.base/java.net.URLClassLoader
at org.apache.hadoop.hive.ql.session.SessionState.(SessionState.java:394)
at org.apache.hadoop.hive.ql.session.SessionState.(SessionState.java:370)
at org.apache.hadoop.hive.cli.CliSessionState.(CliSessionState.java:60)
at org.apache.hadoop.hive.cli.CliDriver.run(CliDriver.java:708)
at org.apache.hadoop.hive.cli.CliDriver.main(CliDriver.java:686)
at java.base/jdk.internal.reflect.NativeMethodAccessorImpl.invoke0(Native Method)
at java.base/jdk.internal.reflect.NativeMethodAccessorImpl.invoke(NativeMethodAccessorImpl.java:62)
at java.base/jdk.internal.reflect.DelegatingMethodAccessorImpl.invoke(DelegatingMethodAccessorImpl.java:43)
at java.base/java.lang.reflect.Method.invoke(Method.java:564)
at org.apache.hadoop.util.RunJar.run(RunJar.java:234)
at org.apache.hadoop.util.RunJar.main(RunJar.java:148)
I’m wired about the error that cast class in different jdk versions, I have set JAVA_HOME in profile, why I still got this error?
I tested java version, it’s jdk1.8
wanghongmeng:2.3.1 gizmo$ java -version
java version "1.8.0_151"
Java(TM) SE Runtime Environment (build 1.8.0_151-b12)
Java HotSpot(TM) 64-Bit Server VM (build 25.151-b12, mixed mode)
But when I checked jdk’s installed directory, I found /Library/Java/Home was linked to jdk9’s home, I never used jdk9, so I uninstalled jdk9, and linked /Library/Java/Home to jdk1.8’s home.
After this, problem solved.😀😀
dapanji!!

I applied GCE recently, so I installed Mesos/Marathon for test.
Compute Engine: n1-standard-1 (1 vCPU, 3.75 GB, Intel Ivy Bridge, asia-east1-a region)
OS: CentOS 7
10.140.0.1 master
10.140.0.2 slave1
10.140.0.3 slave2
10.140.0.4 slave3
Prepare
1.install git
sudo yum install -y tar wget git
2.install and import apache maven repository
sudo wget http://repos.fedorapeople.org/repos/dchen/apache-maven/epel-apache-maven.repo -O /etc/yum.repos.d/epel-apache-maven.repo
sudo yum install -y epel-release
sudo bash -c 'cat > /etc/yum.repos.d/wandisco-svn.repo <<EOF
[WANdiscoSVN]
name=WANdisco SVN Repo 1.9
enabled=1
baseurl=http://opensource.wandisco.com/centos/7/svn-1.9/RPMS/$basearch/
gpgcheck=1
gpgkey=http://opensource.wandisco.com/RPM-GPG-KEY-WANdisco
EOF'
3.install tools
sudo yum update systemd
sudo yum groupinstall -y "Development Tools"
sudo yum install -y apache-maven python-devel python-six python-virtualenv java-1.8.0-openjdk-devel zlib-devel libcurl-devel openssl-devel cyrus-sasl-devel cyrus-sasl-md5 apr-devel subversion-devel apr-util-devel
Installation
1.append hosts
cat << EOF >>/etc/hosts
10.140.0.1 master
10.140.0.2 slave1
10.140.0.3 slave2
10.140.0.4 slave3
EOF
2.zookeeper
2.1.install zookeeper on slave1/slave2/slave3
2.2.modify conf/zoo.cfg on slave1/slave2/slave3
cat << EOF > conf/zoo.cfg
tickTime=2000
initLimit=10
syncLimit=5
dataDir=./data
clientPort=2181
maxClientCnxns=0
autopurge.snapRetainCount=3
autopurge.purgeInterval=0
leaderServes=yes
skipAcl=no
server.1=slave1:2888:3888
server.2=slave2:2889:3889
server.3=slave3:2890:3890
EOF
2.3.create data folder, and write serverid to myid on slave1/slave2/slave3, id is equals server’s sequence
mkdir data && echo ${id} > data/myid
2.4.start zookeeper on slave1/slave2/slave3, check zk’s status
bin/zkServer.sh start
bin/zkServer.sh status
3.mesos
3.1.install and import mesos repository on each server
rpm -Uvh http://repos.mesosphere.io/el/7/noarch/RPMS/mesosphere-el-repo-7-1.noarch.rpm
rpm --import /etc/pki/rpm-gpg/RPM-GPG-KEY-mesosphere
3.2.install mesos on each server
yum install mesos -y
3.3.modify mesos-master’s zk address on master/slave1
echo "zk://slave1:2181,slave2:2181,slave3:2181/mesos" >/etc/mesos/zk
3.4.modify quorum of mesos-master on master/slave1
echo 2 > /etc/mesos-master/quorum
3.5. start master and enable auto start on master/slave1
systemctl enable mesos-master.service
systemctl start mesos-slave.service
3.6.start slave and enable auto start on slave1/slave2/slave3
systemctl enable mesos-slave.service
systemctl start mesos-slave.service
4.marathon
4.1.install marathon on master
yum install marathon -y
4.2.config master/zk address on master
cat << EOF >>/etc/default/marathon
MARATHON_MASTER="zk://slave1:2181,slave2:2181,slave3:2181/mesos"
MARATHON_ZK="zk://slave1:2181,slave2:2181,slave3:2181/marathon"
EOF
4.3.start marathon and enable auto start on master
systemctl enable marathon.service
systemctl start marathon.service
Test
mesos: http://master:5050
marathon: http://master:8080w
I received alert email that my website crushed down, after checking, I found mysql container is stoped..
I checked system log, found infos as below:
Jan 22 18:42:39 ip-172-31-28-84 kernel: Out of memory: Kill process 597 (mysqld) score 226 or sacrifice child
Jan 22 18:42:39 ip-172-31-28-84 kernel: Killed process 597 (mysqld) total-vm:1128616kB, anon-rss:228980kB, file-rss:0kB, shmem-rss:0kB
I think the process is killed by kernel for lack of memory, because the server only has 1GB memory ..
[root@ip-172-31-28-84 log]# free -h
              total        used        free      shared  buff/cache   available
Mem:           990M        559M         83M        113M        348M        133M
Swap:            0B          0B          0B
I restarted mysql container, and check containers’s status:
[root@ip-172-31-28-84 log]# docker stats --no-stream
CONTAINER           CPU %               MEM USAGE / LIMIT     MEM %               NET I/O             BLOCK I/O           PIDS
9e5a47485105        0.00%               28.66MiB / 990.8MiB   2.89%               90.9MB / 43.2MB     24.9MB / 0B         2
c9187825cc0c        0.00%               273.8MiB / 990.8MiB   27.63%              3.95GB / 1.02GB     11GB / 2.58MB       11
628e301d00a1        0.04%               217.9MiB / 990.8MiB   21.99%              10.4MB / 136MB      101MB / 363MB       31
there is no limitation on resources, so mysql will occupy more memory which caused being killed.
After thinking about this, I decided deploy by docker swarm which will start container if stoped, and also could restrict resources for every container.
1.init docker swarm on single server
docker swarm init
2.modify blog-compose.yml to support swarm, please follow gist
https://gist.githubusercontent.com/hongmengwang/c5ca0368f5de15a612972c4bb676d409/raw/d8d706bb42769f20506d00f01603f34686b4fac9/blog-compose.yml
3.deploy service
docker stack deploy -c blog-compose.yml blog
4.check container status
[root@ip-172-31-28-84 docker]# docker stack services blog
ID                  NAME                MODE                REPLICAS            IMAGE               PORTS
0l68syg6q1bi        blog_nginx          replicated          1/1                 nginx:1.13.8        *:80->80/tcp,*:443->443/tcp
cx82xalbzdzu        blog_wordpress      replicated          1/1                 wordpress:4.9.1
xulj5sbkbapb        blog_mysql          replicated          1/1                 mysql:5.7
5.check container stats
[root@ip-172-31-28-84 docker]# docker stats --no-stream
CONTAINER           CPU %               MEM USAGE / LIMIT   MEM %               NET I/O             BLOCK I/O           PIDS
08bc88c00f0c        0.04%               189.7MiB / 250MiB   75.86%              70.5kB / 1.02MB     14MB / 13.9MB       30
64d37b150392        0.00%               29.02MiB / 50MiB    58.05%              12.6kB / 14.7kB     1.24MB / 0B         2
f33ecf2c045e        0.00%               92.32MiB / 300MiB   30.77%              1.03MB / 76.8kB     27.8MB / 0B         9
The memory of each container is restricted, it will not occupy more memory than limitation, I will keep on watching to see if works well.
I registed my domain “wanghongmeng.com” on Aliyun, and applied free EC2 server for one year on AWS.
After building my blog on AWS, I set A parse to the server’s IP of AWS.
But yesterday I received email from Aliyun which said that my server was not in Aliyun after they checking, it was not allowed, I have to miggrate my blog server to Aliyun, otherwise they will undo my authority number.
After thinking about this, for saving money(Aliyun is not free for one year), I solved it by the way below:
1.Set A parse to my friend’s server ip which was bought in Aliyun
2.Add a piece of configuration in his nginx.conf:
server {
    listen  80;
    server_name  wanghongmeng.com www.wanghongmeng.com;

    location / {
        rewrite ^/(.*)$ https://$server_name/$1 permanent;
    }
}

server {
    listen 443;
    server_name wanghongmeng.com www.wanghongmeng.com;
    ssl on;
    ssl_certificate "Location of Pem File";
    ssl_certificate_key "Location of Key File";
    ssl_session_timeout 5m;
    ssl_protocols TLSv1 TLSv1.1 TLSv1.2;
    ssl_ciphers "Your Algorithm";
    ssl_session_cache shared:SSL:50m;
    ssl_prefer_server_ciphers on;

    location / {
        proxy_pass  http://AWS's IP:443/;
    }
}
3.Expose 443 port on my AWS, and only accept requests from my friend’s server IP:
server {
    listen  443;

    set $flag 0;
    if ($host = 'www.wanghongmeng.com') {
        set $flag 1;
    }
    if ($host = 'wanghongmeng.com') {
        set $flag 1;
    }
    if ($flag = 0){
        return 403;
    }

    location / {
        allow "My Friend's Server IP";
        proxy_pass  http://blog-ip;
    }
}
Things done! 😀😀
I thought something before, when I check nginx’s log, I found a wired hostname.
After checking, I think our website was mirrored.
I think they parsed their domain by CNAME to our domain, and we don’t do any host check at that time.
To prevent being mirrored again, I add host check configuration in nginx.conf
set $flag 0;
if ($host = 'www.wanghongmeng.com') {
    set $flag 1;
}
if ($host = 'wanghongmeng.com') {
    set $flag 1;
}
if ($flag = 0){
    return 403;
}
By adding this, nginx will check every request to see if it’s from our domain, if not, return 403 response code.
After this, our website was no longer mirrored again.
Nginx Version: 1.9.12
switch..😂😂

Reply