Tagged: Cloud Toggle Comment Threads | Keyboard Shortcuts

  • Unknown's avatar

    Wang 21:44 on 2018-11-20 Permalink | Reply
    Tags: , Cloud, , , , ,   

    Sticky session in Kubernetes 

    As we know RESTful API is stateless, every request will be forward to backend server by round robin mechanism.

    But in some scenario we need sticky session which means request from one client should be forward to one backend server.

    After checking kubernetes documentation we added some annotations under ingress configuration, and it works well.

    annotations:
      nginx.ingress.kubernetes.io/affinity: "cookie"
      nginx.ingress.kubernetes.io/session-cookie-name: "router"
      nginx.ingress.kubernetes.io/session-cookie-hash: "sha1"
    

    If you open Developer Tools in Chrome, you will find the cookie.

     
  • Unknown's avatar

    Wang 22:21 on 2018-11-05 Permalink | Reply
    Tags: , Cloud, , , , , , ,   

    [Presto] Secure with LDAP 

    For security issue we decided to enable LDAP in presto, to deploy presto into kubernetes cluster we build presto image ourselves which include kerberos authentication and LDAP configurations.

    As you see the image structure, configurations under catalog/etc/hive are very important, please pay attention.

    krb5.conf and xxx.keytab are used to connect to kerberos

    password-authenticator.properties and ldap_server.pem under etc, hive.properties and hive-security.json under catalog are used to connect to LDAP.

    password-authenticator.properties

    password-authenticator.name=ldap
    ldap.url=ldaps://<IP>:<PORT>
    ldap.user-bind-pattern=xxxxxx
    ldap.user-base-dn=xxxxxx
    

    hive.properties

    connector.name=hive-hadoop2
    hive.security=file
    security.config-file=<hive-security.json>
    hive.metastore.authentication.type=KERBEROS
    hive.metastore.uri=thrift://<IP>:<PORT>
    hive.metastore.service.principal=<SERVER-PRINCIPAL>
    hive.metastore.client.principal=<CLIENT-PRINCIPAL>
    hive.metastore.client.keytab=<KEYTAB>
    hive.config.resources=core-site.xml, hdfs-site.xml
    

    hive-security.json

    {
      "schemas": [{
        "user": "user_1",
        "schema": "db_1",
        "owner": false
      }, {
        "user": " ",
        "schema": "db_1",
        "owner": false
      }, {
        "user": "user_2",
        "schema": "db_2",
        "owner": false
      }],
      "tables": [{
        "user": "user_1",
        "schema": "db_1",
        "table": "table_1",
        "privileges": ["SELECT"]
      }, {
        "user": "user_1",
        "schema": "db_1",
        "table": "table_2",
        "privileges": ["SELECT"]
      }, {
        "user": "user_2",
        "schema": "db_1",
        "table": ".*",
        "privileges": ["SELECT"]
      }, {
        "user": "user_2",
        "schema": "db_2",
        "table": "table_1",
        "privileges": ["SELECT"]
      }, {
        "user": "user_2",
        "schema": "db_2",
        "table": "table_2",
        "privileges": ["SELECT"]
      }],
      "sessionProperties": [{
        "allow": false
      }]
    }
    
     
  • Unknown's avatar

    Wang 22:30 on 2018-10-15 Permalink | Reply
    Tags: Cloud, , , ,   

    Jenkins pipeline & kubernetes 

    We build deployment pipeline by Jenkins, Git, Maven, Docker, JFrog, Kubernetes, Slack, below is overall process:

    develop -> create branch -> push code -> git hook -> jenkins build -> code check -> unit test -> docker build -> push docker image -> deploy -> notificationa
    

    For every project we generate pipeline scripts by JHipster like this:

    ci contains docker related scripts, cd contains kubernetes related scripts.

    We configured Jenkins to scan projects from git automatically which followed naming rule, if any changes on git, Jenkins will pull the code and start building.

     
  • Unknown's avatar

    Wang 22:43 on 2018-10-08 Permalink | Reply
    Tags: , Cloud, , , , , ,   

    Nginx ingress in kubernetes 

    There are 3 ways to expose your service: NodePort, LoadBalancer, Ingress, next I will introduce about how to use ingress.

    1.Deploy ingress controller

    You need deploy ingress controller at first which will start nginx pods, then nginx will bind domains and listen to the requests.

    I built a common ingress chart for different service, I only need change values-<service>.yaml and deploy script if any changes.

    Another key point is that you must be clear about ingress-class, different service use different ingress-class, it will be quite messy if you mistake them.

    args:
      - /nginx-ingress-controller
      - --default-backend-service=$(POD_NAMESPACE)/default-http-backend
      - --configmap=$(POD_NAMESPACE)/nginx-configuration
      - --tcp-services-configmap=$(POD_NAMESPACE)/tcp-services
      - --udp-services-configmap=$(POD_NAMESPACE)/udp-services
      - --ingress-class={{ .Values.server.namespace }}
      - --sort-backends=true
    

    2.Configure service ingress

    Next we need configure service ingress which will append nginx server configuration dynamically.

    I also built a service chart which include environment configurations, Jenkins & Helm will use different values-<env>.yaml when execute pipeline deployment.

    Ingress example:

    apiVersion: extensions/v1beta1
    kind: Ingress
    metadata:
      name: {{ .Values.app.name }}{{ .Values.deploy.subfix }}
      namespace: {{ .Values.app.namespace }}
      annotations:
        kubernetes.io/ingress.class: "{{ .Values.ingress.class }}"
        kubernetes.io/tls-acme: "true"
        nginx.ingress.kubernetes.io/enable-cors: "false"
        nginx.ingress.kubernetes.io/rewrite-target: /
        nginx.ingress.kubernetes.io/proxy-body-size: 10m
    spec:
      rules:
      - host: {{ .Values.ingress.hostname }}
        http:
          paths:
          - path: {{ .Values.ingress.path }}
            backend:
              serviceName: {{ .Values.app.name }}{{ .Values.deploy.subfix }}
              servicePort: {{ .Values.container.port }}


  • Unknown's avatar

    Wang 21:23 on 2018-09-06 Permalink | Reply
    Tags: Cloud, , , ,   

    Probe in kubernetes 

    There’s two kinds of probe: readinessProbe, livenessProbe in kubernetes used to detect if your service is healthy.

    We encountered a problem when configured readinessProbe, there’s a property named initialDelaySeconds which indicate kubernetes will start health check after specific second, we used the default value 60 which means kubernetes will check health after 60 seconds.

    readinessProbe:
      initialDelaySeconds: 60
      timeoutSeconds: 5
    

    As we deployed over 20 StatefulSet pods and these pods joined as a cluster which cost over 60 seconds, kubernetes can’t ping service successfully so that kubernetes restart these pods, thees pods restart in loop all the time.

    After we increased the initialDelaySeconds to 120, everything goes fine.

     
  • Unknown's avatar

    Wang 21:56 on 2018-08-22 Permalink | Reply
    Tags: Cloud, , , ,   

    Stateful deployment in kubernetes 

    If you deploy pod by setting “kind: Deployment“, you will lost your data when the pod restart or being deleted.

    It’s not acceptable when we want to deploy storage system like Redis, Elasticsearch, in this case we need use StatefulSet.

    For the concrete explanation please refer to the official documentation, StatefulSet use PVC(Persistent Volume Claim) as storage, and it will exist all the time no matter what happened to the pod.

    You must specify PVC in StatefulSet’s yaml file like this:

    volumeClaimTemplates:
    - metadata:
      name: redis
    spec:
      accessModes: [ "ReadWriteOnce" ]
      storageClassName: fast
      resources:
        requests:
          storage: 10Gi
    

    Please also pay attention to PVC’s name, there’s a rule for StatefulSet and PVC name mapping which IS NOT covered by documentation.

     
  • Unknown's avatar

    Wang 19:25 on 2018-08-11 Permalink | Reply
    Tags: , Cloud, , , ,   

    Auto scaling in kubernetes 

    When we deploy a API in kubernets we must define replication number for the pod, but as we know there will be high traffic during peak time and we usually can’t estimate service capacity exactly at first time, in this case we must scale our service like creating more pods to share online traffic to avoid service crash down.

    We usually scale service manually before using kubernetes, append more nodes during peak time and destroy nodes when the traffic became smooth.

    In kubernetes there’s a kind of feature called HPA(Horizontal Pod Autoscaler) which could help your scale service automatically. You could specify minimum and maximum replica number in yaml file, HPA will monitor pod’s CPU and Memory by collecting pod’s metric, if HPA found your pod’s metric is over the threshold number which you defined in yaml file, it will create more pods automatically and join the service cluster to load the traffic.

    Here is a simple HPA samle:

    apiVersion: autoscaling/v2beta1
    kind: HorizontalPodAutoscaler
    metadata:
      name: hpa-demo
      namespace: test-ns
      labels:
        app: hpa-demo
        component: api
    spec:
      scaleTargetRef:
        apiVersion: apps/v1
        kind: Deployment
        name: hpa-demo
      minReplicas: 3
      maxReplicas: 10
      metrics:
      - type: Resource
        resource:
          name: memory
          targetAverageUtilization: 75
      - type: Resource
        resource:
          name: cpu
          targetAverageUtilization: 75
    

    I defined there’s will be at least 3 replicas for the pod, if the CPU or Memory usage is over 75%, HPA will create at most 10 pods.

    HPA monitor pod’s metric by using metrics-server.

     
  • Unknown's avatar

    Wang 21:47 on 2018-07-27 Permalink | Reply
    Tags: Cloud, ,   

    Build kubernetes cluster 

    As you know kubernetes is the most popular container orchestration tool which helps us deploy/manage/scale container and service more easily.

    We deploy kubernetes cluster by kuberspray which could help us build production ready cluster very fast and provide many convenient tools. Before start deploying you must configure SSH key between nodes.

     
  • Unknown's avatar

    Wang 21:43 on 2018-03-02 Permalink | Reply
    Tags: , , Cloud, , , , , ,   

    [GCP ] Install bigdata cluster 

    I applied google cloud for trial which give me 300$, so I initialize 4 severs to do test.

    Servers:

    Host

    OS

    Memory

    CPU

    Disk

    Region

    master.c.ambari-195807.internal

    CentOS 7

    13 GB

    Intel Ivy Bridge: 2

    200G

    asia-east1-a

    slave1.c.ambari-195807.internal

    CentOS 7

    13 GB

    Intel Ivy Bridge: 2

    200G

    asia-east1-a

    slave2.c.ambari-195807.internal

    CentOS 7

    13 GB

    Intel Ivy Bridge: 2

    200G

    asia-east1-a

    slave3.c.ambari-195807.internal

    CentOS 7

    13 GB

    Intel Ivy Bridge: 2

    200G

    asia-east1-a

    1.prepare

    1.1.configure ssh key on each slave to make master login without password

    1.2.install jdk1.8 on each server, download, set JAVA_HOME in profile

    1.3.configure hostnames in /etc/hosts on each server


    2.install hadoop

    2.1.download hadoop 2.8.2

    wget http://ftp.jaist.ac.jp/pub/apache/hadoop/common/hadoop-2.8.3/hadoop-2.8.3.tar.gz
    tar -vzxf hadoop-2.8.3.tar.gz && cd hadoop-2.8.3
    

    2.2.configure core-site.xml

    <property>
        <name>fs.default.name</name>
        <value>hdfs://master.c.ambari-195807.internal:9000</value> 
    </property>
    <property>
        <name>hadoop.tmp.dir</name>  
        <value>/data/hadoop/hdfs/tmp</value>
    </property>
    <property>
        <name>hadoop.http.filter.initializers</name>
        <value>org.apache.hadoop.security.HttpCrossOriginFilterInitializer</value>
    </property>
    

    2.3.configure hdfs-site.xml

    <property>
        <name>dfs.name.dir</name>
        <value>/data/hadoop/dfs/name</value>
    </property>
    <property>
        <name>dfs.data.dir</name>
        <value>/opt/hadoop/dfs/data</value>
    </property>
    <property>
        <name>dfs.replication</name>
        <value>3</value>
    </property>
    

    2.4.configure mapred-site.xml

    <property>  
        <name>mapred.job.tracker</name>  
        <value>master.c.ambari-195807.internal:49001</value>  
    </property>
    <property>
        <name>mapreduce.framework.name</name>  
        <value>yarn</value>  
    </property>
    <property>
        <name>mapred.local.dir</name>  
        <value>/data/hadoop/mapred</value>  
    </property>
    <property>
        <name>yarn.scheduler.minimum-allocation-mb</name>
        <value>2048</value>
    </property>
    <property>
        <name>yarn.scheduler.maximum-allocation-mb</name>
        <value>4096</value>
    </property>
      <property>
        <name>yarn.nodemanager.resource.memory-mb</name>
        <value>4096</value>
    </property>
    <property>
        <name>mapreduce.map.memory.mb</name>
        <value>4096</value>
    </property>
    <property>
        <name>mapreduce.reduce.memory.mb</name>
        <value>4096</value>
    </property>
    <property>
        <name>mapreduce.map.java.opts</name>
        <value>-Xmx6144m</value>
    </property>
    <property>
        <name>mapreduce.reduce.java.opts</name>
        <value>-Xmx6144m</value>
    </property>
    

    2.5.configure yarn-site.xml

    <property>  
        <name>yarn.resourcemanager.hostname</name>  
        <value>master.c.ambari-195807.internal</value>  
    </property>  
    <property>  
        <name>yarn.resourcemanager.address</name>  
        <value>${yarn.resourcemanager.hostname}:8032</value>  
    </property>  
    <property>  
        <name>yarn.resourcemanager.scheduler.address</name>  
        <value>${yarn.resourcemanager.hostname}:8030</value>  
    </property>  
    <property>  
        <name>yarn.resourcemanager.webapp.address</name>  
        <value>${yarn.resourcemanager.hostname}:8088</value>  
    </property>  
    <property>  
        <name>yarn.resourcemanager.webapp.https.address</name>  
        <value>${yarn.resourcemanager.hostname}:8090</value>  
    </property>  
    <property>  
        <name>yarn.resourcemanager.resource-tracker.address</name>  
        <value>${yarn.resourcemanager.hostname}:8031</value>  
    </property>  
    <property>  
        <name>yarn.resourcemanager.admin.address</name>  
        <value>${yarn.resourcemanager.hostname}:8033</value>  
    </property>  
    <property>
        <name>yarn.nodemanager.aux-services</name>
        <value>mapreduce_shuffle</value>
    </property>
    <property>
        <name>yarn.nodemanager.aux-services.mapreduce_shuffle.class</name>
        <value>org.apache.hadoop.mapred.ShuffleHandler</value>
    </property>
    <property>
        <name>yarn.timeline-service.enabled</name>
        <value>true</value>
    </property>
    <property>
        <name>yarn.resourcemanager.system-metrics-publisher.enabled</name>
        <value>true</value>
    </property>
    <property>
        <name>yarn.timeline-service.generic-application-history.enabled</name>
        <value>true</value>
    </property>
    <property>
        <name>yarn.timeline-service.http-cross-origin.enabled</name>
        <value>true</value>
    </property>
    <property>
        <name>yarn.timeline-service.hostname</name>
        <value>master.c.ambari-195807.internal</value>
    </property>
    <property>
        <name>yarn.resourcemanager.webapp.cross-origin.enabled</name>
        <value>true</value>
    </property>
    <property>
        <name>yarn.resourcemanager.address</name>
        <value>master.c.ambari-195807.internal:8032</value>
    </property>
    <property>
        <name>yarn.resourcemanager.scheduler.address</name>
        <value>master.c.ambari-195807.internal:8030</value>
    </property>
    <property>
        <name>yarn.resourcemanager.resource-tracker.address</name>
        <value>master.c.ambari-195807.internal:8031</value>
    </property>
    

    2.6.set slaves

    echo slave1.c.ambari-195807.internal >>slaves
    echo slave2.c.ambari-195807.internal >>slaves
    echo slave3.c.ambari-195807.internal >>slaves
    

    2.7.copy hadoop from master to each slave

    scp -r hadoop-2.8.3/ gizmo@slave1.c.ambari-195807.internal:/opt/apps/
    scp -r hadoop-2.8.3/ gizmo@slave2.c.ambari-195807.internal:/opt/apps/
    scp -r hadoop-2.8.3/ gizmo@slave3.c.ambari-195807.internal:/opt/apps/
    

    2.8.configure hadoop env profile

    echo 'export HADOOP_HOME=/opt/apps/hadoop-2.8.3' >>~/.bashrc
    echo 'export HADOOP_CONF_DIR=$HADOOP_HOME/etc/hadoop' >>~/.bashrc
    echo 'export PATH=$PATH:$HADOOP_HOME/sbin:$HADOOP_HOME/bin:$JAVA_HOME/bin' >>~/.bashrc
    

    2.9.start hdfs/yarn

    start-dfs.hs
    start-yarn.sh
    

    2.10.check

    hdfs, http://master.c.ambari-195807.internal:50070

    yarn, http://master.c.ambari-195807.internal:8088


    3.install hive

    3.1.download hive 2.3.2

    wget http://ftp.jaist.ac.jp/pub/apache/hive/hive-2.3.2/apache-hive-2.3.2-bin.tar.gz
    tar -zvxf apache-hive-2.3.2-bin.tar.gz && cd apache-hive-2.3.2-bin
    

    3.2.configure hive env profile

    echo 'export HIVE_HOME=/opt/apps/apache-hive-2.3.2-bin' >>~/.bashrc
    echo 'export PATH=$PATH:$HIVE_HOME/bin' >>~/.bashrc
    

    3.3.install mysql to store metadata

    rpm -ivh http://repo.mysql.com/mysql57-community-release-el7.rpm
    yum install -y mysql-server
    systemctl start mysqld
    mysql_password="pa12ss34wo!@d#"
    mysql_default_password=`grep 'temporary password' /var/log/mysqld.log | awk -F ': ' '{print $2}'`
    mysql -u root -p${mysql_default_password} -e "set global validate_password_policy=0; set global validate_password_length=4;" --connect-expired-password
    mysqladmin -u root -p${mysql_default_password} password ${mysql_password}
    mysql -u root -p${mysql_password} -e "create database hive default charset 'utf8'; flush privileges;"
    mysql -u root -p${mysql_password} -e "grant all privileges on hive.* to hive@'' identified by 'hive'; flush privileges;"
    

    3.4.download mysql driver

    wget http://central.maven.org/maven2/mysql/mysql-connector-java/5.1.45/mysql-connector-java-5.1.45.jar -O $HIVE_HOME/lib
    

    3.5.configure hive-site.xml

    <configuration>
        <property>
            <name>javax.jdo.option.ConnectionURL</name>
        </property>
        <property>
            <name>javax.jdo.option.ConnectionDriverName</name>
            <value>com.mysql.jdbc.Driver</value>
        </property>
        <property>
            <name>javax.jdo.option.ConnectionUserName</name>
            <value>hive</value>
        </property>
        <property>
            <name>javax.jdo.option.ConnectionPassword</name>
            <value>hive</value>
        </property>
    </configuration>
    

    3.6.initialize hive meta tables

    schematool -dbType mysql -initSchema
    

    3.7.test hive


    4.install tez

    4.1.please follow the instruction “install tez on single server” on each server


    5.install hbase

    5.1.download hbase 1.2.6

    wget http://ftp.jaist.ac.jp/pub/apache/hbase/1.2.6/hbase-1.2.6-bin.tar.gz
    tar -vzxf hbase-1.2.6-bin.tar.gz && cd hbase-1.2.6
    

    5.2.configure hbase-site.xml

    <property>
        <name>hbase.rootdir</name>
        <value>hdfs://master.c.ambari-195807.internal:9000/hbase</value>
    </property>
    <property>
        <name>hbase.master</name>
        <value>master</value>
    </property>
    <property>
        <name>hbase.cluster.distributed</name>
        <value>true</value>
    </property>
    <property>
        <name>hbase.zookeeper.property.clientPort</name>
        <value>2181</value>
    </property>
    <property>
        <name>hbase.zookeeper.quorum</name>
        <value>slave1.c.ambari-195807.internal,slave2.c.ambari-195807.internal,slave3.c.ambari-195807.internal</value>
    </property>
    <property>
        <name>dfs.support.append</name>
        <value>true</value>
    </property>
    <property>  
        <name>hbase.master.info.port</name>  
        <value>60010</value>  
    </property>
    

    5.3.configure regionservers

    echo slave1.c.ambari-195807.internal >>regionservers
    echo slave2.c.ambari-195807.internal >>regionservers
    echo slave3.c.ambari-195807.internal >>regionservers
    

    5.4.copy hbase from master to each slave

    5.5.configure hbase env profile

    echo 'export HBASE_HOME=/opt/apps/hbase-1.2.6' >>~/.bashrc 
    echo 'export PATH=$PATH:$HBASE_HOME/bin' >>~/.bashrc
    

    5.6.start hbase

    start-hbase.sh
    

    5.7.check, http://35.194.253.162:60010


    Things done!

     
  • Unknown's avatar

    Wang 22:13 on 2018-02-21 Permalink | Reply
    Tags: , , Cloud, ,   

    Manage BDP by ambari 

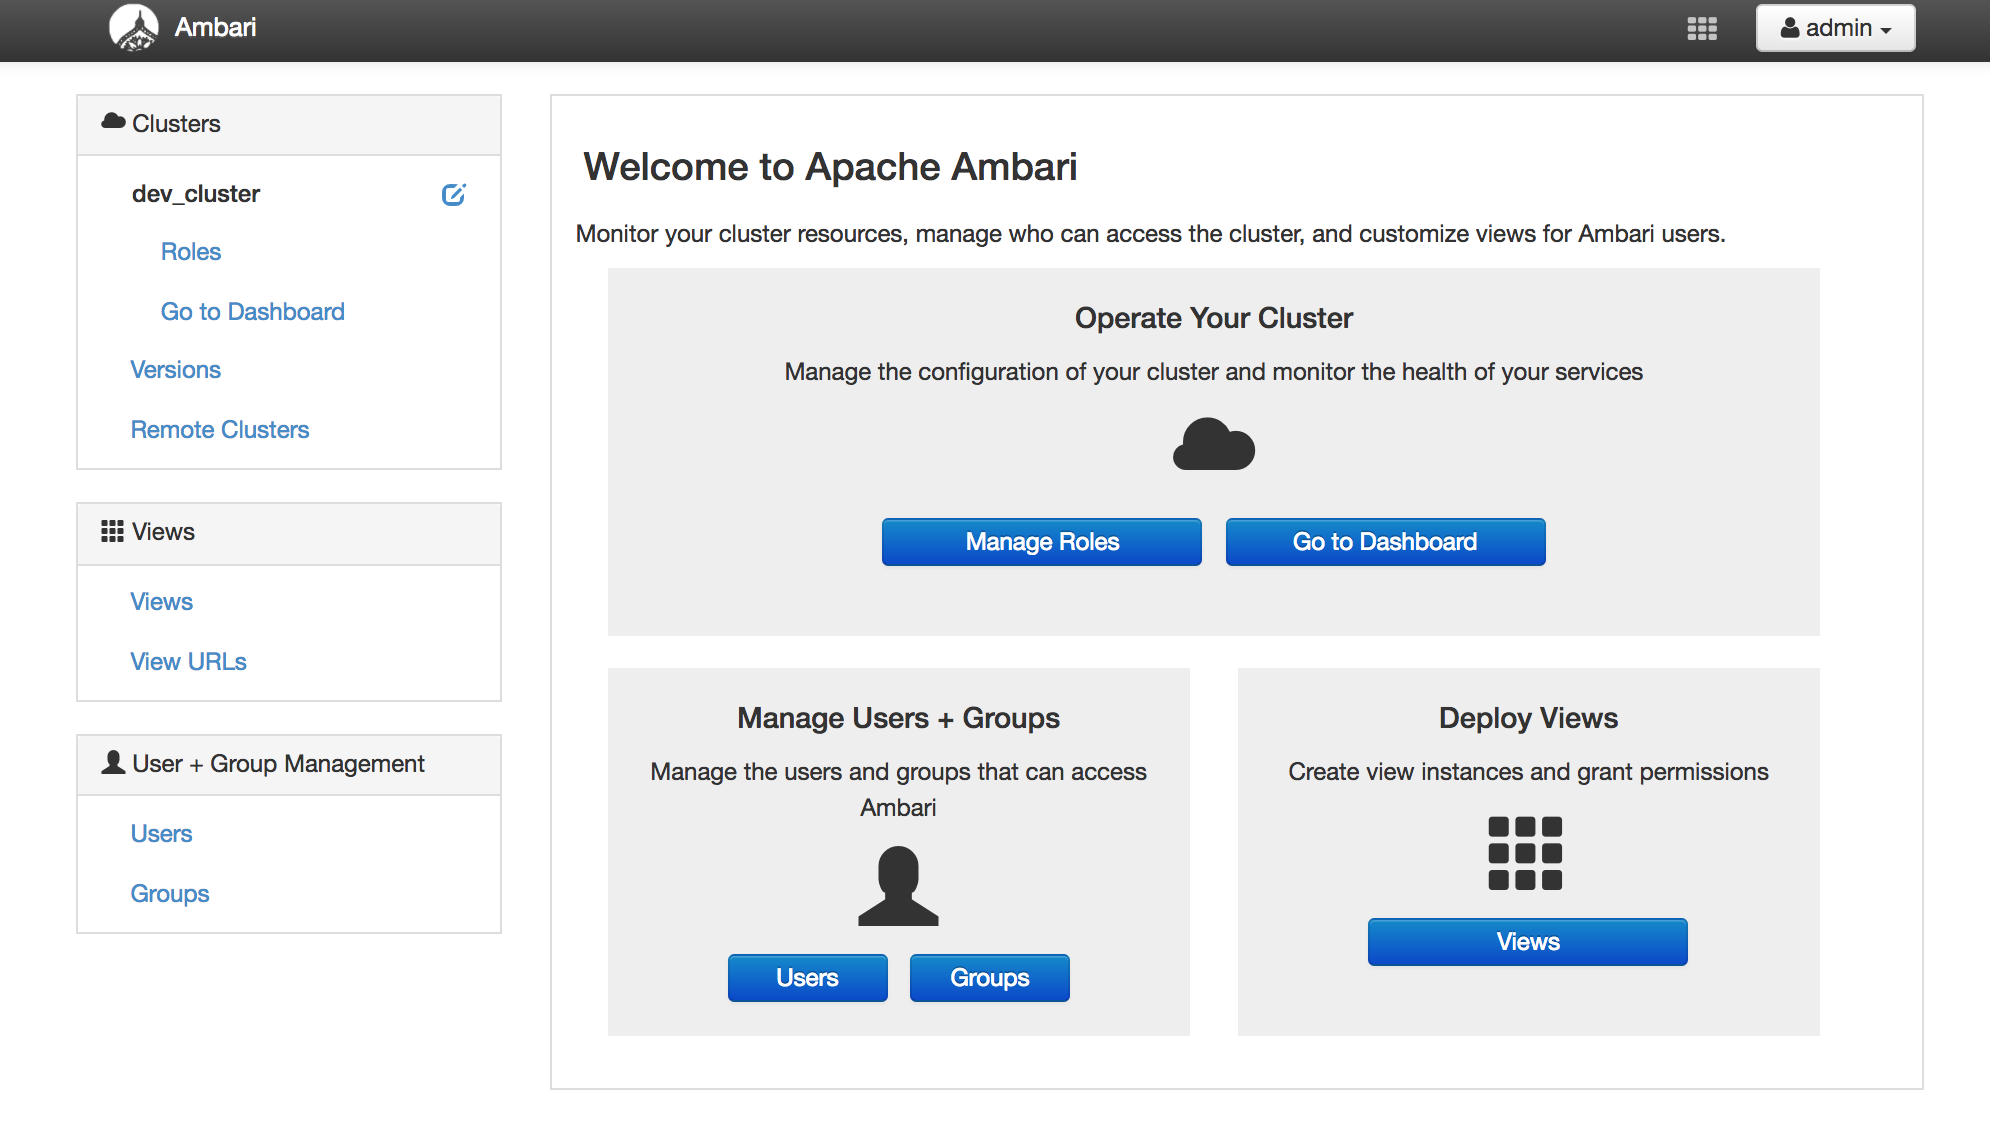
    It’s boring and complicated to manage bigdata platforms, there are so many softwares need to be installed and coordinated to make them work well together, so I tried ambari to manage them.

    1.run centos7 container

    docker run -dit --name centos7 --privileged --publish 8080:8080 centos:7 /usr/sbin/init
    

    2.operate container

    2.1.enter container

    docker exec -it centos7 bash
    

    2.2.update yum and install tools

    yum update -y && yum install -y wget
    

    2.3.download the ambari repository

    wget -nv http://public-repo-1.hortonworks.com/ambari/centos7/2.x/updates/2.6.0.0/ambari.repo -O /etc/yum.repos.d/ambari.repo
    

    2.4.install the ambari

    yum install -y ambari-server
    yum install -y ambari-agent
    

    2.5.install mysql as metastore, ,create mysql repo under /etc/yum.repos.d

    cat << 'EOF' >/etc/yum.repos.d/mysql.5.7.repo
    [mysql57-community]
    name=MySQL 5.7 Community Server
    baseurl=http://repo.mysql.com/yum/mysql-5.7-community/el/7/$basearch/
    enabled=1
    gpgcheck=0
    EOF
    

    2.6.install mysql server

    yum install -y mysql-community-server
    

    2.7.start mysql

    systemctl start mysqld
    

    2.8.create mysql user && init database

    mysql_password=ambari
    mysql_default_password=`grep 'temporary password' /var/log/mysqld.log | awk -F ': ' '{print $2}'`
    mysql -u root -p${mysql_default_password} -e "set global validate_password_policy=0; set global validate_password_length=4;" --connect-expired-password
    mysqladmin -u root -p${mysql_default_password} password ${mysql_password}
    mysql -u root -p${mysql_password} -e "create database ambari default charset 'utf8'; flush privileges;"
    mysql -u root -p${mysql_password} -e "grant all privileges on ambari.* to ambari@'' identified by 'ambari'; flush privileges;"
    mysql -u root -p${mysql_password} -e "use ambari; source /var/lib/ambari-server/resources/Ambari-DDL-MySQL-CREATE.sql;"
    

    2.9.download mysql driver

    driver_path=/usr/share/java
    mkdir ${driver_path}
    wget http://central.maven.org/maven2/mysql/mysql-connector-java/5.1.45/mysql-connector-java-5.1.45.jar -O ${driver_path}/mysql-connector.jar
    

    2.10.setup ambari server, pay attention to database configuration, need select mysql manually

    ambari-server setup
    

    2.11.modify ambari database configuration

    echo "server.jdbc.driver.path=${driver_path}/mysql-connector.jar" >> /etc/ambari-server/conf/ambari.properties
    

    2.12.start ambari

    ambari-server start
    ambari-agent start
    ambari-server setup --jdbc-db=mysql --jdbc-driver=${driver_path}/mysql-connector.jar
    

    3.login, default accuont: admin/admin
    http://localhost:8080


    P.S.

    The above steps are configured on single server,  if you wanna build cluster with several servers, you also need configure ssh key(please google for specific steps, it’s simple) and start ambari-agent on slave servers.


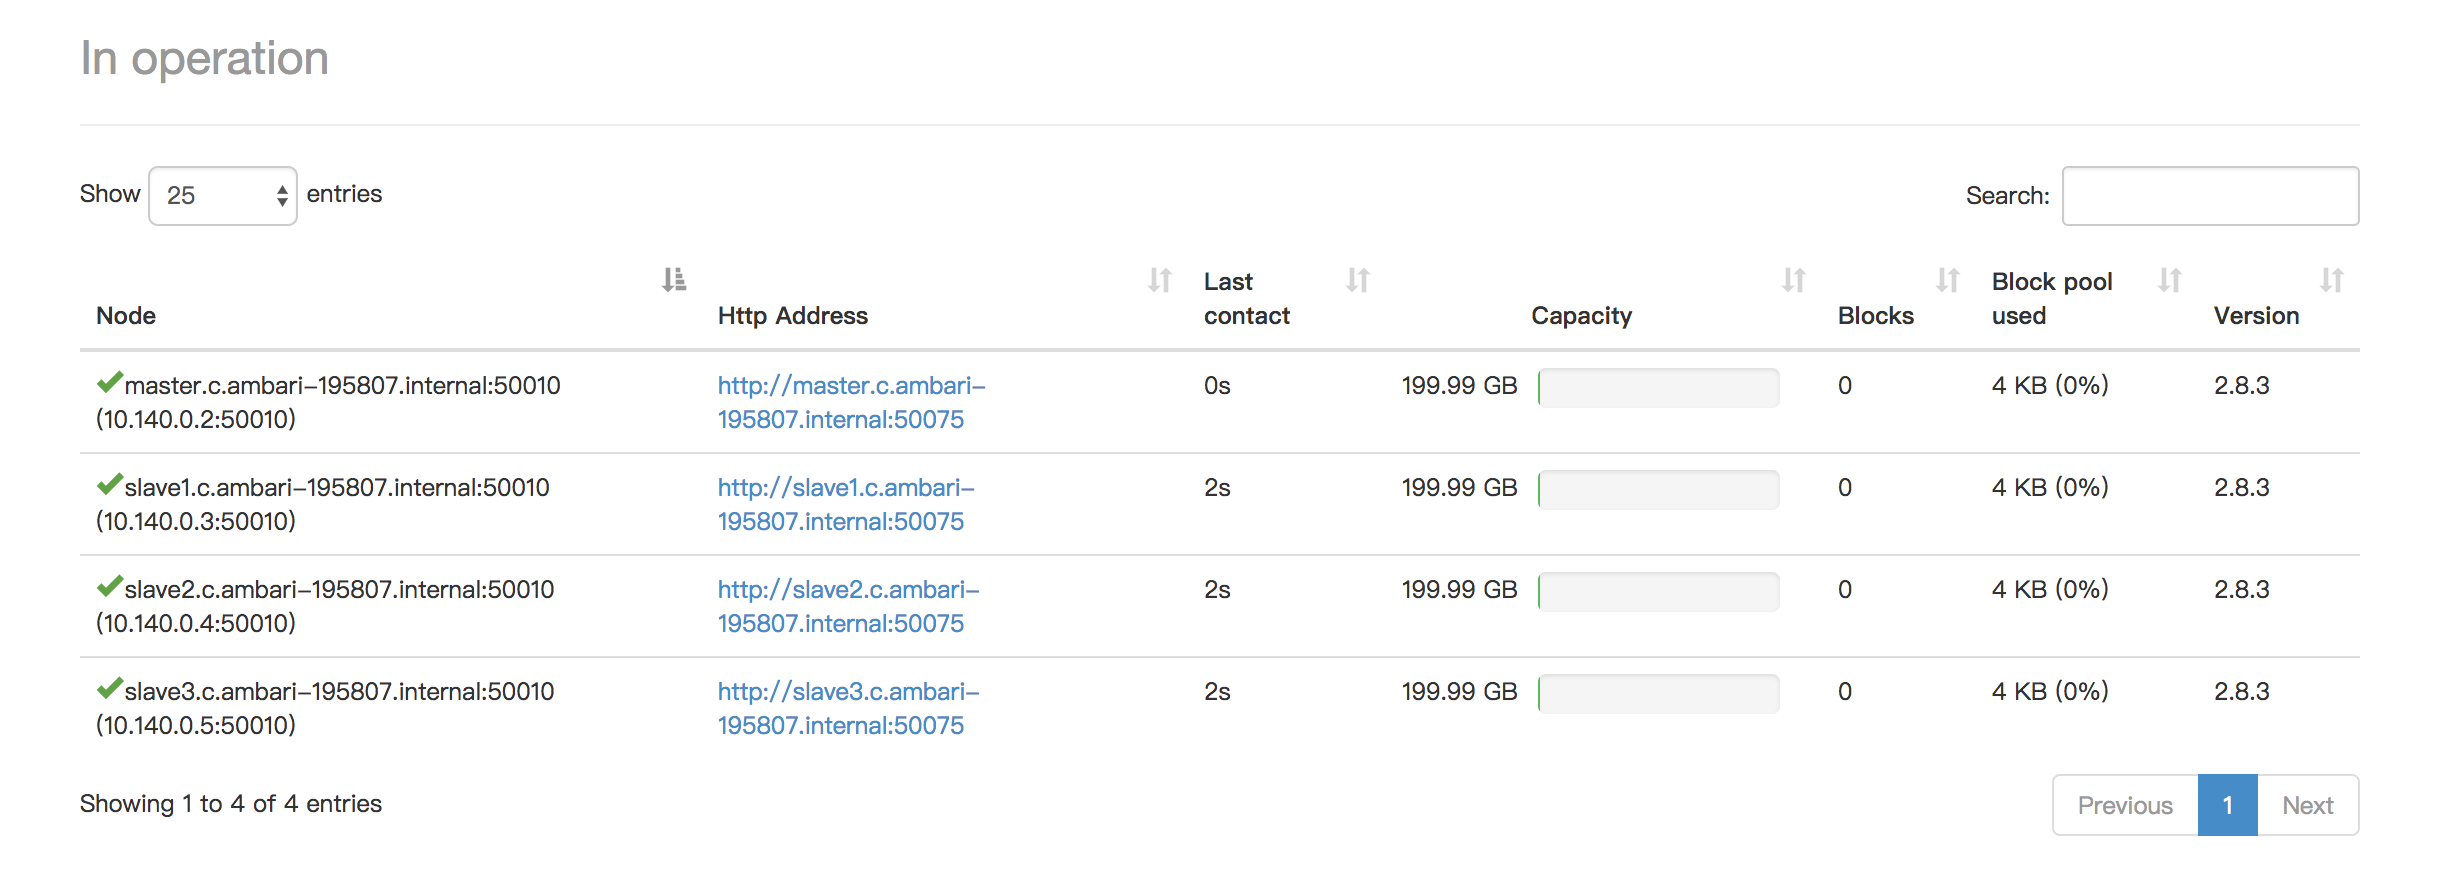
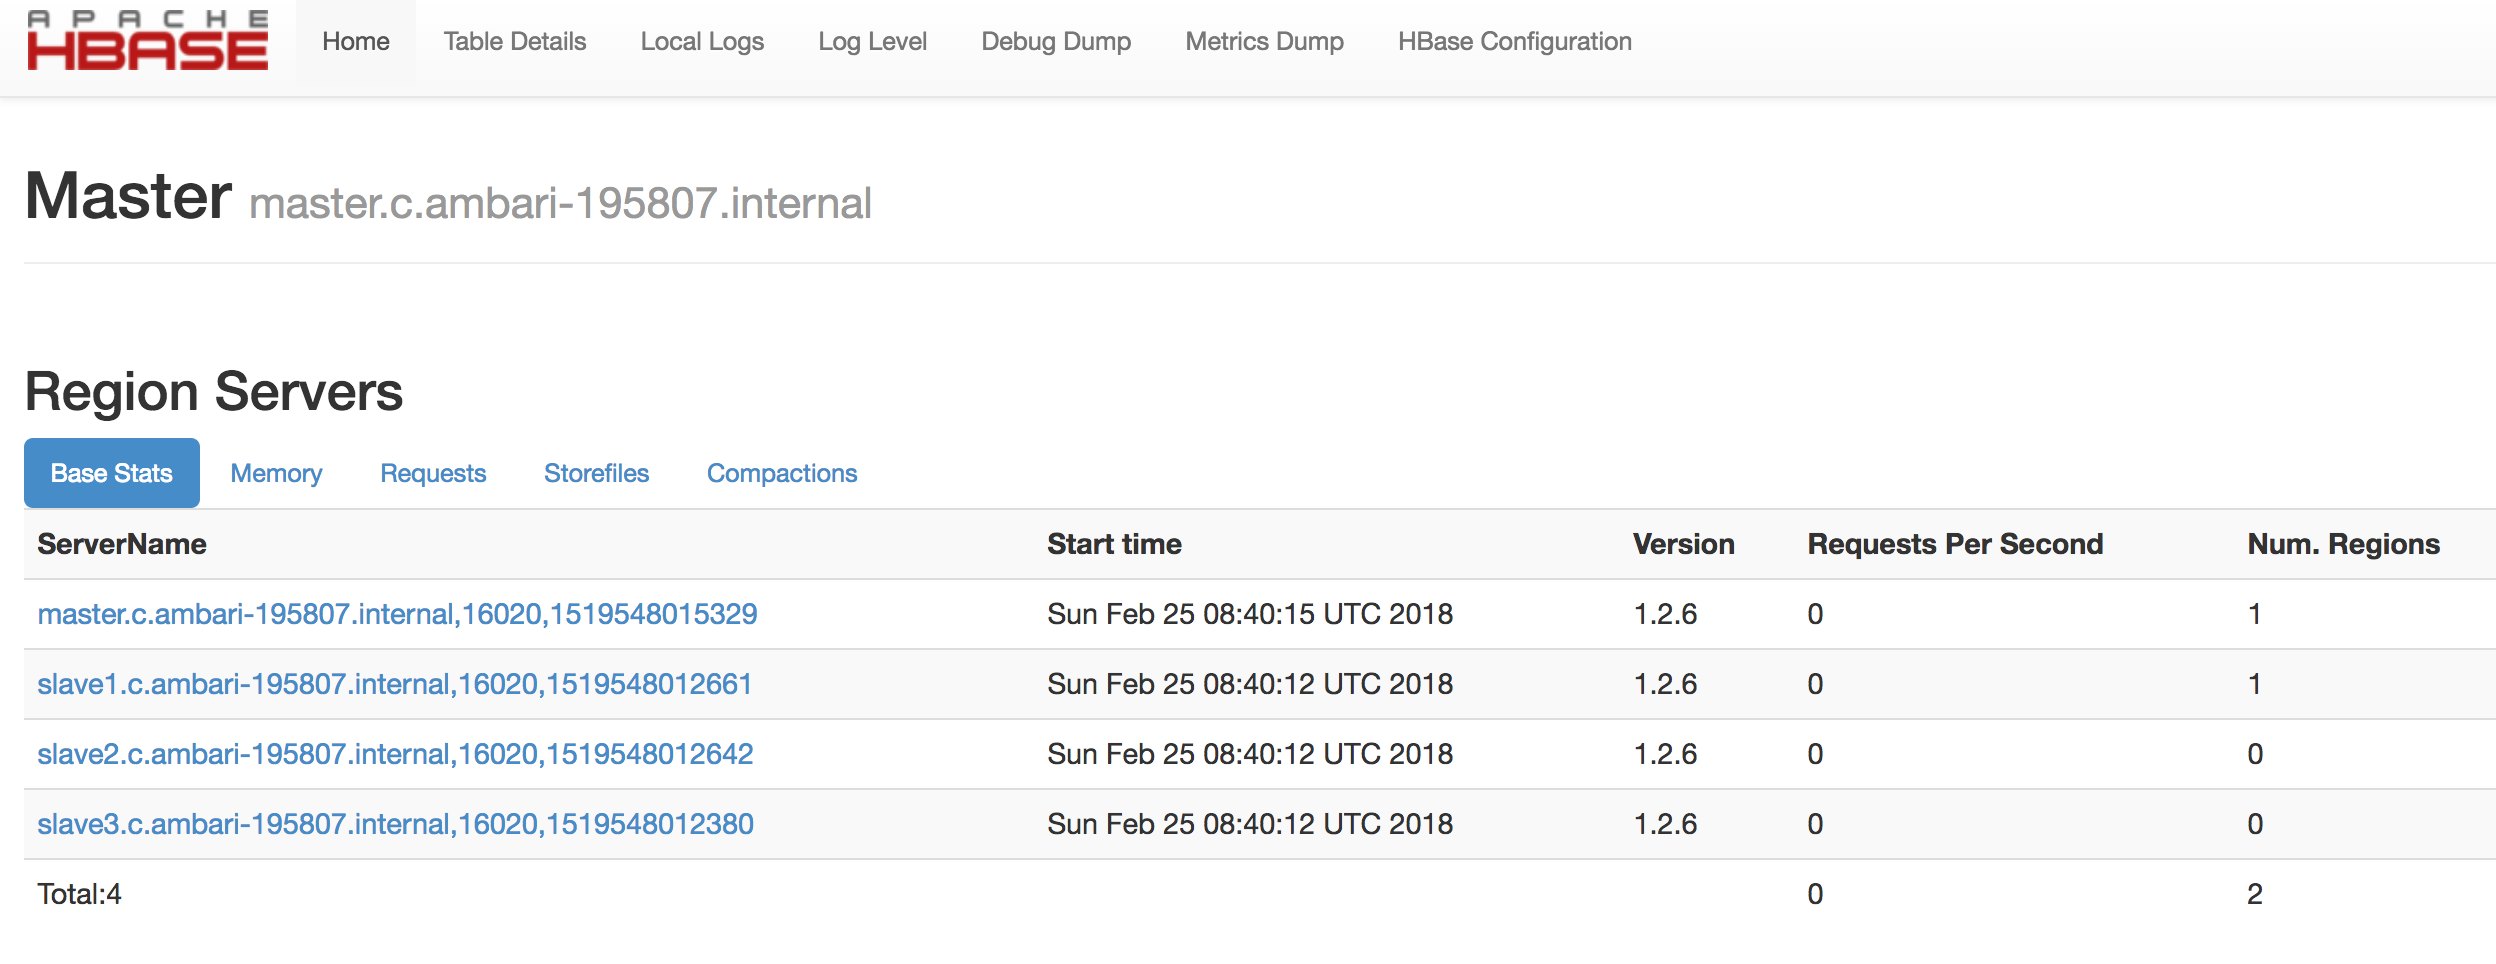
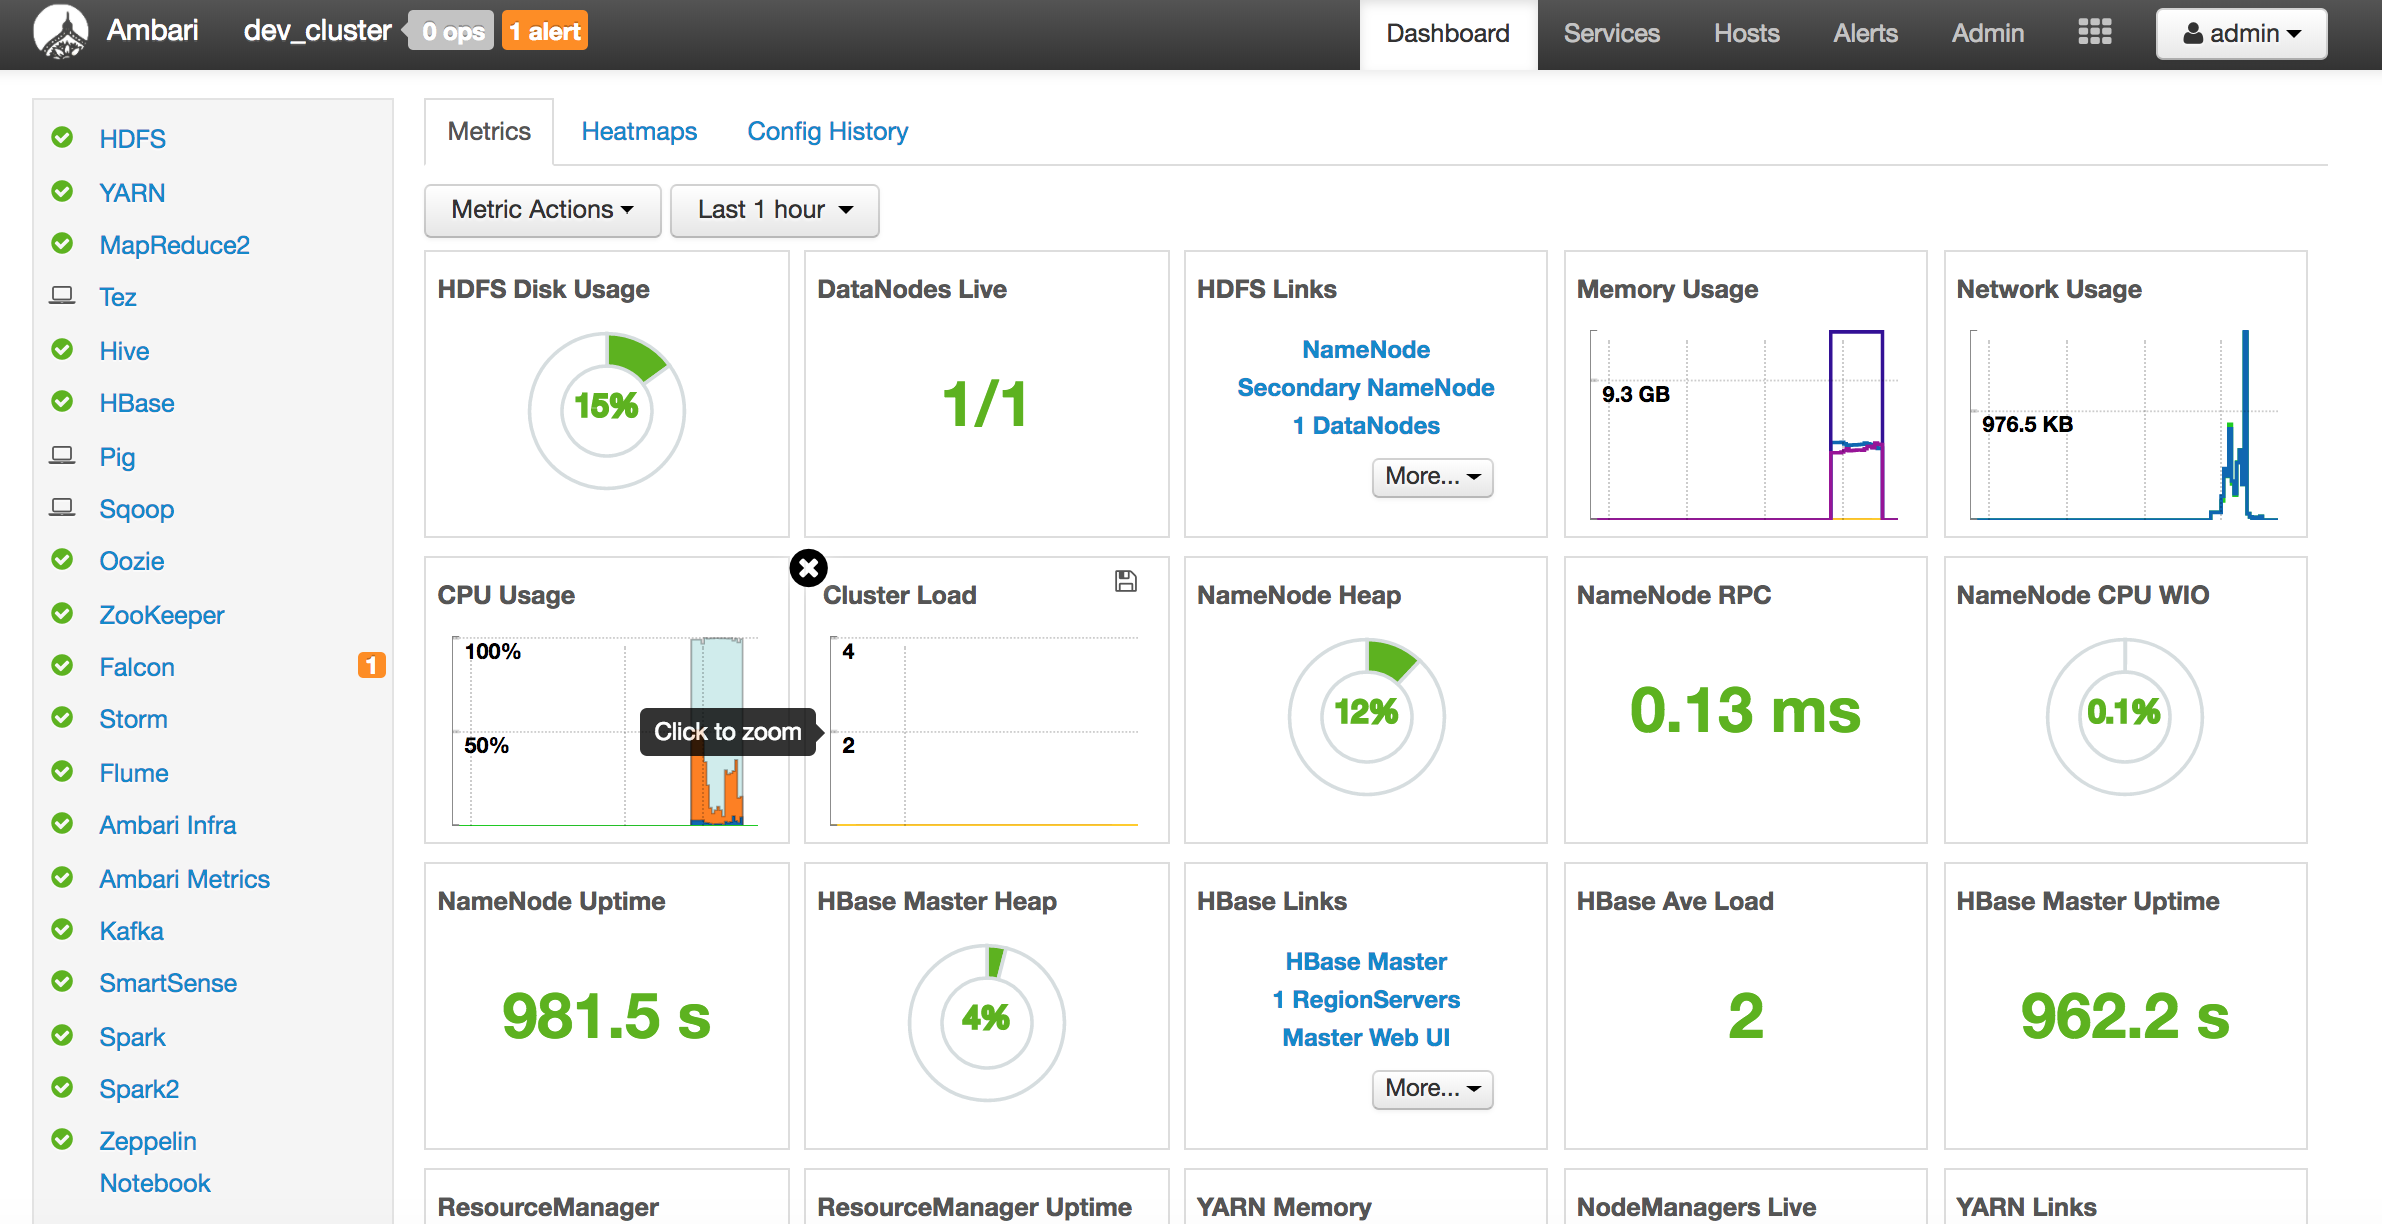
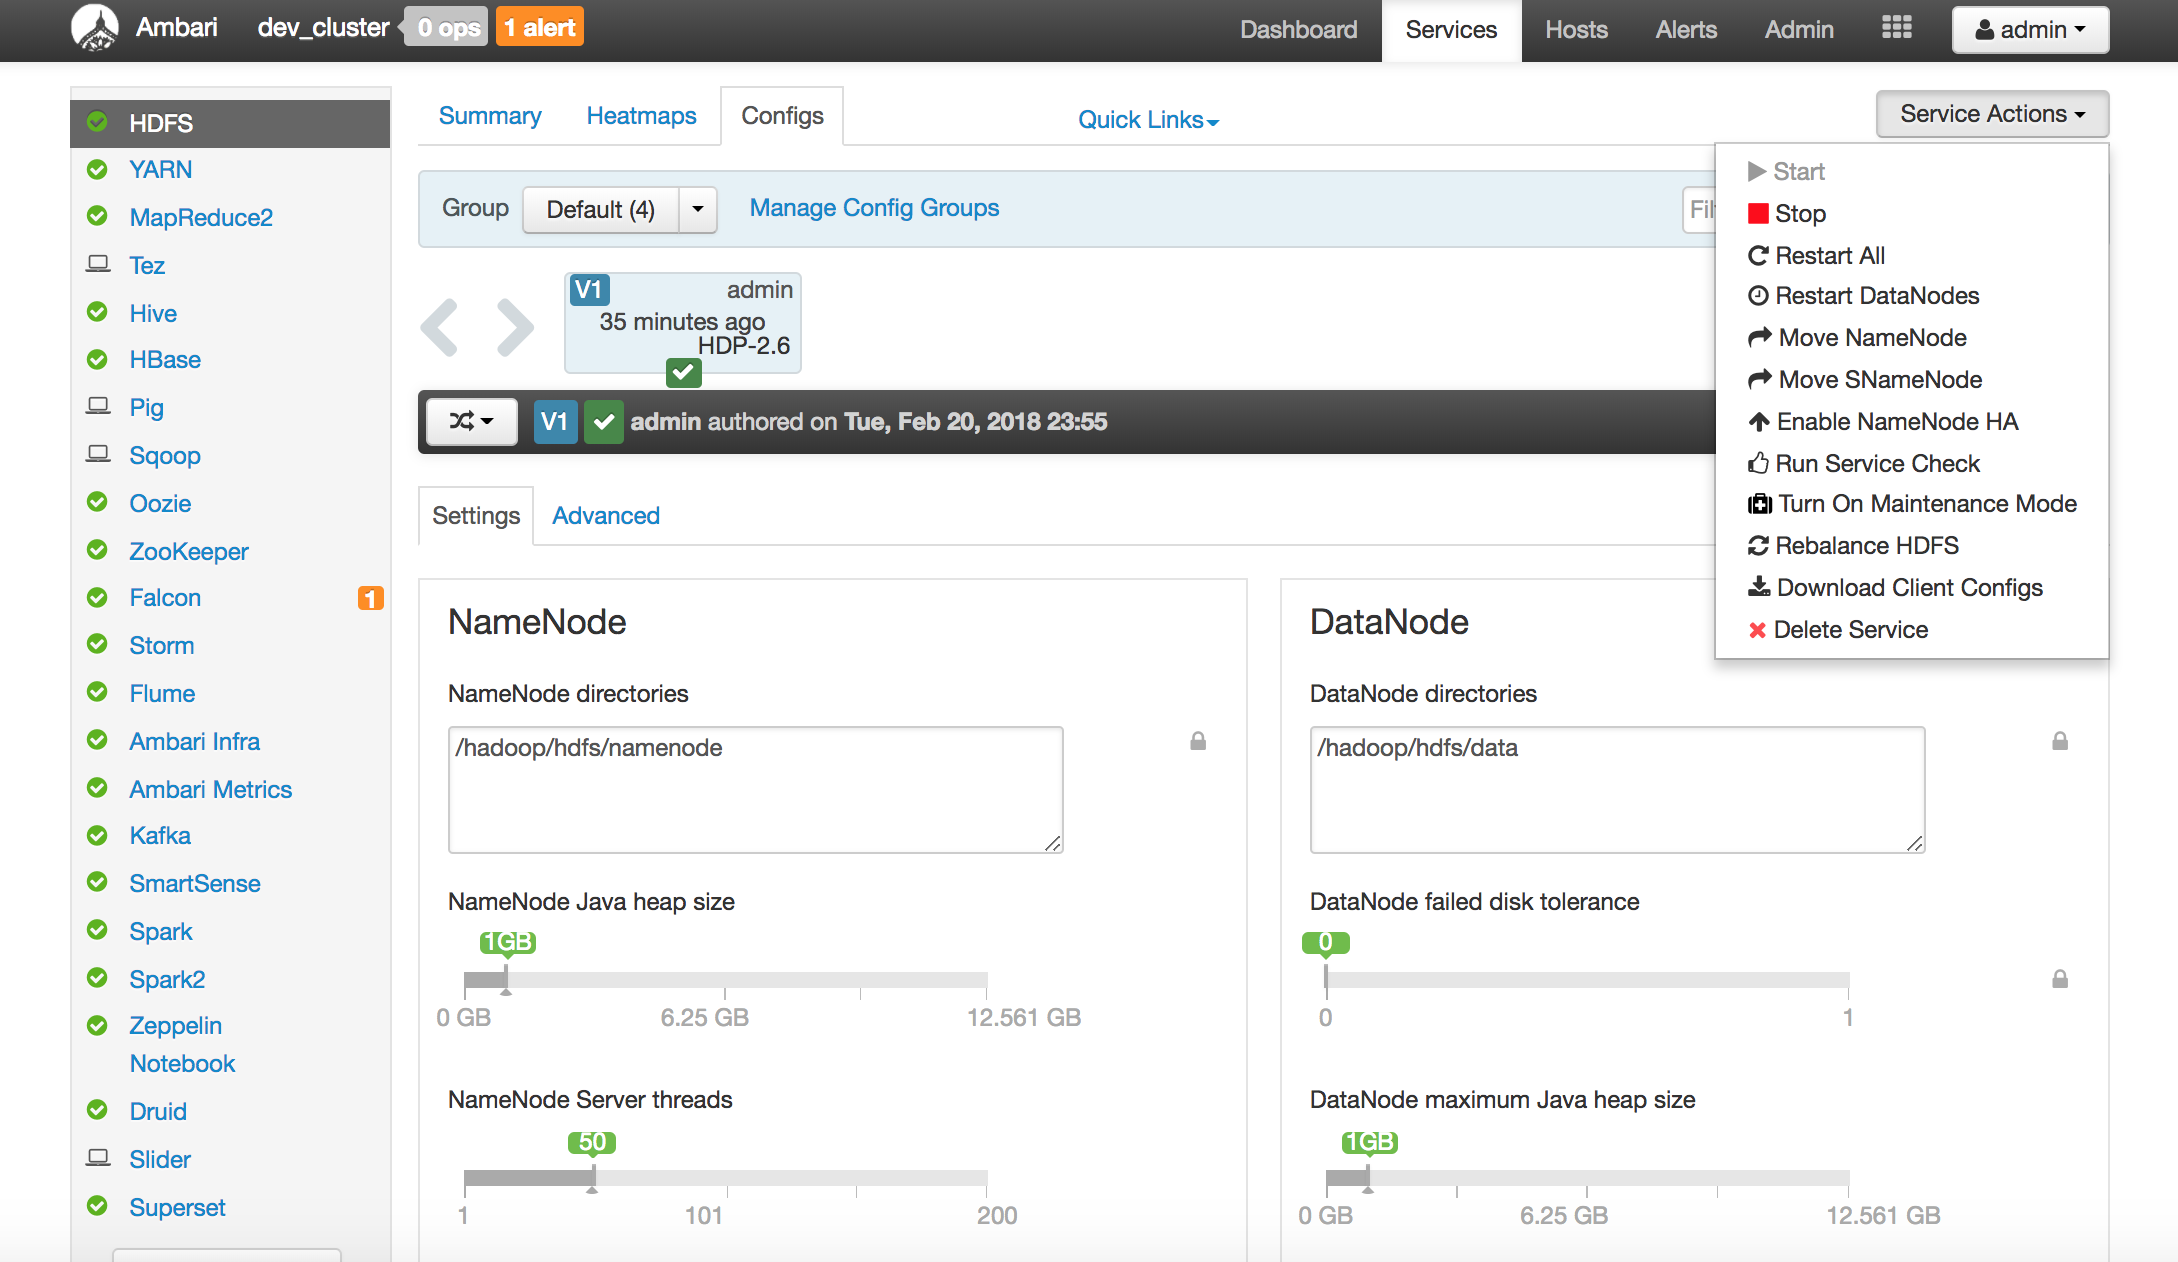
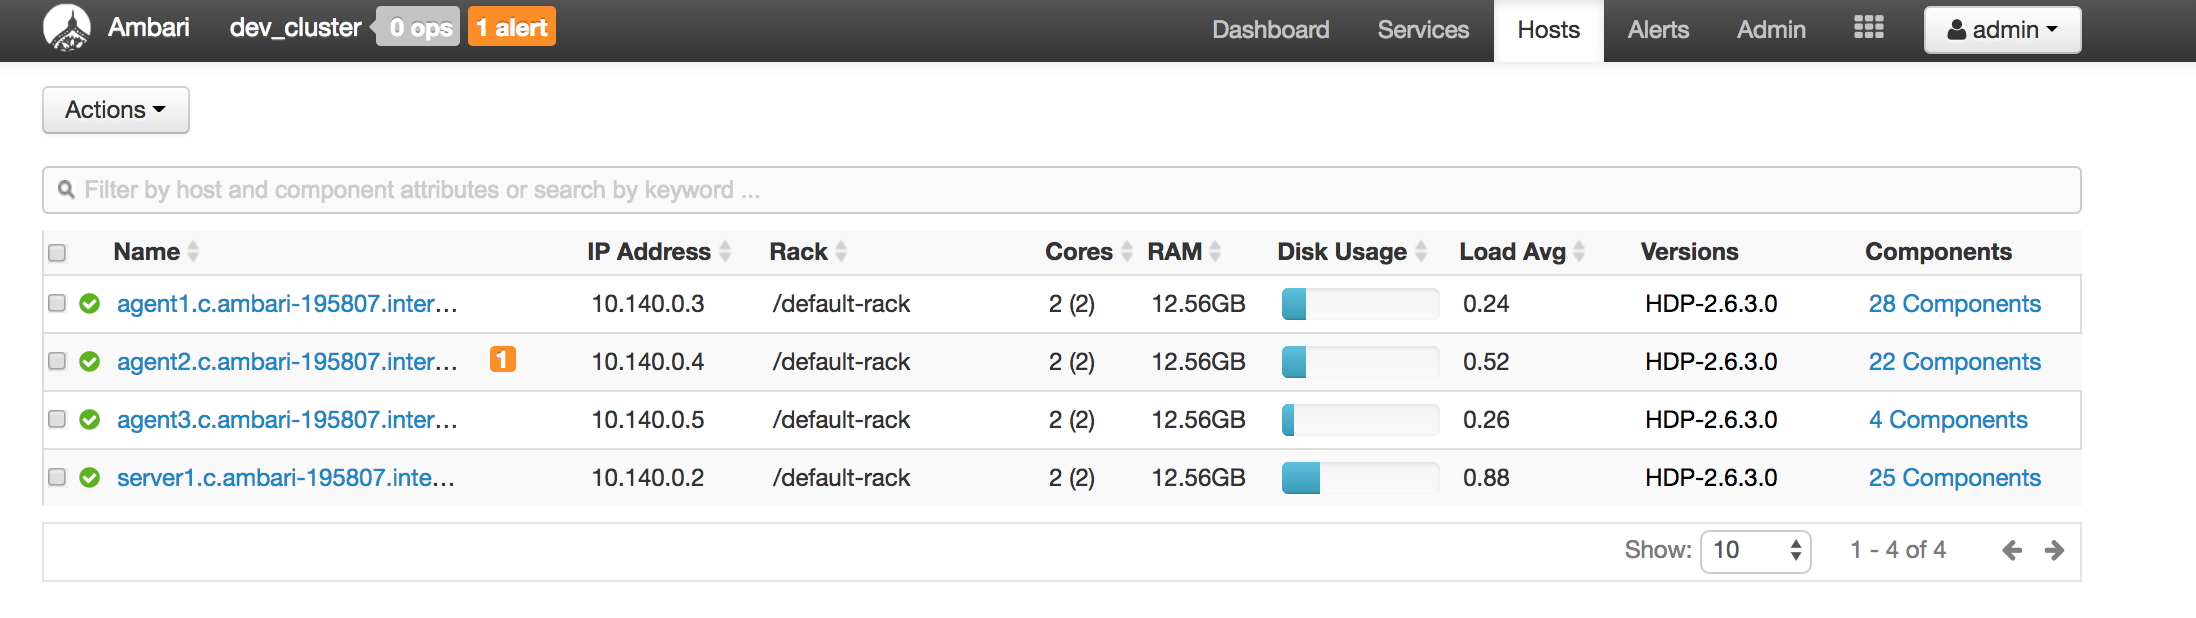
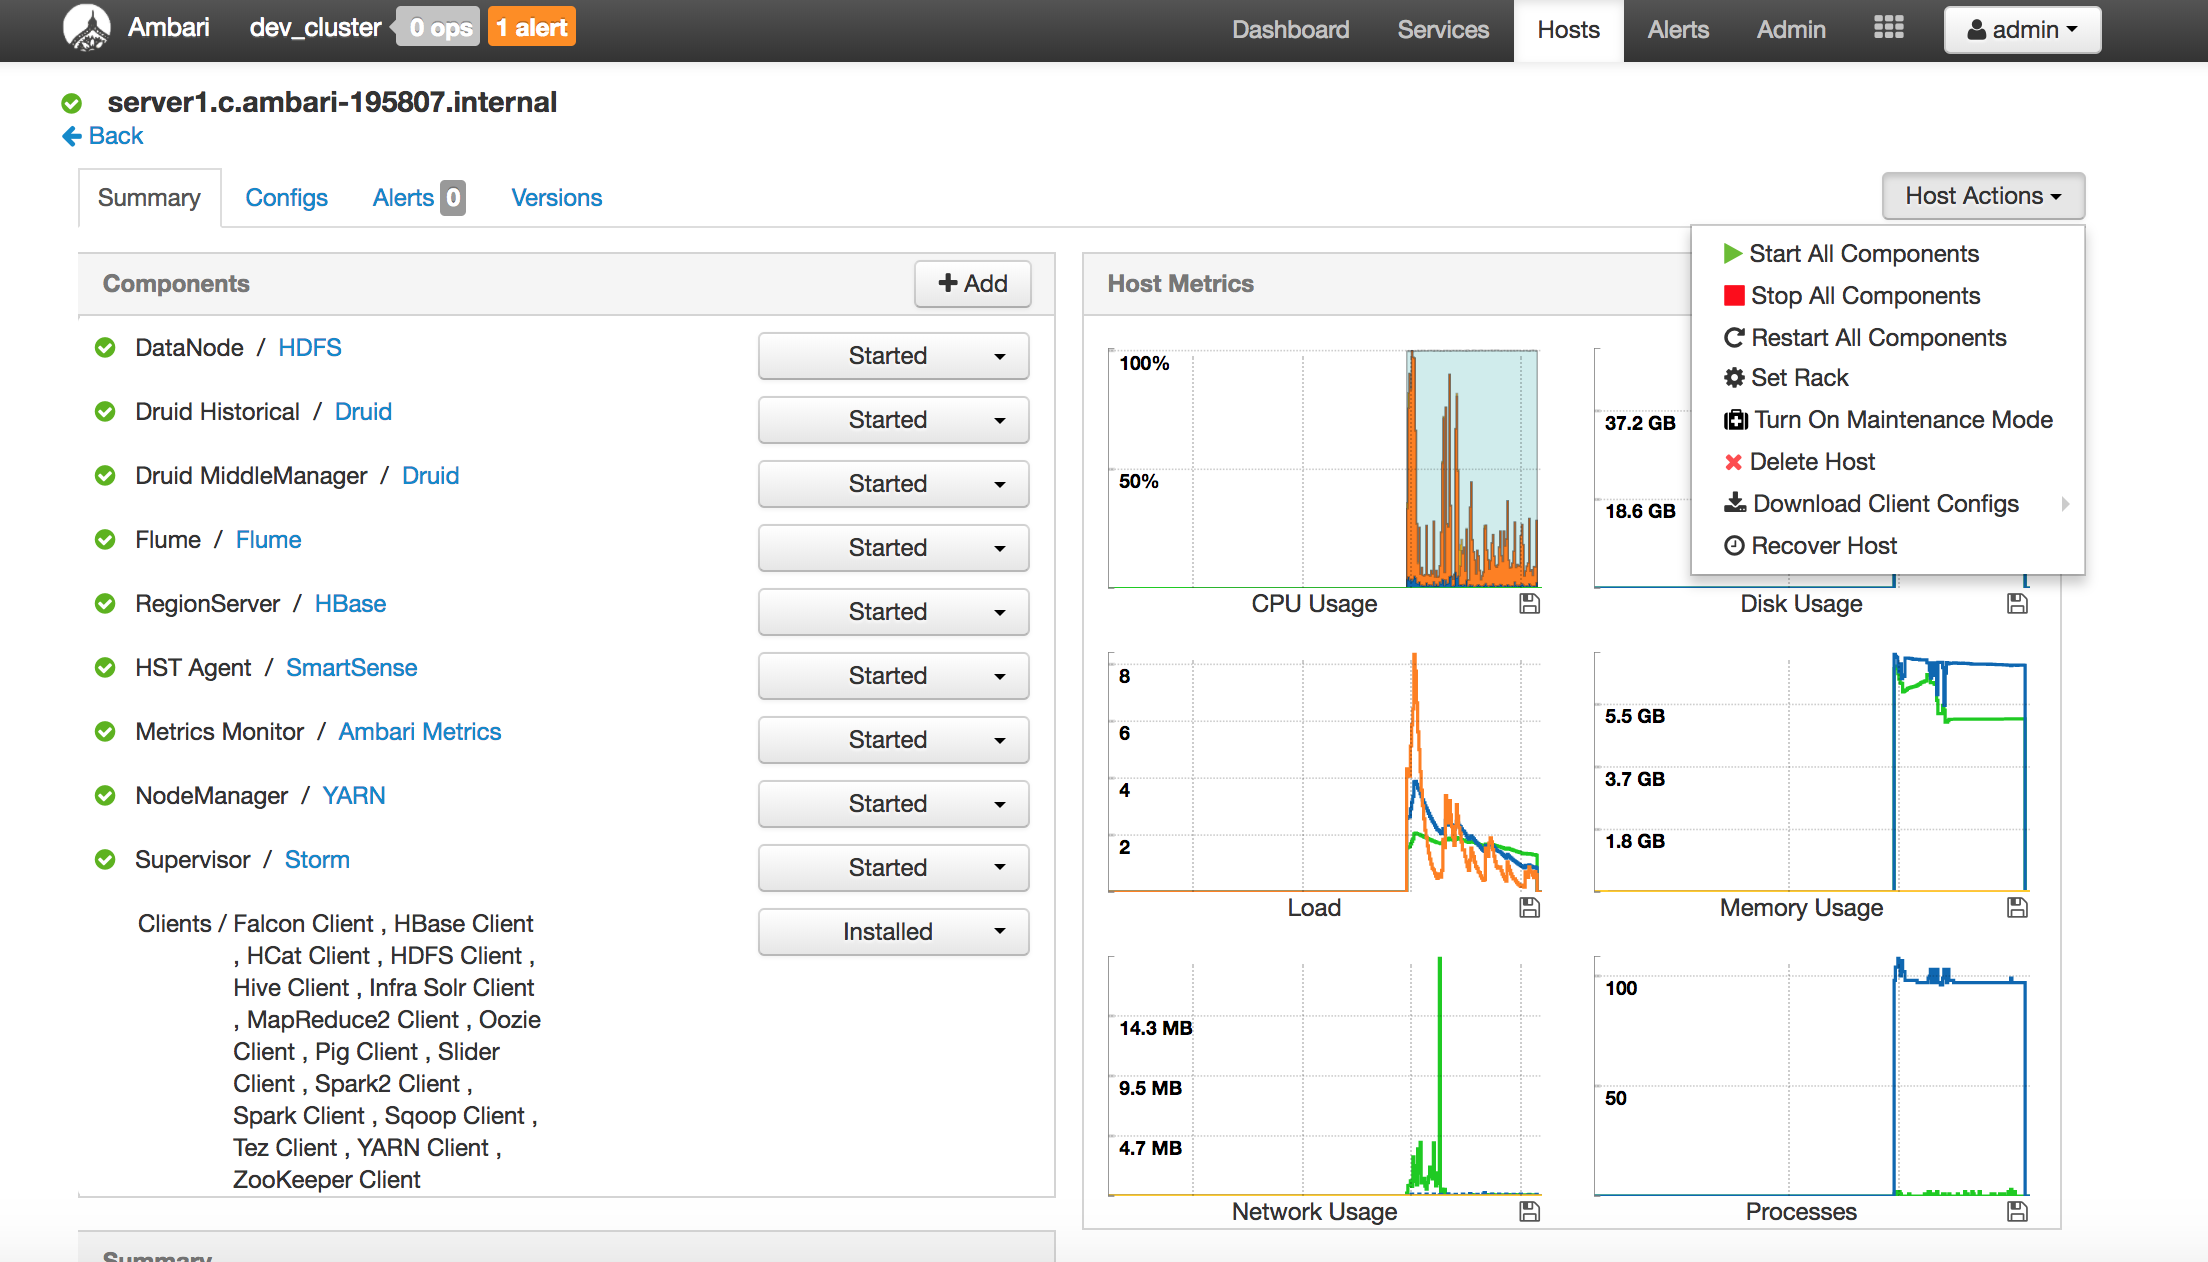
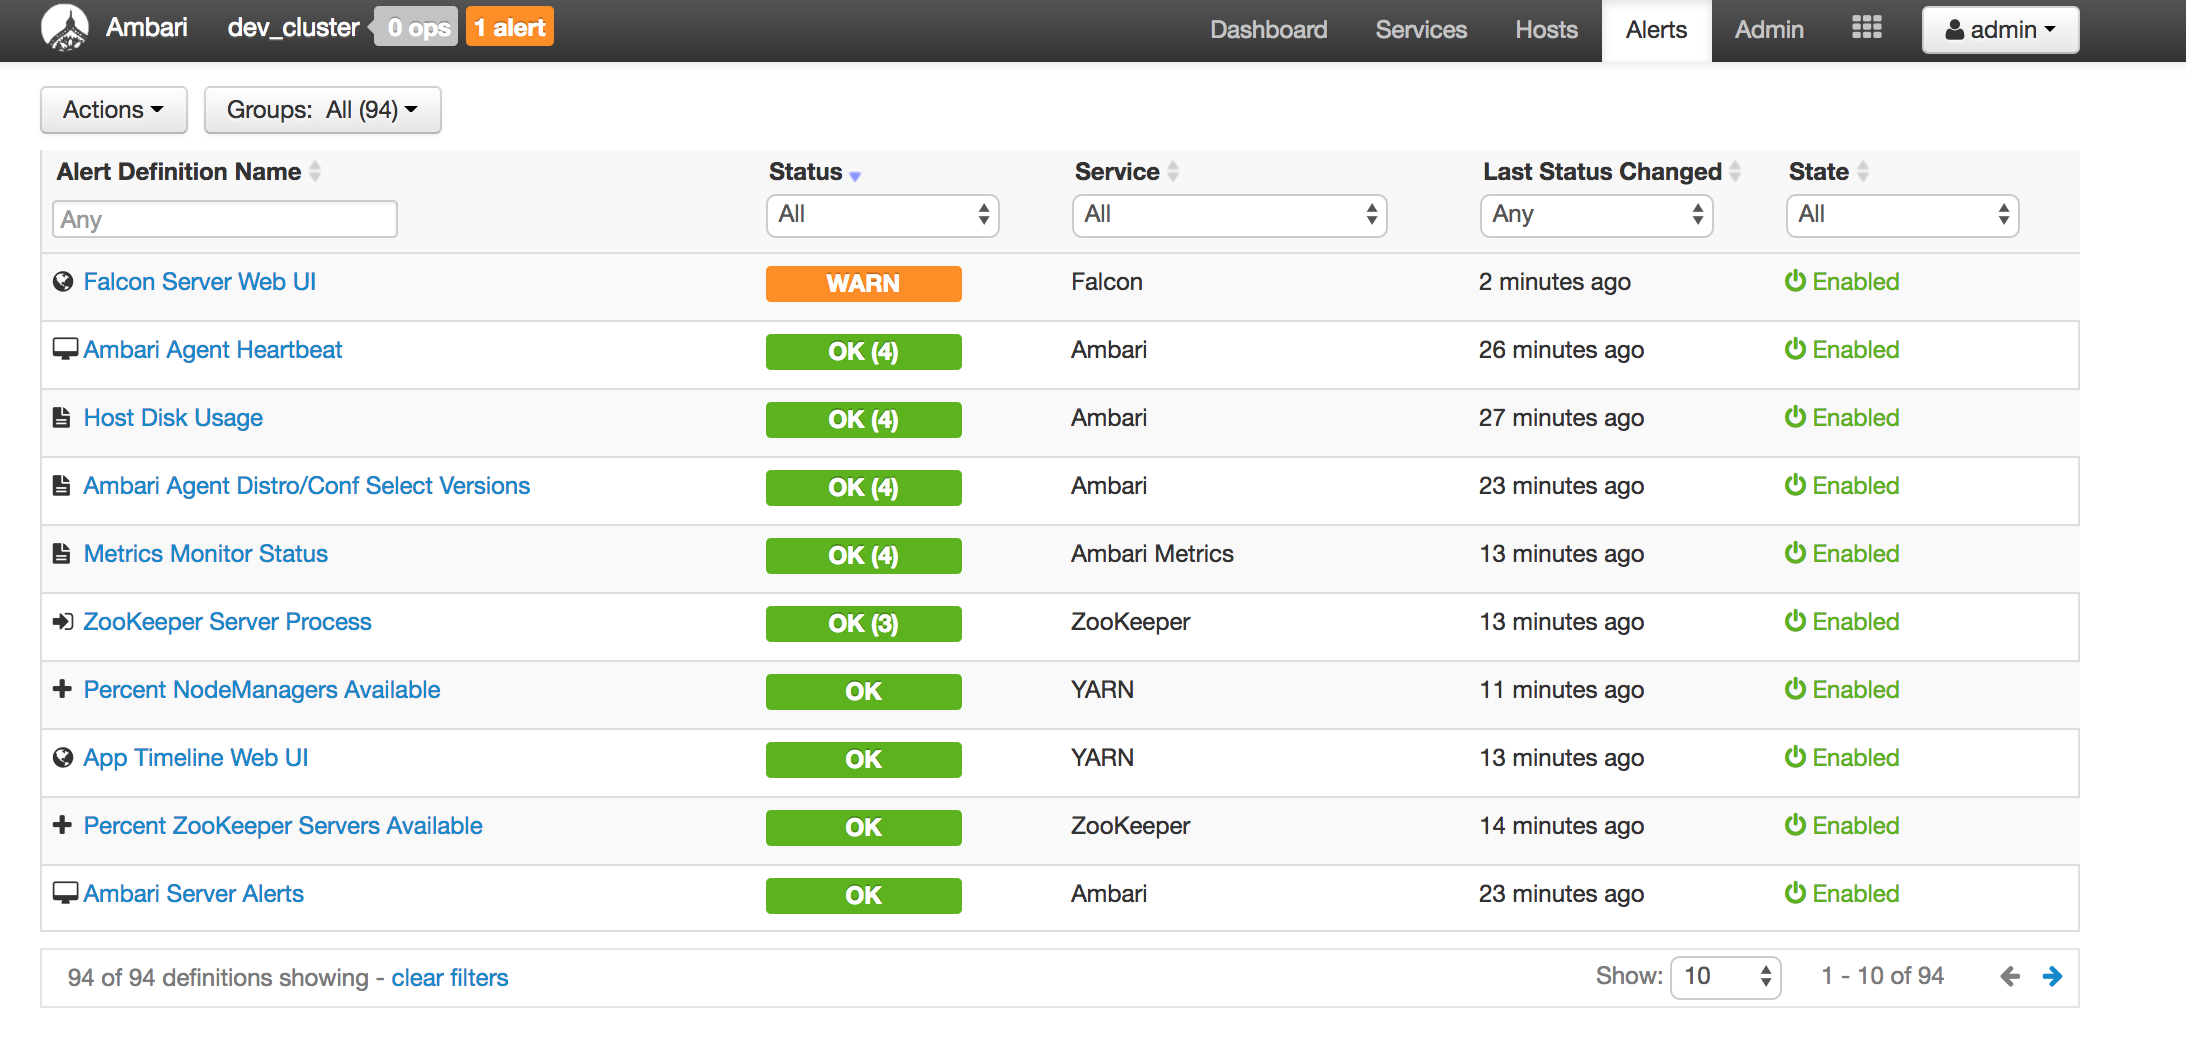
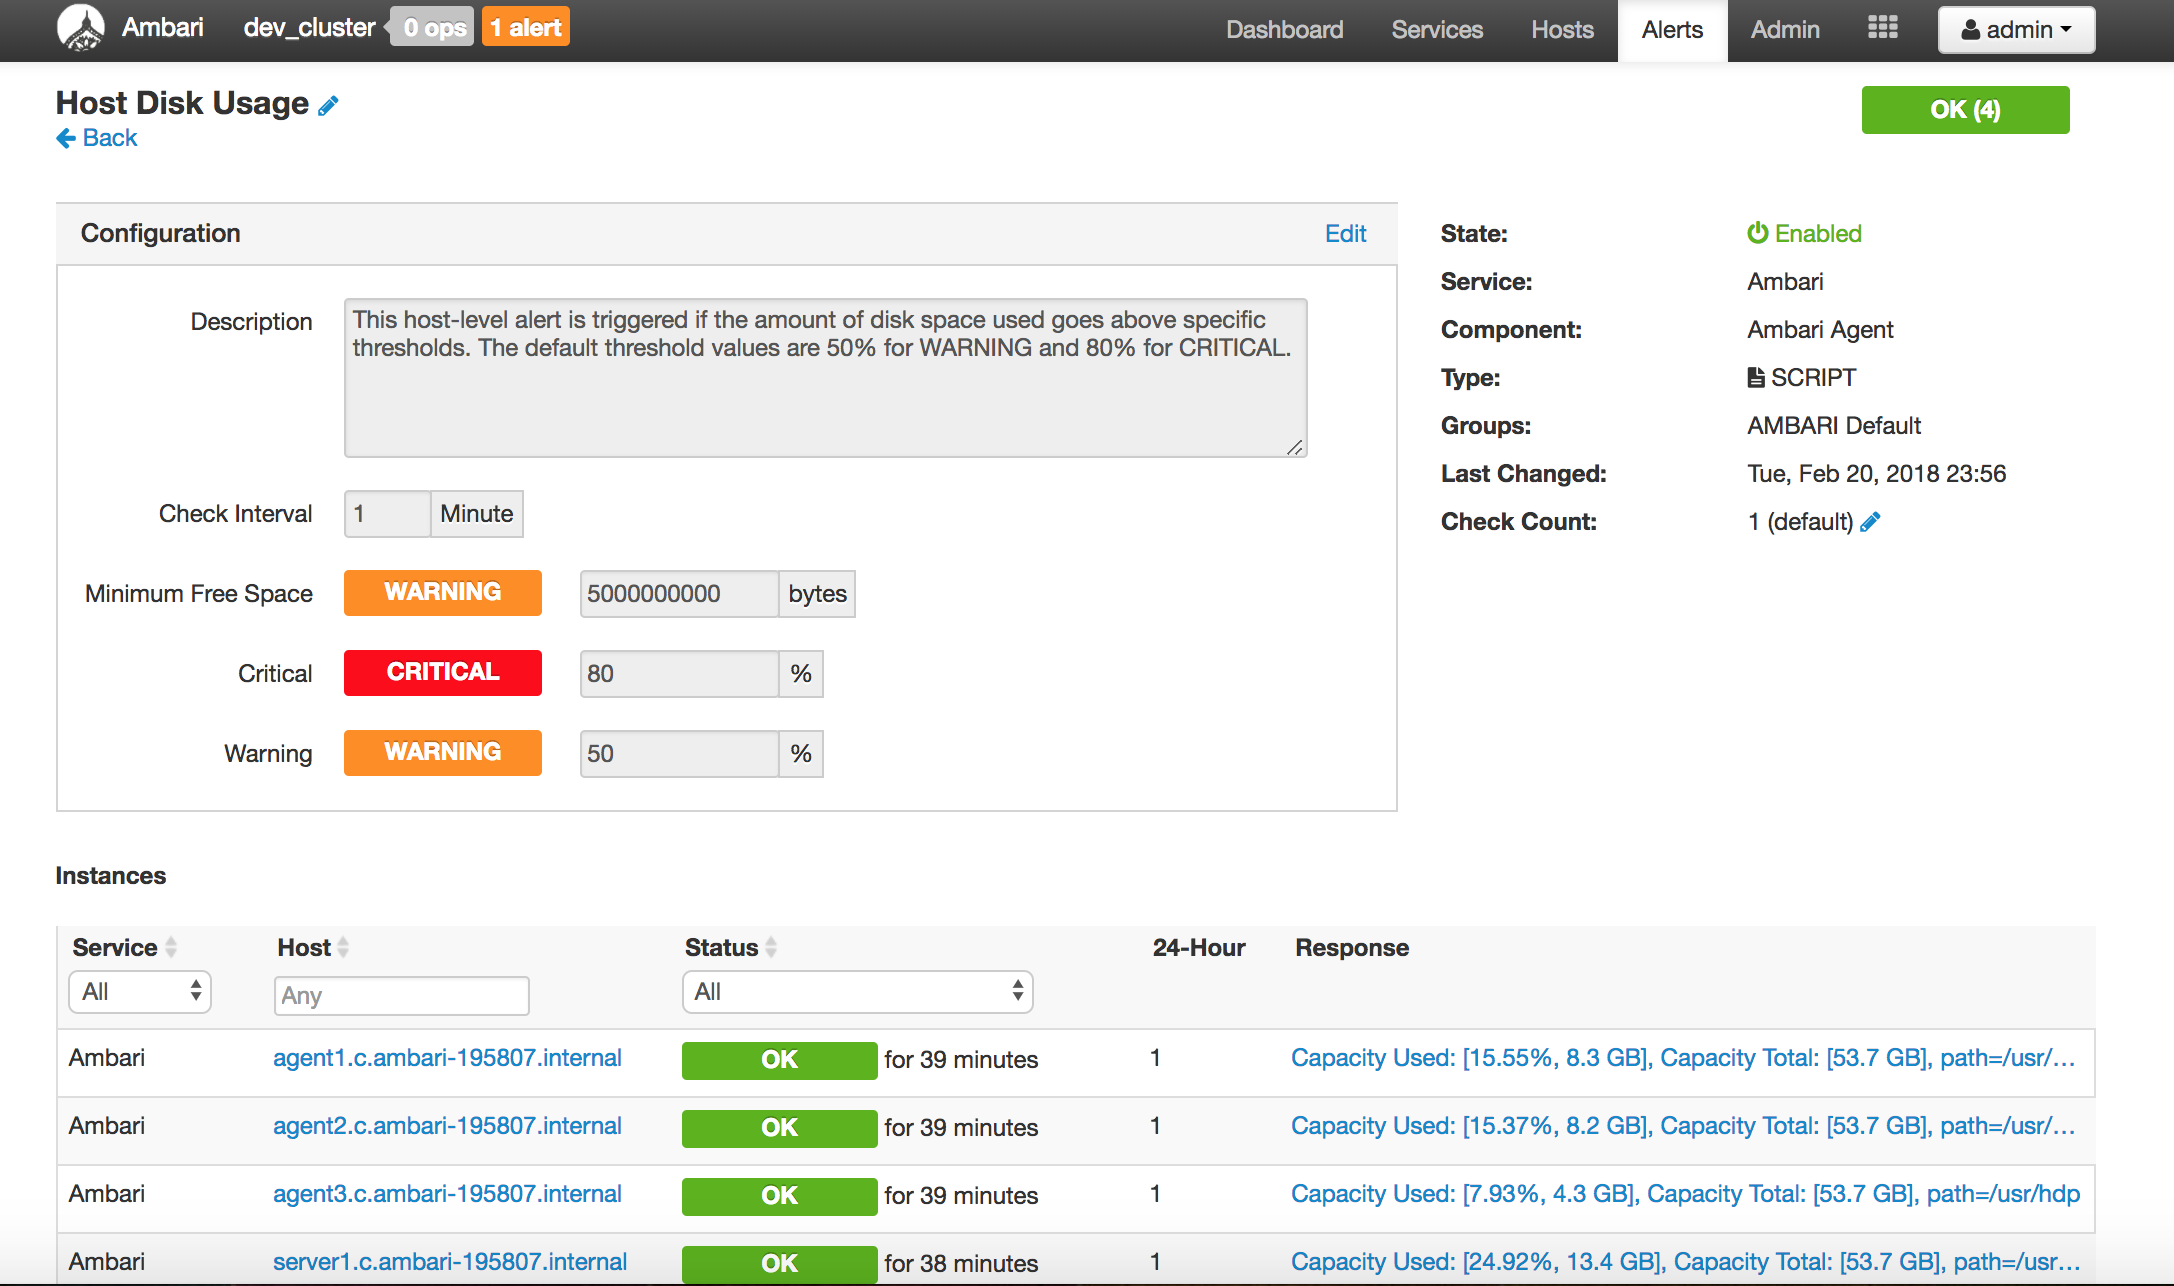
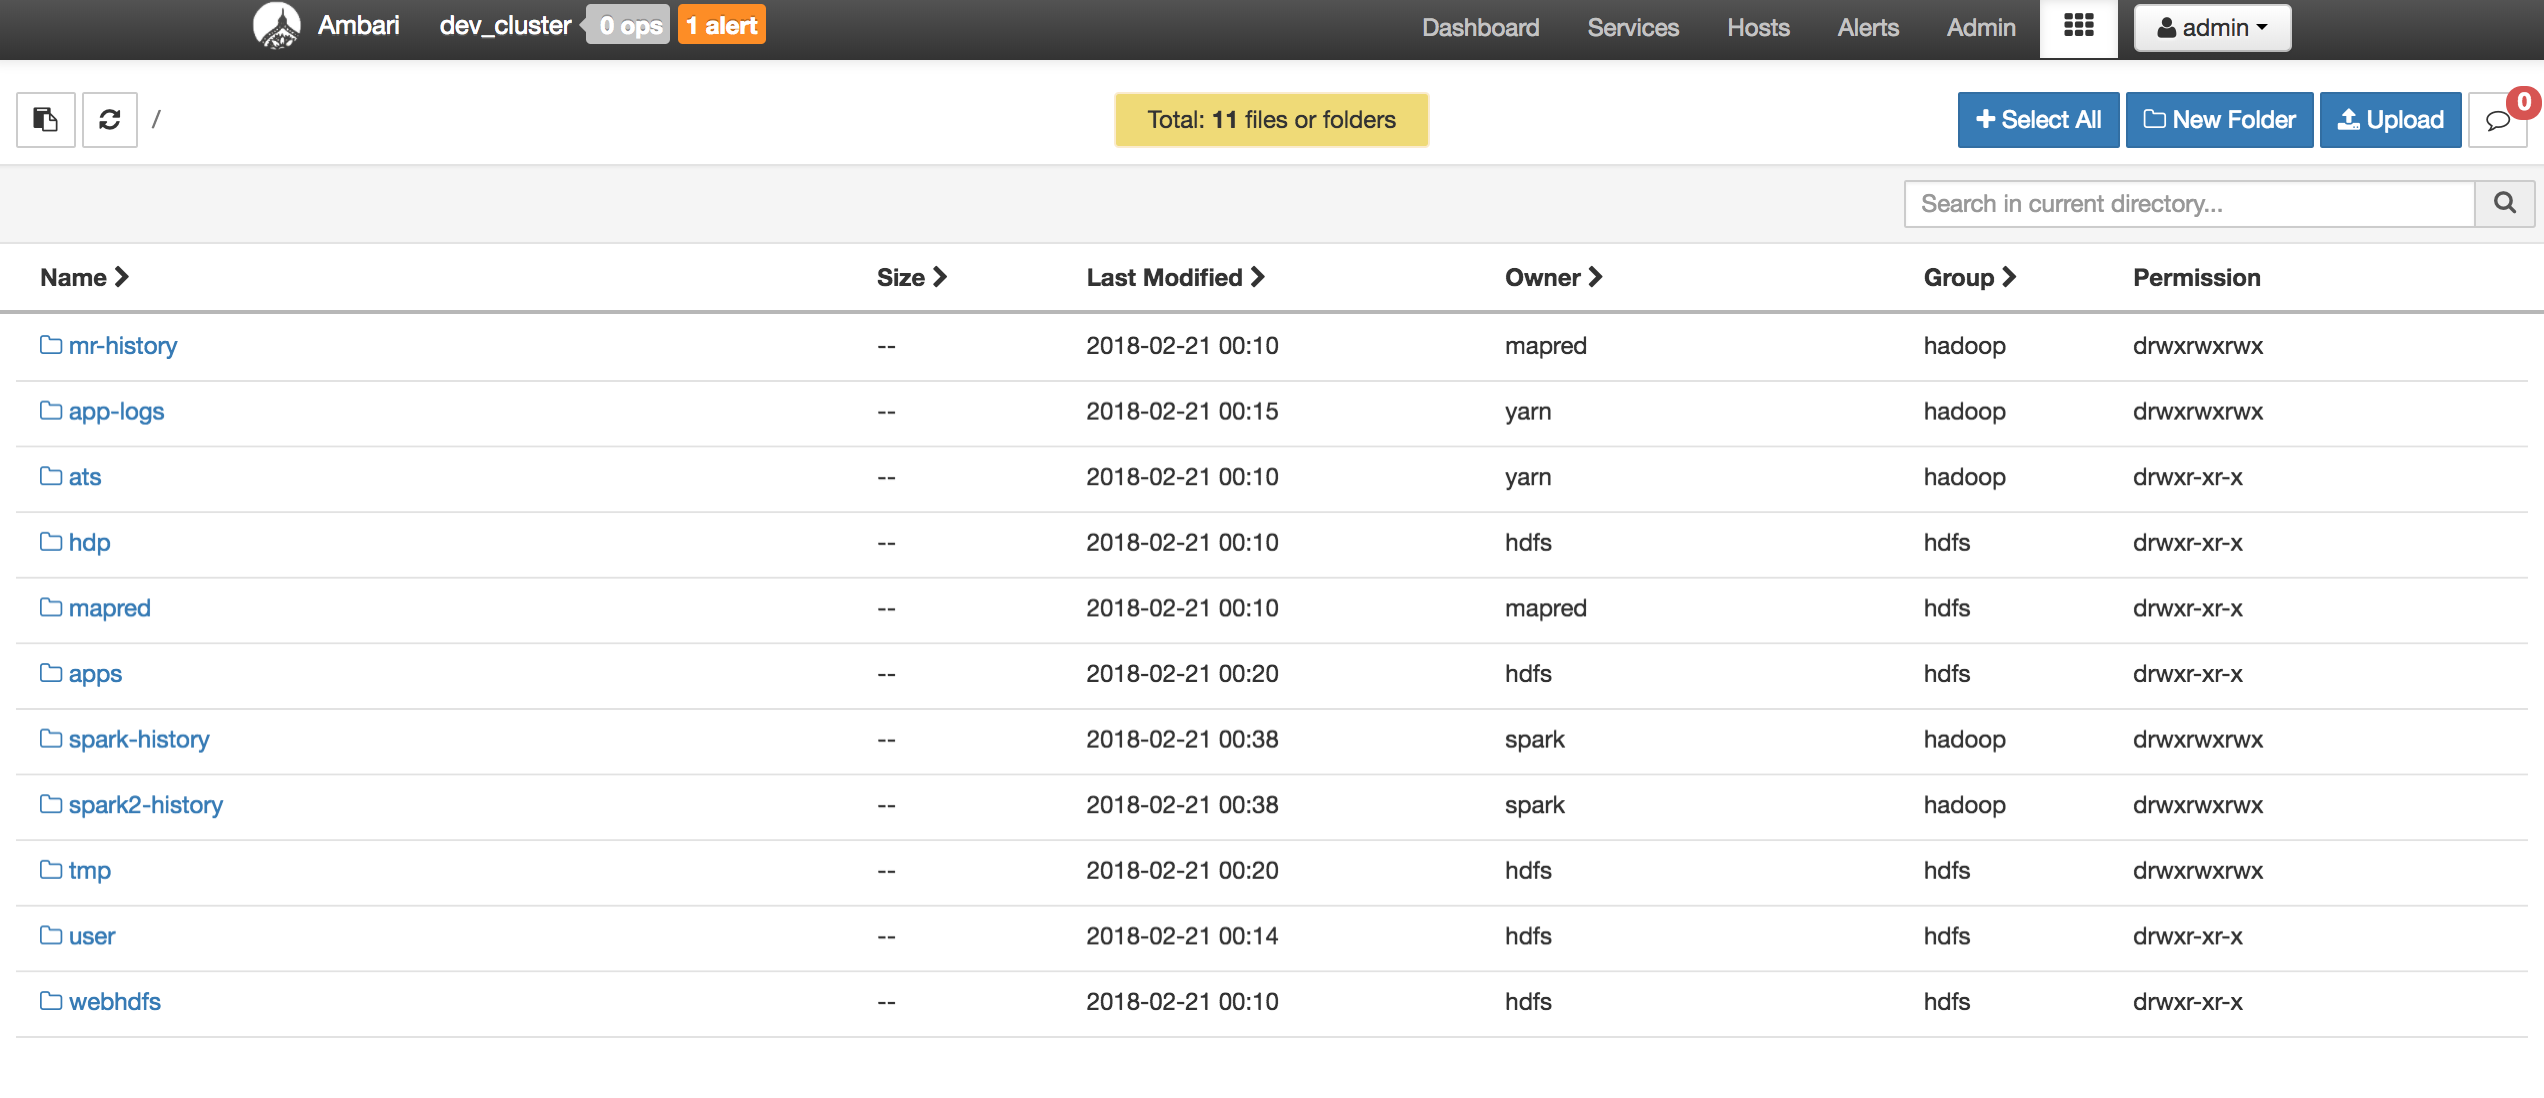
    Below are screenshots of a mini cluster which was built by 4 servers:

     
c
Compose new post
j
Next post/Next comment
k
Previous post/Previous comment
r
Reply
e
Edit
o
Show/Hide comments
t
Go to top
l
Go to login
h
Show/Hide help
shift + esc
Cancel